Operation Instructions Thank you for purchasing this monitor, a high-resolution multi-scan color monitor. Please read this guide thoroughly before installation. This monitor has been tested and found compliant with the limits for a Class B digital device, pursuant to part 15 of the FCC Rules. These limits are designed to provide proper protection against harmful interference to a residential installation. This monitor generates, uses, and can radiate radio frequency energy.
Content English Safety Precautions.............................................................................1 First Setup .........................................................................................2 Quick Installation................................................................................2 Rear View of the Product ...................................................................3 Using On Screen Display (OSD) Functions .......................................
Safety Precautions WARNINGS: This monitor should be operated only at the correct power sources indicated on the label on the rear end of the monitor. If you’re unsure of the power supply in your residence, consult your local dealer or power company. Do not try to repair the monitor yourself as it contains no user-serviceable parts. The monitor should only be repaired by a qualified technician. Do not remove the monitor cabinet.
First Setup English Congratulation for purchasing this monitor of high performance! This monitor comes with the following accessories : Power cable. User guide book. Quick Installation 1. Connect video cable (D-Sub cable) Make sure both monitor and computer are powered OFF. Connect the video cable ( D-Sub cable) to the computer. 2. Connect power cord Connect the power cord to a properly grounded AC outlet, then to the monitor. 3.
Front View of the Product English glish ➊ ➋ ➌ ➍ ➎ ➏ ➊ OSD TURN ON/OFF ➋ SCROLL DOWN/DECREASE ➌ SCROLL UP/INCREASE ➍ CONFIRM SELECTION ➎ POWER ON/OFF ➏ LED INDICATOR Rear View of the Product ➐ ➑ ➐ POWER INPUT ➑ VGA CABLE (D-SUB 15 PIN) 3
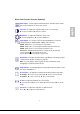
Using On Screen Display (OSD) Functions 1 Display main menu. English Exit from OSD menu. 2 Auto adjust the image when not in main menu. Confirm the selection. V or W Select the desired item when in OSD menu. When not in OSD menu, it is to immediately activate Contrast/ Brightness. It should be change to Contrast/ Brightness by pressing button 2 . ▼+▲ Recall both of Contrast and Brightness.
Short Cuts Function from the button(s) Auto Adjust : To auto adjust Horizontal Position, Vertical Position, Phase (Fine Tune) and Clock (H. Size) of the screen. Brightness : To adjust the luminance of the video. V : increase brightness, W : decrease brightness. Color Adjust : To select the color for improving brightness and color saturation between 9300K, 6500K, 5400K, and User Color. 9300K : Adds blue to screen image for cooler white. 6500K : Adds red to screen image for warmer white and richer red.
Sharpness : To adjust the clarity of a non-SXGA (1280x1024) signal with W or V button. English Setup Menu : To set up Language Select, Resolution Notice, OSD Position, and OSD Time Out. Language Select : To allow users to choose from available languages. Resolution Notice : Resolution Notice is to remind you set the best quality for the image.
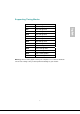
Supporting Timing Modes 720 x 400 @ 70Hz VESA 640 x 480 @ 60Hz MAC 640 x 480 @ 67Hz VESA 640 x 480 @ 75Hz VESA 800 x 600 @ 56Hz VESA 800 x 600 @ 60Hz VESA 800 x 600 @ 72Hz VESA 800 x 600 @ 75Hz MAC 832 x 624 @ 75Hz VESA 1024 x 768 @ 60Hz VESA 1024 x 768 @ 70Hz VESA 1024 x 768 @ 75Hz VESA 1280 x 1024 @ 60Hz VESA 1280 x 1024 @ 75Hz Warning : Do not set the graphic card in your computer to exceed these maximum refresh rates. Doing so may result in permanent damage to your monitor.
Technical Information Technical Specification English LCD Panel 17.0” TFT Power Management Energy Star compliant VESA DPMS compatible <1W Displayable Resolution SXGA 1280 x 1024 max. Vertical Frequency 75Hz max. Pixel Dimension 0.264 x 0.264 mm LCD Display Color 16.2M (6 bits + FRC/ color) Tilt 0°~20° Active Display Area 337.9 mm x 270.
Care and Maintenance Note Move the LCD out of the package and take off the plastic bag and Polystyrene Foam. Pull the base from Parallel versus Panel to Vertical. Adjust the Panel within 0 degree leaning forward and 20 degree leaning backward. You must bend harder to exceed 20 degree backward but this range is for packing the unit to a small size for storage only.
English Wrong or abnormal colors If any colors (red, green, blue) are missing, check the video cable to make sure it is securely connected. Loose or broken pins in the cable connector could cause an improper connection. Connect the monitor to another computer.