Downloaded From TV-Manual.
Contents CONTENTS Contents....................................................................................................................1 Warning.....................................................................................................................2 Safety Instructions .................. ........ .. ................ .............................................4 Introduction...........................................................................................
Warning WARNING CAUTION RISK OF ELECTRIC SHOCK DO NOT OPEN WARNING: TO REDUCE THE RISK OF ELECTRIC SHOCK DO NOT REMOVE COVER(OR BACK). NO USER SERVICEABLE PARTS INSIDE. REFER TO QUALIFIED SERVICE PERSONNEL. The lightning flash with arrowhead symbol, within an equilateral triangle, is intended to alert the user to the presence of uninsulated”dangerous voltage”within the products enclosure that may be of sufficient magnitude to constitute a risk of electric shock to persons.
Warning CAUTION: DO not attempt to modify this product in any way without written authorization from supplier. Unauthorized modification could void the user’s authority to operate this product. NOTIFICATION FCC Class B radio frequency Interference Statement Warning: ( for FCC CERTIFIED MODELS ) This equipment has been tested and found to comply with the limits for a Class B digital device , pursuant to Part 15 of the FCC Rules .
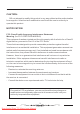
Safety instructions SAFETY INSTRUCTIONS WARNING: TO Reduce The Risk Of Fire Or Electric Shock, Do Not Expose This Apparatus To Rain Or Moisture. Apparatus shall not be exposed to dripping or splashing and no objects filled with liquids, such as vases, shall be placed on the apparatus. IMPORTANT SAFETY INSTRUCTIONS 1. Read these instructions. 8. Do not install near any heat source such as radiators, heat registers, stoves, or other Apparatus(including amplifiers)that produce heat. 2.
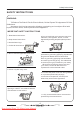
Safety instructions SAFETY INSTRUCTIONS CONTINUED 14. Refer all servicing to qualified service personnel. Servicing is required when the apparatus has been damaged in any way. 12. Use only cart, stand, tripod, bracket, or table specified by the manufacturer or sold with the apparatus . 13. Unplug this apparatus during lightning storms or when unused for a long time. Note - If the TV is cold, there may be a small “flicker” when you turn it on.
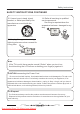
Introduction ACCESSORIES Ensure that the following accessories are included with your TV. If any accessory is missing, please contact the dealer from where you purchased the product. Accessories List Power Cable Remote Control AAA Battery User Manual x x x x 1 1 2 1 Quick Start Guide Warranty Card Video cable x 1 x 1 x 1 Installing Batteries 1 2 Open the battery compartment cover on the back side. Insert two 1.5V AAA size batteries in correct polarity. Don’t mix old or used batteries with new ones.
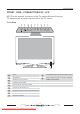
Introduction FRONT , SIDE , CONNECTIONS OF LCD NOTE:In this manual, the colour of the TV may be different from your TV, because this is just a kind of colour in the TV series. Front View 1 2 3 4 SOURCE MENU 5 6 7 8 V- V+ CH - 9 CH + STANDBY 10 11 Eject 10 Infrared sensor for the remote control. 2 Play/Pause 11 3 Select the input source Switch ON the LCD TV when at standby mode or vice versa.
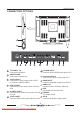
Introduction CONNECTION OPTIONS 1 2 3 4 5 6 TV SIGNAL IN Connect the antenna 8 9 10 PC-RGB INPUT Connect the PC-RGB output jack of PC HEADPHONE Connect the headphone PC AUDIO INPUT Connect the Audio output jack of PC AUDIO INPUT Connect the Audio output jack of DVD or VCR for CVBS/S-VIDEO HDMI INPUT Connect the HDMI output jack of DVD USB SLOT Can be used for software updating.
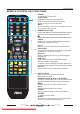
Introduction REMOTE CONTROL KEY FUNCTIONS POWER Turn the LCD TV ON or OFF. EJECT/EPG DVD mode: Press to eject the disc. EPG:To show the Electronic Program Guide during no - menu state only . MUTE Press to mute the sound. Press again or press V+ to recover the volume. NUMBER BUTTONS Press 0-9 to select a TV channel directly when you are watching TV. The channel change after 2 seconds. Press to return to the previous channel that was viewed.
Introduction AUTO FAV LIST/ Press FAV LIST to display a FAV menu in TV mode” DVD mode: Press to play or pause the DVD. ADD/ERASE/ Press ADD / ERASE to add or delete Favorite channel DVD mode: Press to stop playing FAV CH+/ Digital mode: Press to increase favourite channel. DVD mode: to slow/step the speed of DVD playing FAV CH-/GOTO Digital mode: Press to decrease favourite channel. DVD mode: Press to Go To a specific chapter on a DVD.
TV Operation INPUT &CONNECTIONS Power Cord Connection - Connect the power cord correctly as shown. - Press the STANDBY switch of your LCD to switch ON.The power indicator on the front panel lights up in green. AC AC Antenna Connection - Antenna or Cable Service without a Cable Box Connections. - For optimum picture quality, adjust antenna direction if needed.
TV Operation AV INPUT Connection NOTE: All cables shown are not included with the TV. - Connect the VIDEO /S-VIDEO and AUDIO output jack of the DVD or VCR to the AV IN jacks on the set with RCA cable. - Match the jacks colors: Video=yellow, Audio left=white, and Audio right=red. - Select the AV/S-VIDEO input source with INPUT button. S-VIDEO Cable VIDEO Cable YPbPr INPUT Connection DVD or VCR 1.
TV Operation PC Connection This TV has got Plug and Play capability. The TV sends configuration information (EDID) to the PC using the Video Electronics Standard Association (VESA) Display Data Channel (DDC) protocol. 1TUPNI CP 2 PC - Connect the RGB output of the PC to the VGA IN jack on the set. - Connect the PC AUDIO output of the PC to the PC AUDIO IN jack on the set. - Turn on the PC and set. - Select the VGA input source with INPUT button. HDMI INPUT Connection 1.
TV Operation Headphone Connection Earphone - You can connect a headphone to your TV if you wish to watch a TV program without disturbing people around you. - Insert a headphone into the 3.5mm mini-jack on the set. NOTE: 1. Prolonged used of headphones at a high volume may damage your hearing. 2. You will not receive the sound from speaker when you connect headphones to the system. 14 Downloaded From TV-Manual.
TV Operation This OSD instructions might not be exactly the same as the actual OSD you see on the TV. If there is any query please contact the local after service provider for help.
TV Operation PICTURE MENU PICTURE Picture Settings Screen Settings PC Settings Color Temperature Normal Advanced Picture Settings MENU :Return :Select Menu ENTER / :Go to Next Menu Picture Settings 1 . Press ENTER when the Picture Settings item is highlighted . Then you will go the sub - menu as following . 2 . Press to ▼ / ▲select the desired menu item . Press ENTER to proceed if necessary . 3 . Press to◄ / ► adjust the item to the desired level . 4 .
TV Operation Color Press ▼/ ▲ button to select Color , then press ◄ / ► button to adjust. Contrast Press ▼/▲ button to select Contrast , then press ◄ / ► button to adjust. Color 27 Contrast 25 Tint Sharpness Press ▼/ ▲ button to select Sharpness , then press ◄ / ► button to adjust. Press ▼/ ▲ button to select Tint , then press ◄ / ► button to adjust. ( This option can not be adjusted. ) Sharpness 27 Tint 25 Screen Settings 1. Press ENTER when the Screen Settings item is highlighted .
TV Operation Screen Size Press▼ / ▲button to select Screen Size , then press ◄ / ► button to adjust . ( Available Screen Size : WaterGlass , Cinema , Full , Normal ) Auto Wide Press▼ / ▲button to select the item Auto Wide , then press ENTER button to adjust . When the Auto Wide is selected , the symbol will show as following : Auto Wide Color Temperature Press ENTER when the Color Temperature item is highlighted . Then press ◄ / ► button to adjust .
TV Operation MPEG Noise Reduction Press ▼/▲button to select the item MPEG Noise Reduction, then press ◄/► button to adjust. It can improve the quality of the pictures by reducing the block noise. (Available MPEG Noise Reduction: Low, Medium, Off,High) MPEG Noise Reduction Medium SOUND MENU SOUND Sound Settings Surround Mode Analog Sound SAP Digital Sound English Other Settings Equalizer Settings MENU :Return :Select Menu ENTER / :Go to Next Menu Sound Settings 1.
TV Operation Sound Mode Press▼/▲ button to select the item Sound Mode , then press ◄/► button to adjust . ( Available Sound Mode : Standard , Soft , User , Dynamic ) Bass Press▼/▲ button to select the item Bass , then press ◄/► button to adjust . Treble Press▼/▲button to select the item Treble, then press ◄ / ► button to adjust. Treble 7 Bass 7 Balance Press▼/▲button to select the item Balance , then press ◄/► button to adjust .
TV Operation Other Settings OTHER SETTINGS MENU AVL Off Speaker On ::Enable/ Disable :Select Menu :Return AVL Press▼/▲button to select the item AVL, then press ◄/► button to select ON or OFF. SPEAKER Press▼/▲button to select the item SPEAKER, then press ◄/► button to select ON or OFF.
TV Operation CHANNEL Channel List Favorite List Channel Setting Signal Type Air Execute Auto Channel Search MENU :Return :Select Menu ENTER / :Go to Next Menu Channel List Press ▼/▲button to select Channel List , then press ENTER button to scan the Channel List . Page 1/1 Channel List 2 FUNNY 3 6 7 9 MENU :Return :Select Menu :Page ENTER :Select Channel Favorite List Press▼/▲button to select Favorite List , then press ENTER button to scan the Favorite Channel List .
TV Operation Channel Setting Press ▼/▲ button to select Manual Channel Setting , then press ENTER button to set the value in the sub menu . Channel Number Press ▼/▲ button to select Channel Number , then press button to select the Channel Number or press the number buttons to select the channel you want to set .
TV Operation CHANNEL SETTING Channel Number 2 In Channel List Channel Label _______ O Favorite Channel MENU :Return :Name Entry :Select Menu ENTER :Cursor Favorite Channel Press ▼ / ▲ button to select Favorite Channel , then press ENTER button to Add or Delete the current channel in Favorite Channel list .
TV Operation PARENTAL CONTROL PARENTAL CONTROL Lock Parental Control V-CHIP Change Password Front Panel Lock Source Lock MENU :Return DIGITAL :Enter password Input password to enter , default password is “0000”. V - CHIP Press▼/▲ button to select V - CHIP , then press ENTER button to adjust . A Sub Menu Will appear as below .
TV Operation Movie Rating Press ▼ / ▲ button to select Movie Rating , then press ENTER button to adjust . A Sub Menu Will appear as below . EF E Movie Rating G PG R PG-13 LY R NC-17 O N X :Select ENTER :Lock/Unlock Press ▼ / ▲ button to select Rating, then press ENTER button to lock TV Rating Press ▼ / ▲ button to select TV Rating, then press ENTER button to adjust. A Sub Menu Will appear as below.
TV Operation CANADA English Rating O French Rating :Select Menu MENU :Return ENTER / :Go to Next Menu The operation of CANADA V - CHIP is the same as the operation of US V - CHIP . Block UnRated Show Press ▼ / ▲ button to select Block UnRated Show , then press ENTER button to set the rating locked . Downloadable Rating Press ▼ / ▲ button to select Downloadable Rating , then press ENTER button to set the rating . If the DTV program doesn’t have this rating information , this option will be in gray .
TV Operation FRONT PANEL LOCK Press ▼/▲ button to select FRONT PANEL LOCK , then press ENTER button to adjust . Front Panel Lock Source Lock Press ▼/▲button to select Source Lock , then press Enter button to enter the sub menu Press ▼/▲button to select Source , then press Enter button to set the Source Lock. You can’t enter the locked source if you set the Source lock .
TV Operation Press ▼/▲ button to select the item Closed Caption , then press ◄/► button to adjus . CLOSED CAPTION Caption Display Off Analog Caption Type TEXT3 Digital Caption Type Service1 Digital CC Preset Default O Digital CC Style MENU :Select Menu :Return :On/Off Caption Display Press▼/▲button to select Caption Display , then press ◄/► button to select ON or OFF . Analog Caption Type Press▼/▲button to select Analog Caption Type , then press ◄/► button to select the type .
TV Operation CC Size Press▼/▲button to select , then press ◄/► button to set .( Available CC Size Size : Small , Standard , Large , Default ) CC Font Press▼/▲button to select CC Font , then press ◄/► button to select the Font . ( Available type : Style1 ~ 7 ) CC Opacity Press▼/▲button to select CC Opacity , then press ◄/► button to select the Opacity .
TV Operation Time Zone Press ▼/▲button to select Timer Zone , then press ◄ / ► button to set .( Available Size : Hawaii , Alaska , Eastern , Central , Mountain , Pacific , Samoa , Newfoundland , Atlantic ) Auto Clock Press ▼/▲ button to select Auto Clock , then press ◄ / ► button to set it On or Off . If you set it On , it will adjust the time corresponding the DTV time automatically .
DVD Operation Using built-in DVD Player Insert the disc with mirror side facing you. The driver will read the disc automatically when the it is inserted. If the player cannot play the disc, please check whether the disc inserted correctly. Mirror Side Eject the disc Press on the remote control or on the top of the TV to eject the disc.
DVD Operation Active Directory Music001 Photo001 music002 Photo002 Photo003 Directories List Highlighted item: Current playing track Music Play list Videos Category Music Category Photos Category DVD Setup POWER MUTE DISPLAY Press D.SETUP button to access the DVD Setup MENU. SYSTEM SETUP TV SYSTEM Press▲ /▼ / ◄ / ► buttons to navigate through the DVD Setup. Press ENTER button to confirm setting. Press D.SETUP button again to exit seup.
DVD Operation SYSTEM SETUP TV SYSTEM TV TYPE 4 : 3PS PASSWORD 4 : 3LB RATING 16 : 9 TV TYPE Select the video output size of DVD. 4:3PS: 4:3 PanScan. 4:3LB: 4:3 LetterBox. 16:9: DEFAULT EXIT SETUP PassWord SYSTEM SETUP -The default setting is locked. No Rating selection or change password could be done. To edit the Rating setting, please enter default password “0000” by number buttons, then press ENTER button to confirm. -To change password, input any 4 digit number when the lock is unlocked.
DVD Operation Note: Password and rating cannot be restored with this operation. LANGUAGE SETUP LANGUAGE SETUP OSD LANGUAGE ENGLISH AUDIO LANG GERMAN SUBTITLE LANG SPANISH MENU LANG FRENCH OSD LANGUAGE Select the DVD OSD language. The default OSD language is English PORTUGUESE ITALIAN EXIT SETUP POWER LANGUAGE SETUP OSD LANGUAGE AUDIO LANG ENGLISH SUBTITLE LANG GERMAN MENU LANG SPANISH MUTE DISPLAY AUDIO LANGUAGE Select the default audio language while playing back the DVD disc.
DVD Operation AUDIO SETUP TONE Adjust the tone of the audio AUDIO SETUP # +4 TONE +2 EXIT SETUP 0 -2 -4 EXIT SETUP Exit DVD OSD menu. AUDIO SETUP TONE EXIT SETUP DIGITAL SETUP DIGITAL SETUP DYNAMIC RANGE DUAL MONO FULL 6/8 4/8 2/8 OFF EXIT SETUP DUAL MONO DIGITAL SETUP Selects the type that converting multi-channel audio into stereo audio.
Dimensions & Specifications Dimensions & Specifications Model LC19W060C Panel size 19" Resolution 1440 x 900 TV System NTSC standard ATSC standard (8-VSB, Clear-QAM) Channel coverage VHF: 2 through 13 UHF: 14 through 69 Cable TV: Mild band (A - 8 through A - 1, A through I) Super band (J through W) Hyper band (AA through ZZ, AAA, BBB) Ultra band (65 through 94, 100 through 125) Speaker 3W x 2 Antenna impedance 75Ω Input Voltage 120VAC, 60Hz Standby power consumption <1W Video/audio Termin
Trouble Shooting Trouble shooting Before contrast the service technician, perform the following simple checks. If any program still persists, unplug the LCD TV and calling for serving. PROBLEM POSSIBLE SOLUTION - Check that the main plug has been connected to a wall let. - Check that you have pressed the POWER button on the front of No sound and picture TV set. - Check the picture contrast and brightness settings. - Check the volume. Normal picture but no - Sound muted? Press the MUTE button.
Trouble Shooting PROBLEM The signal is out of range. Vertical bar or stripe on back ground&Horizontal Noise&Incorrect position. Screen color is unstable or single color. POSSIBLE SOLUTION - Adjust resolution, horizontal frequency, or vertical frequency. - Adjust resolution, horizontal frequency, or vertical frequency. - Check the input source. - Work the auto configure or adjust clock, phase, or H/V position. - Check the signal cable. - Reinstall the PC video card.
Downloaded From TV-Manual.