USER’S MANUAL L19W761 / L22W761 Thank you very much for choosing the Envision Series LCD TV. We recommend that you take a few minutes to read carefully through this manual before installing and using the TV. Please keep this manual in a safe place for your future reference. www.AOC .
TABLE OF CONTENTS TABLE OF CONTENTS …………………………….………………….. 1 FOR YOUR SAFETY …………………………………………………... 2 PRECAUT IONS AND REMINDERS ……………………………………3 IMPORTANT SAFETY INSTRUCTIONS …………………………….. 5 PREPARAT ION ………………………………………………………… 7 OPERATING INSTRUCTIONS ………………………………………. 10 TO USE PANEL CONTROL ......................…………………….. 10 TO USE THE REMOTE CONTROL ……………………………. 11 TO USE THE MENUS ……………………………………………. 12 SETUP MENU …………………………………………………….. 12 VIDEO MENU ……………………………………………………...
FOR YOUR SAFETY Before operating the TV please read this manual thoroughly. This manual should be retained for future reference. FCC Class B Radio Frequency Interference Statement WARNING: (FOR FCC CERTIFIED MODELS) English NOTE: This equipment has been tested and found to comply with the limits for a Class B digital device, pursuant to Part 15 of the FCC Rules. These limits are designed to provide reasonable protection against harmful interference in a residential installation.
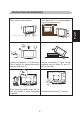
PRECAUTIONS AND REMINDERS Don't place the TV in confined spaces or in a box when using it. Unplug immediately if is malfunction like no picture, no video/audio,smoke and bad odor from TV. Unplug immediately if other foreign materials are put inside TV box or if the TV fell down. Don't throw any object inside the TV box like metals or other flammable materials. Prohibit/Avoid opening TV cabinet English Place unit on even surfaces.
English Remember to unplug the AC cord from the AC outlet before cleaning. Do not use liquid cleaners or aerosol cleaners to clean the display. Avoid direct sunlight, dusty, high humidity and smoky areas. Make sure to unplug the unit when not in use for a long period of time (days). Call service personnel to clean the internal part of the TV once a year. Do not cover or block any vents and openings. Inadequate ventilation may shorten the life of the display unit and cause overheating.
IMPORTANT SAFETY INSTRUCTIONS 1. 2. 3. 4. 5. 6. 7. Read these instructions. Keep these instructions. Heed all warnings. Follow all instructions. Do not use this apparatus near water. Clean only with a dry cloth. Do not block any of the ventilation openings. Install in accordance with the manufacturers instructions. 8. Do not install near any heat sources such as radiators, heat registers, stoves, or other apparatus (including amplifiers) that produce heat. 9.
English 18. Tilt/Stability – All televisions must comply with recommended international global safety standards for tilt and stability properties of its cabinets design. Do not compromise these design standards by applying excessive pull force to the front, or top, of the cabinet, which could ultimately overturn the product. Also, do not endanger yourself, or children, by placing electronic equipment/toys on the top of the cabinet.
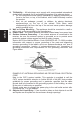
PREPARATION Min 1m Ensure that the TV is placed in a position to allow free flow of air. Do not cover the ventilation openings on the back cover. To prevent any unsafe situations, no naked flame sources, such as lighted candles, should be placed on or in the vicinity. Avoid heat, direct sunlight and exposure to rain or water. The equipment shall not be exposed to dripping or splashing. 2. Connect the antenna cable or CATV cable to the aerial socket ANT IN 75Ω at the back of the TV set.
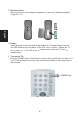
3. Remote control: Remove the cover of the battery compartment. Insert the 2 batteries supplied (Type AA 1.5V). English 4. Power: Insert the power cord in the wall socket having an AC power supply.You can see LED states at the front panel. If the LED color is Green , means the TV set is power on. If the LED color is amber, which means this TV set is in standby state. 5. Turn on the TV: Push the POWER key on the Remote control or the control knobs on right of TV.
PERIPHERAL CONNECTION GUIDE English AC POWER Once your equipment is connected, use the following procedure to view the input signal: Press the source button on the remote controller to select the relevant source to view. (ex: Press VIDEO button to select “Video1 Composite Rear” if you have connected a DVD player to Video1 Composite socket.) "HDMI, the HDMI logo and High-Definition Multimedia Interface are trademarks or registered trademarks of HDMI Licensing LLC.
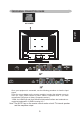
OPERATION INSTRUCTIONS TO USE THE PANEL CONTROL English 1 VOL VOL : Press to increase the sound volume level. 2 VOL VOL : Press to decrease the sound volume level. 3 CH CH : Press to select the next higher Program number. 4 CH CH : Press to select the next lower Program number. 5 MENU Menu key: Press to open or exit the OSD menu. 6 INPUT Input key: Press to select the input source. 7 POWER Power key: Press to turn on / off (standby) the TV set.
TO USE THE REMOTE CONTROL “0 ~ 9 /- number” Press to power ON/OFF (standby) TV. (Note:1.TV is never completely power off unless physically unplugged. 2.Press to turn on TV after the power on status LED had changed to the amber color and stopped flashing. ) “MENU” Press to open or exit menu. “VOL- / VOL+” “MUTE” Press + or - to adjust the volume. Press to set TVsound mute ON/OFF. “CH- / CH +” “MTS/SAP” Press + or - to browse through the TV channels.
TO USE THE MENUS 1. 2. 3. 4. 5. Press the MENU button to display the main menu Use the cursor up/down to select a menu item. Use the cursor left/right to enter a submenu. Press the OK button to enable/disable the function. Press the MENU or EXIT button to exit the menu. English Press the MENU button to enter the main OSD (On Screen Display). Adjust the items including Setup menu, Video menu, Audio menu and Feature menu.
4. Add on Ch search:Add channels which are new found. 5. Manual Channel Set: Show the channel setup table. User can choose to display the ATSC or NTSC TV channels and then edit (add/delete) the channel numbers. 6. Channel Labels: Show the NTSC or ATSC TV channel label menu for user modifying channel labels specifically. 7. Menu Language: Select the menu display language. (English /Spanish / French) 9.
AUDIO MENU The Audio menu in TV mode shows as below. It provides audio adjustment for user to modify the audio setting. Except in ATSC TV mode, some audio adjustment items for user to modify the audio setting. Excepting in ATSC TV mode, the Audio Language option is disable in others source modes. The audio language setting is only available in ATSC TV source. English 1. Audio Language: Change the audio language setting on ATSC TV programs.
FEATURE MENU English The Feature menu in TV mode shows as below. It provides certain optional control functions such as time set, sleep timer, video noise reduction, parental control (V-chip) and close caption style setting. This menu gives users the most flexibilities to satisfy their generally demands. According to the various requirements in different source modes, certain features should be hidden (disable) on the menu. The details footnotes will be described clearly below. 1.
【Noise Reduction】gives four NR effect degrees, such as: Low、Mid、High and Off. The default setting is off . 【3D Y/C】provides On / Off switches. The default setting is On. 【Color Temp】gives three color temperature modes as: Normal、Warm and Cool. The default mode is Warm. o 【Setting】restores the default advanced video option settings. 【Dynamic contrast】provides On / Off switches. The default setting is Off. English 4. Password Set: Change the 4-numeral parental control password.
English 6. Digital Captions: Select the close caption options ( Service 1-6, Text 1-4 and CC 1-4) in digital TV mode. When select service 1 to service 6 you can modulate parameters in the Digital Close Caption. 7. Digital Closed Caption: Provide numerous options for setting the close caption style. In the sub-menu. 【 Style】item can be set as Automatic or Custom mode. If Custom mode is selected, user can modify the detail styles described below.
English 【Size】: Digital close caption font size, which can be set as Small、Normal or Large. 【Font】: Digital close caption font style, which can be chosen as Default or Font 1 ~ 7. 【Text Color】: Giving Red / Green / Blue / Yellow / Magenta / Cyan / Black / White Colors. 【Text Opacity】: Giving Transparent / Translucent / Solid / Flashing modes. 【Background Color】: Giving Red / Green / Blue / Yellow / Magenta / Cyan / Black / White Colors.
TIPS Mobile telephone warning To avoid disturbances in picture and sound, malfunctioning of your TV or even damage to the TV, keep away your mobile telephone from the TV. End of life directives We are paying a lot of attention to produce environmentally friendly in green focal areas. Your new receiver contains materials, which can be recycled and reused.
Canadian notice – This Class B digital apparatus meets all requirements of the Canadian Interference-Causing Equipment Regulations. Avis Canadian – Cat apparel numerous de la classed B respected toutes les exigencies du règlement sur le materiel brouilleur du Canada.
PRODUCT SPECIFICATION_L19W761 NOTE: *This model complies with the specifications listed below. *Designs and specifications are subject to change without notice. *This model may not be compatible with features and/or specifications that may be added in the future.
PRODUCT SPECIFICATION_L22W761 NOTE: *This model complies with the specifications listed below. *Designs and specifications are subject to change without notice. *This model may not be compatible with features and/or specifications that may be added in the future.
BEFORE CALLING SERVICE Please make these simple checks before calling service. These tips may save you time and money since charges for receiver installation and adjustments of customer controls are not covered under your warranty.
GLOSSARY Audio / Video Inputs Located on the rear and the front of the receiver these connectors (RCA phono type plug) are used for the input of audio and video signals. Designed for use with VCRs (or other accessories) in order to receive higher picture resolution and offer sound connection options. English Menu An on-screen listing of features shown on the TV screen is made available for user adjustments.
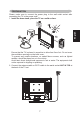
English Wall Mount Bracket (19”) (22”) 1. Remove the four units M4.0 screws. 2. Remove the Base Ass’y. 3. Fasten four units M4.0 X 10mm screws to secure the wall mount bracket. Note: If you want to wall mount the TV, for the safety of you and the appliance, please use the correct hanging brackets.