USB Monitor User Manual E1759FWU www.aoc.com ©2014 AOC. All Rights Reserved.
Safety........................................................................................................................................................................ 3 National Conventions ......................................................................................................................................... 3 Installation..........................................................................................................................................................
Safety National Conventions The following subsections describe notational conventions used in this document. Notes, Cautions, and Warnings Throughout this guide, blocks of text may be accompanied by an icon and printed in bold type or in italic type. These blocks are notes, cautions, and warnings, and they are used as follows: NOTE: A NOTE indicates important information that helps you make better use of your computer system.
Installation Do not place the monitor on an unstable cart, stand, tripod, bracket, or table. If the monitor falls, it can injure a person and cause serious damage to this product. Use only a cart, stand, tripod, bracket, or table recommended by the manufacturer or sold with this product. Follow the manufacturer‟s instructions when installing the product and use mounting accessories recommended by the manufacturer. A product and cart combination should be moved with care.
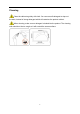
Cleaning Clean the cabinet regularly with cloth. You can use soft-detergent to wipe out the stain, instead of strong-detergent which will cauterize the product cabinet. When cleaning, make sure no detergent is leaked into the product. The cleaning cloth should not be too rough as it will scratch the screen surface.
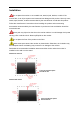
Other If the product is emitting a strange smell, sound or smoke, disconnect the power plug IMMEDIATELY and contact a Service Center. Make sure that the ventilating openings are not blocked by a table or curtain. Do not engage the USB Monitor in severe vibration or high impact conditions during operation. Do not knock or drop the monitor during operation or transportation.
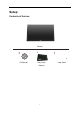
Setup Contents of the box Monitor * CD Manual Carry Case (Option) 7 USB Cable
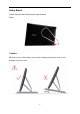
Setup Stand Please setup the stand following the steps as below. Setup: Caution: Must put unit on a flat surface. Any uneven or sloped surface may result in unit damage or injury to user.
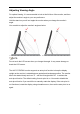
Adjusting Viewing Angle For optimal viewing, it is recommended to look at the full face of the monitor, and then adjust the monitor's angle to your own preference. Hold the stand so you will not topple the monitor when you change the monitor's angle. You are able to adjust the monitor's angle as below. NOTE: Do not touch the LCD screen when you change the angle. It may cause damage or break the LCD screen.
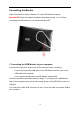
Connecting the Monitor Cable Connections In Rear of Monitor to Connect PC/Notebook/Laptop: Important!! Follow the software installation described on page 11 to 16 before connecting the USB monitor to your Notebook/Laptop/PC. 1 Connecting the USB Monitor to your computer To protect the equipment, always turn off the computer before connecting. - Connect one end of the USB cable to the USB Monitor and the other end of USB cable to the computer. - Your computer should detect the USB Monitor automatically.
Installation of USB Graphic software on your computer For Microsoft ® Windows® 8/8.1 Important!! Install the USB Graphic software first before connecting the USB monitor to your computer. Windows 8/8.1 DisplayLink software can be installed from Windows update. Alternatively, the software can be downloaded from the DisplayLink website following the steps below. 1. Double click on Setup.exe. The Windows User Account Control window opens (if enabled in the OS). 2. Click Yes.
4. Connect your DisplayLink device via the USB cable to your PC. A message will be shown that DisplayLink software is configuring itself for first use. 5. The screen should flash and the DisplayLink device should start to extend the Windows desktop. Note: You may need to reboot the computer before you use the DisplayLink enabled device. For Microsoft ® Windows® 7 Important!! Install the USB Graphic software first before connecting the USB monitor to your computer. 1. Double click on Setup.exe.
3. Click I Accept. DisplayLink Core software and DisplayLink Graphics installs. Note: The screen may flash or go black during the installation. The installation box above will disappear but no message will be shown at the end of the installation. 4. Connect your AOC USB Monitor via the USB cable to your PC/Notebook. Installing device driver message will be shown on the taskbar. The Windows User Account control window opens. 5. Click YES. DisplayLink will automatically install the AOC USB Monitor.
For Microsoft® Windows Vista® Important!! DO NOT connect USB Monitor to your PC/Notebook before the software install. 1. Double click on Setup.exe. The Windows User Account Control window opens (if enabled in the OS). 2. Click Yes. The USB Monitor software end user license agreement window opens. 3. Click I Accept. DisplayLink Core software and DisplayLink Graphics installs. Note: The screen may flash or go black during the installation.
4. Connect your AOC USB Monitor via the USB cable to your PC/Notebook. Installing device driver message The Windows User Account control window opens. 5. Click YES. DisplayLink automatically installs the AOC USB Monitor. The DisplayLink software end user license agreement windows opens (see above). 6. Click I Accept. The DisplayLink USB Graphics software installs, without notification that it has completed. Note: On some machines you may need reboot before you can use your AOC USB Monitor.
For Microsoft® Windows® XP Important!! DO NOT connect USB Monitor to your PC/Notebook before the software install. 1. Double click on Setup.exe. The Windows User Account Control window opens (if enabled in the OS). 2. Click I Accept. DisplayLink core software and DisplayLink Graphics installs. Note: The screen may flash or go black during the installation. 3. Connect your AOC USB Monitor via the USB cable to your PC/Notebook. The following message (or similar) will be seen.
Setting the USB Monitor Follow this procedure to configure the AOC Monitor 1. Open screen resolution 2. Set the display options. Refer to the table below for details on each option. Menu Sub-Menu Description Display Use the drop down list to select a display to be configured.
To Control the Display You can use the AOC USB USB Monitor in mirror mode or extended mode. Settings may vary depending on your operating system. For Microsoft® Windows® 8/8.1 and Microsoft® Windows® 7 Press the Windows® key ( ) + P to switch between different modes as shown below. For Microsoft® Windows® XP and Microsoft® Windows Vista® ”icon in the system tray of your Windows ® desktop to configure the Right-click the “ display settings. MENU Displaylink Manager Sub-menu Opens the Resolution window.
Disconnecting the USB Monitor 1. For Microsoft® Windows® 7 only, you can turn the monitor OFF by pressing the Windows key ( ) + P, and then selecting “Computer only”. For Microsoft® Windows vista® and Windows® XP, you can select OFF by right-Clicking the “ ” icon in the system tray. 2. Remove the USB cable from the computer and monitor. Cleaning the USB Monitor Please follow the guidelines below when cleaning the USB Monitor: - Always unplug the monitor before cleaning.
Media Playback On Windows 8/8.1, Windows 7, Vista, and Windows XP (XP in extend mode), the DisplayLink USB Graphic device can display media files and DVDs using the following media players: Windows Media Player 12 (http://www.microsoft.com/windows/windowsmedia/default.mspx) Windows Media Player 11 (http://www.microsoft.com/windows/windowsmedia/default.mspx) WinDVD 11 (www.intervideo.com) PowerDVD 12 (www.cyberlink.
Windows 7 and Windows 8/8.1 For Windows 7 and Windows 8/8.1, the Windows Experience Index (WEI) is a useful measure of hardware level. The WEI is accessible from Computer > Properties, or from Control Panel > System. The recommended typical hardware requirements for the PC are: WEI score of at least 3 in the „Graphics; Desktop performance for Windows Aero‟ category. Overall WEI score of at least 3 as recommended by Microsoft. At least one USB 2.0 port. 30 megabytes (MB) of free disk space.
Windows XP For 1-2 monitors, business usage, productivity target. This may not provide full frame rate DVD playback at full screen. 1.2GHz Single Core CPU 512MB memory For 3 monitors where 1 could run DVD video while also targeting productivity and business apps. Will support only 1 video of DVD resolution at full screen: 1.6GHz CPU 1GB memory For 6 screens where 1 screen can run full screen DVD video: 1.8GHz Core Duo 1GB memory At least one USB 2.0 port.
Troubleshooting This section provides tips for correcting problems, should any occur. It also describes how to contact AOC should you encounter problems that you cannot resolve. Before you call AOC service center, please read the troubleshooting advice in this manual and in your computer User's Manual. You may also want to consult with your system administrator or company technical support staff. Problem & Question Possible Solutions Check the connectors.
Specification General Specification Panel Resolution Model name E1759FWU Driving system TFT Color LCD Viewable Image Size 43.8cm diagonal Pixel pitch 0.2388(H)mm x 0.2388(V)mm Display Color 262144 Colors Dot Clock 107.80MHz Horizontal scan range 55.567kHz Horizontal scan Size(Maximum) 382.08mm Vertical scan range 60Hz Vertical scan Size(Maximum) 214.92mm Optimal preset resolution 1600×900@60Hz Plug & Play VESA DDC2B Input Connector Micro USB 3.
FACTORY PRESENT TIMING TABLE Mode SVGA XGA SXGA SXGA WXGA WSXGA Resolution 800x600@60 1024x768@60 1280x720@60 1280x800@60 1440x900@60 1600x900@60 Regulation FCC Notice FCC Class B Radio Frequency Interference Statement WARNING: (FOR FCC CERTIFIED MODELS) NOTE: This equipment has been tested and found to comply with the limits for a Class B digital device, pursuant to Part 15 of the FCC Rules.
WEEE Declaration Disposal of Waste Equipment by Users in Private Household in the European Union. This symbol on the product or on its packaging indicates that this product must not be disposed of with your other household waste. Instead, it is your responsibility to dispose of your waste equipment by handing it over to a designated collection point for the recycling of waste electrical and electronic equipment.
EPA Energy Star ENERGY STAR® is a U.S. registered mark. As an ENERGY STAR® Partner, AOC International (Europe) BV and Envision Peripherals, Inc. have determined that this product meets the ENERGY STAR® guidelines for energy efficiency.
Service Warranty Statement for Europe LIMITED THREE-YEAR WARRANTY* For AOC LCD Monitors sold within Europe, AOC International (Europe) B.V. warrants this product to be free from defects in material and workmanship for a period of Three (3) years after the original date of consumer purchase. During this period, AOC International (Europe) B.V. will, at its option, either repair the defective product with new or rebuilt parts, or replace it with a new or rebuilt product at no charge except as *stated below.
If your warranty has expired, you still have access to all available service options, but you will be responsible for the cost of service, including parts, labor, shipping (if any) and applicable taxes. AOC Certified or Authorized Service Center will provide you with an estimate of service costs before receiving your authorization to perform service.
Warranty Statement for Middle East and Africa (MEA) And The Commonwealth of Independent States (CIS) LIMITED ONE to THREE YEARS WARRANTY* For AOC LCD Monitors sold within the Middle East and Africa (MEA) and the Commonwealth of Independent States (CIS), AOC International (Europe) B.V. warrants this product to be free from defects in material and workmanship for a period of One (1) to Three (3) years from the manufacture date depending on sale country. During this period, AOC International (Europe) B.V.
Repair, modification, or installation of options or parts by anyone other than an AOC Certified or Authorized Service Center Improper environments like humidity, water damage and dusts Damaged by violence, earthquakes and terrorist attacks Excessive or inadequate heating or air conditioning or electrical powers failures, surges, or other irregularities This limited warranty does not cover any of the product firmware or hardware that you or any third party have modified or altered; you bear t
Warranty Statement for North & South America (excluding Brazil) WARRANTY STATEMENT for AOC Color Monitors Including those Sold within North America as Specified Envision Peripherals, Inc. warrants this product to be free from defects in material and workmanship for a period of three (3) years for parts & labor and one (1) year for CRT Tube or LCD Panel after the original date of consumer purchase. During this period, EPI ( EPI is the abbreviation of Envision Peripherals, Inc.
ALL EXPRESS AND IMPLIED WARRANTIES FOR THIS PRODUCT (INCLUDING THE WARRANTIES OF MERCHANTABILITY AND FITNESS FOR A PARTICULAR PURPOSE) ARE LIMITED IN DURATION TO A PERIOD OF THREE (3) YEARS FOR PARTS AND LABOR AND ONE (1) YEAR FOR CRT TUBE OR LCD PANEL FROM THE ORIGINAL DATE OF CONSUMER PURCHASE. NO WARRANTIES (EITHER EXPRESSED OR IMPLIED) APPLY AFTER THIS PERIOD.