916Swa User Manual q 1. Preface About This Guide This guide describes the monitor's features, setup, and operation. lnformation in this document is subject to change without notice. The sections are as follows: • • • • • • • Safety Instructions: lists safety information. Setup: describes the initial setup process. Using the Monitor: gives an overview of how to use the monitor. Drivers: provides driver installation instructions for Windows.
Please link www.aoc.com, select your country or region, log in Product Registration to register . 2. Safety Introduction FCC Notice FCC Class B Radio Frequency Interference Statement WARNING: (FOR FCC CERTIFIED MODELS) NOTE: This equipment has been tested and found to comply with the limits for a Class B digital device, pursuant to Part 15 of the FCC Rules. These limits are designed to provide reasonable protection against harmful interference in a residential installation.
LAMP(S) INSIDE THIS PRODUCT CONTAIN MERCURY AND MUST BE RECYCLED OR DISPOSED OF ACCORDING TO LOCAL, STATE OR FEDERAL LAWS. FOR MORE INFORMATION, CONTACT THE ELECTRONIC INDUSTRIES ALLIANCE AT WWW.EIAE.ORG. Precautions WARNING: Use of controls, adjustments, or procedures other than those specified in this documentation may result in exposure to shock, electrical hazards, and/or mechanical hazards.
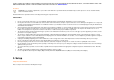
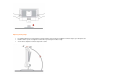
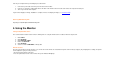
Adjusting Viewing Angle • • • For optimal viewing it is recommended to look at the full face of the monitor, then adjust the monitor's angle to your own preference. Hold the stand so you do not topple the monitor when you change the monitor's angle. You are able to adjust the monitor's angle from -5°to 20°.
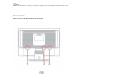
NOTE: Do not touch the LCD screen when you change the angle. It may cause damage or break the LCD screen. Attaching the Cables Cable Connections On Back of Monitor and Computer 1.Power 2.Analog 3.
Turn off your computer before performing the procedure below. 1. 2. 3. Connect the power cable to the AC port on the back of the monitor. Connect one end of the 15-pin D-Sub cable to the back of the monitor and connect the other end to the computer's D-Sub port. Turn on your monitor and computer. If your monitor displays an image, installation is complete. If it does not display an image, see Troubleshooting. Attaching Wall Mounting Arm Preparing to Install An Optional Wall Mounting Arm 4.
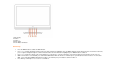
1. Auto Config 2. Volume / 3. Volume / + 4. Menu / Enter 5. Power Button & Indicator OSD Settings • • • • • Press the MENU-button to activate the OSD window. Press+ or - to navigate through the functions. Once the desired function is highlighted, press the MENU-buttonto activate it.If the function selected has a sub-menu, press or again to navigate through the sub-menu functions.Once the desired function is highlighted, press MENU-button to activate it.
DCB Adjustment What is DCB? Dynamic Color Boost (DCB) is an advanced color adjustment technology. Through analyzing RGB signals, DCB creates more vivid and natural images to suit various color environment needs. DCB has two types of color enhancers: “Color Boost” and “Picture Boost” .
Five color-enhancement settings: To accommodate various display needs, Color Boost also offers 5 different color enhancement modes: Full Enhance, Natural Skin, Green Field, Sky Blue, and Auto-Detect. Please go to the fourth icon labeled “Color Boost” in the OSD menu and select one of the five settings you desire to be turned on.
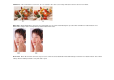
Full Enhance: When "Full Enhance" is turned on, the color saturation of the entire screen is fully enriched, thus all colors become more vibrant. Nature Skin: When "Natural Skin" is turned on, the red and yellow colors are enriched automatically, thus presents human skin with more natural and truer colors. "Natural Skin" setting is ideal for viewing human portrait and detailed skin texture.
Sky Blue: When"Sky Blue" is turned on, the color blue is being fine-tuned so that the sky or ocean landscape will look more vivid and in-depth. "Sky Blue" setting is ideal for viewing sky and ocean images. Auto Detect: When “Auto Detect” is turned on, every pigment will be detected and self-adjusted to render a lively picture.
Demo: Screen divided into two for demonstration purposes. 2) How to use Picture Boost? Users can change the color settings of a self-selected zone on the screen. The size and position of the selected zone can also be adjusted. "Picture Boost" is located in the fifth icon labeled "Picture Boost" in the OSD menu. Turn on "Bright Frame" to select a zone on the screen to be enhanced.
What is DCR? Dynamic Contrast Ratio (DCR) auto adjusts the brightness of the screen so users can see the darker areas of the displayed content in more depths. By increasing the darkness of the dark areas and the brightness of the bright areas, contrast ratio is uplifted to exceed 2000:1. DCR value varies subject to the original CR values of the LCD module. The higher the original CR, the higher DCR can be achieved. DCR is great for watching movie or video contents.
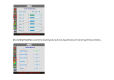
DCR Demos: Disclaimer: DCR aftereffects are subject to the resolution and quality of the display content, hence may look different than the above illustrations. Function Control Illustration Luminance Brightness Contrast Eco mode Gamma DCR Image Setup Clock Focus H.Position V.Position Color Temp. Warm Normal Cool sRGB User Adjust Range 0-100 0-100 Standard Text Internet Game Movie Sports Gamma1 Gamma2 Gamma3 Off On Description Backlight Adjustment Contrast from Digital-register.
Color Boost Full Enhance Nature Skin Green Field Sky-blue AutoDetect Demo Picture Boost Frame Size Brightness Contrast Hue Saturation Position Bright Frame OSD Setup H.Position V.Position Timeout Language Extra Auto Config Reset EXIT/DDC-CI Information User-G User-R User-Y User-C User-M Green Gain Digital-register.
This monitor can be attached to a wall mounting arm you purchase separately. Disconnect power before this procedure. Follow these steps: 1. 2. 3. Remove the base. Follow the manufacturer's instructions to assemble the wall mounting arm. Place the wall mounting arm onto the back of the monitor. Line up the holes of the arm with the holes in the back of the monitor.
4. 5. Insert the 4 screws into the holes and tighten. Reconnect the cables. Refer to the user's manual that came with the optional wall mounting arm for instructions on attaching it to the wall. 5. Drivers Windows 2000 1. Start Windows® 2000 2. Click on the 'Start' button, point to 'Settings', and then click on 'Control Panel'. 3. Double click on the 'Display' Icon. 4. Select the 'Settings' tab then click on 'Advanced...'. 5.
11. Click on the 'Open' button, then click the 'OK' button. 12. Select your monitor model and click on the 'Next' button. - If you can see the 'has not passed Windows® Logo testing to verify its compatibility with Windows® XP' message, please click on the 'Continue Anyway' button. 13. Click on the 'Finish' button then the 'Close' button. 14. Click on the 'OK' button and then the 'OK' button again to close the Display_Properties dialog box. Windows Vista 1. Start Windows® Vista 2.
• • Inspect the monitor's video cable and make sure that none of the pins arebent. Make sure the monitor's video cable is properly connected to the computer. Screen image is not centered or sized properly • Adjust H-Position and V-Position or press hot-key (AUTO).
Environmental Temperature: Operating Non-Operating Humidity: Operating Non-Operating Altitude: Operating Non-Operating 0° to 50° -20°to 60° 10% to 85% (non-condensing) 5% to 80% (non-condensing) 0~ 3000m (0~ 10000 ft ) 0~ 5000m (0~ 15000 ft ) EPA Energy STAR ® ENERGY STAR® is a U.S. registered mark. As an ENERGY STAR® Partner, AOC International (Europe) GmbH has determined that this product meets the ENERGY STAR® guidelines for energy efficiency.
XGA 1024 X 768 60.023kHz 75.0Hz SXGA 1280 X 1024 64.0kHz 60.0Hz SXGA 1280 X 1024 74.4kHz 70.0Hz SXGA 1280 X 1024 77.9kHz 72.0Hz SXGA 1280 X 1024 80.0kHz 75.0Hz WXGA 1440 X 900 55.5kHz 60.0Hz WXGA 1440 X 900 70.6kHz 75.0Hz Pin Assignments Pin Number 15-Pin Side of the Signal Cable 1 2 3 4 5 6 7 8 9 10 11 12 13 14 15 Video-Red Video-Green Video-Blue N.C. Detect Cable GND-R GND-G GND-B +5V Ground N.C.
Warranty Statement LIMITED THREE-YEAR WARRANTY* AOC Color Monitors sold within Europe AOC International (Europe) GmbH warrants this product to be free from defects in material and workmanship for a period of Three (3) years after the original date of consumer purchase. During this period, AOC International (Europe) GmbH will, at its option, either repair the defective product with new or rebuilt parts, or replace it with a new or rebuilt product at no charge except as *stated below.
ALL EXPRESS AND IMPLIED WARRANTIES FOR THIS PRODUCT (INCLUDING THE WARRANTIES OF MERCHANTABILITY AND FITNESS FOR A PARTICULAR PURPOSE) ARE LIMITED IN DURATION TO A PERIOD OF THREE (3) YEARS FOR PARTS AND LABOR FROM THE ORIGINAL DATE OF CONSUMER PURCHASE. NO WARRANTIES (EITHER EXPRESSED OR IMPLIED) APPLY AFTER THIS PERIOD. AOC INTERNATIONAL (EUROPE) GMBH OBLIGATIONS AND YOUR REMEDIES HEREUNDER ARE SOLELY AND EXCLUSIVELY AS STATED HERE.