
Install Instructions


NEED HELP? GIVE US A CALL 833.232.9712
INSTALLATION GUIDE
2
7
PRECAUTIONS
Do
• Comply with all state, local, building,
plumbing, and electrical codes.
• Test your water quality with strips
provided. Optionally, obtain a report
on your water’s quality.
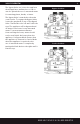
• Install water softener before
water heater.
• Install water softener after the pressure
tank on well water installations.
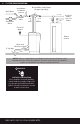
• Install a pressure-reducing valve if inlet
pressure exceeds 70 psi (4.8 bar).
• Examine inlet line to ensure water
will flow through it freely and confirm
inlet pipe is sized correctly. For well
water with iron, the recommended
minimum inlet pipe size is 3/4" (1.9 cm)
I.D. and for municipal water the
recommended minimum inlet pipe size
is 1/2" (1.27 cm) I.D.
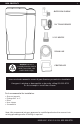
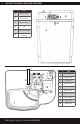
• Install a gravity drain on cabinet.
• Secure drain line on water softener and
at drain outlet. Due to high pressure,
clamps are recommended on drain line.
(see Installation Steps)
• Allow a minimum of 8 to 10' (2.4 to
3.0 m) of 3/4" (1.9 cm) pipe from the
outlet of water softener to the inlet of
water heater.
Do Not
• Install if checklist items are not compliant.
(see Checklist Before Installation)
• Install if incoming or outlet piping water
temperature exceeds 120° F (49° C).
(see Specifications)
• Allow soldering torch heat to be
transferred to valve components
or plastic parts when using optional
copper adapters.
• Over-tighten plastic fittings. Fittings can
be obtained at Lowe’s.
• Position water softener against a wall
that would prohibit access to plumbing.
(see Installation Steps)
• Install water softener backwards. Refer
to the arrows on inlet and outlet for
correct installation.
• Plug transformer into an outlet that is
activated by an On/Off switch.
• Connect drain and the overflow (gravity
drain) lines together.
• Use to treat water that is micro-
biologically unsafe or of unknown quality
without adequate disinfection before or
after the water softener.
• Allow your water softener or drain line
to freeze.