
Install Instructions


NEED HELP? GIVE US A CALL 833.232.9712
12
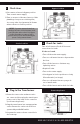
Connect Drain Line
NOTICE: Keep the drain line from being
kinked, crimped, or restricted in any way.
NOTICE: Drain line may require a hose clamp
to hold drain line in place.
INSTALLATION
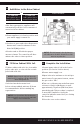
Gravity Overflow Elbow
Connect Drain Line
Connect Gravity Overflow
Connection
The overflow line drains away excess water
should the cabinet overfill or the water
softener malfunction. (see Gravity Overflow
Elbow) Ensure the overflow elbow is in the
down position.
The drain line carries away backwash water
as part of the regeneration cycle.
1 Using PTFE tape or plumber’s putty, screw
threaded drain fitting into drain end cap.
2 Connect drain line to drain end cap (see
Connect Drain Line) with a minimum 1/2"
(1.27 cm) I.D. tubing (supplied). This size
cannot be reduced.
3 Route drain line to a floor drain, laundry
tub, or other suitable waste receptacle.
Maintain a minimum 2" (5 cm) air gap
between drain line and flood level rim
of waste receptacle to prevent back
siphoning. This drain line should be the
shortest distance to the suitable drain.
4 Drain line may be elevated up to 8'
(2.4 m) from the discharge on the water
softener if water pressure in your system
is 40 psi (2.8 bar) or more.
5 If drain line is 25 feet (7.6 m) or longer,
increase drain line to 3/4" I.D. The end of
drain line must be equal to or lower in
height than the control valve.
5
6
Connect 1/2" (1.27 cm) I.D. tubing (size
cannot be reduced) between the overflow
fitting and a floor drain, laundry tub, or
other suitable waste receptacle. Note:
This tubing is not supplied with the water
softener. Ensure the overflow line ends
at a drain that is at least 3" (8 cm) lower
than the bottom of the overflow fitting.
Maintain a minimum 2" (5 cm) air gap
between the overflow line and the flood
level rim of the waste receptor to prevent
back-siphoning. The gravity line cannot be
run overhead.