Dear customer, Thank you for choosing cherubic products. Maybe you are familiar with 3D printing technology or have purchased Republican printers before, we still highly recommend that you read this manual carefully. The installation techniques-and precautions in this manual can help you avoid any unnecessary damage or frustration:. More information please refer to: 1. HTTP/ /www.anycubic.com Arrears website provides software, videos, models, after-sale service, ete.
Contents .
Safety Instructions Always fallow the safety instructions during assembly and usage;to avoid any unnecessary damage to the 30 printer or individual injury fl Please contact our customer service first if you have any issue after reeving the products. towards your hands. ANY CUBIC 3D printer and contact the technical support. CUBICAL superintendence moving parts that can cause injury. cautious when using the scraper.
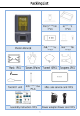
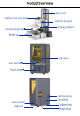
Product Overview Resin vat Platform securing knob.
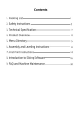
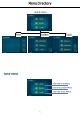
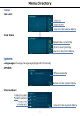
Menu Directory Print File List: Page up Page down Return to the Home Menu Click Files Delete the current gite Click to start printing Return to the Print Menu System Language: Change Service: Official website Return to the Shyster Menu Information: Product system System version Product 1D 1P Address Return tithe System Menu
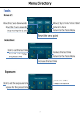
Menu Directory Tools Move Z: Move the Z axis-downwards Move Z by Move the Z axis upwards i Return ta Zero Stop macing the Z axis . Return tithe Tools Menu Detection: Click to set the test time Test LED and LCD for & . the preset time . Return to the Tools Menu Reduce anesthetist Increase the test time Exposure: .
Assembly and Leveling Instructions 1. Assembly instructions (1) Unpack the machine and remove the protective film outside. Then install the handle on the top cover. (2) Loosen the set screw on the printing platform with a Allen' wrench so the platform can be moved freely.
Assembly and Leveling Instructions in the power cord and turn _on the printer. Click “"Tools” — “Move the touchscreen to raise Z axis. Then install the platform. onto-the platform bracket and tighten the black platform securing knob on the top. Doter The printing platform-must be-well installed to the-end: 2. Leveling instructions (1) Tear off the protective film on the L.CD screen.
Assembly and Leveling Instructions (2} Ensure that the platform-is-aligned-in-every direction. Then put the leveling paper on the LCD screen. The platform must be aligned in every direction, (3) Then click the “TOOLS” = "MOVE 2" =" L Wait for the Z axis to descend and then it will stop automatically. 7 on the touch screen, (4) Use-fingers-to-press on top-of the platform gently, then tighten the screw on the right side of the platform.
Assembly and Leveling Instructions (5) Lastly, click the touch screen, and then click the pop-up window. Till now, the leveling process is finished. Click "Enter” again and pull out leveling paper. Make sure the platform is parallel to the 2K LCD screen. 3. Testing UV lights (1) Click on the touch screen to raise the platform-abeut120mm: {2) set the testing time, and then click the screen-as shown below. The 2K LCD screen should display @ complete image as shown below.
Assembly and Leveling Instructions seethe test time The detection result 4-stalling the resin vat Check and ensure the LCD screen and platform are clean and free of dust. Install the resin vat till it aligns with the two limit-screws on the panel. Finally tighten the adjustable nuts on both sides to secure the vat.
Assembly and Leveling Instructions 5. Installing the WI-Fl antenna Install the WI-Fi antenna on the back of the machine. And you can control the model printing via the application. For detailed instructions, please refer to “*Any cubic 3D User Manual” from the USB drive.
First Print Instructions Before minimize the first time frustration, please ensure (1) 2 axis-is-working fine; (2) the platform is-well leveled -and Ht with 2K-LCD screen; {3} the UV sight is functional properly. print Insert the USB memory {or the SD card with card reader) into the USB port. Then wear masks and gloves, slowly pour the resin into the vat until it reaches 1/3 volume of the vat. After that, close the door.
First Print Instructions 2. Handling models and residues After printing, wait until the resin stop dropping from the platform and then unscrew and remove the platform. The model can be removed by scrapper carefully. The removed model should be washed with ethanol vol% concentration. The printed model may need post curing overachieve better hardness by direct sunlight or UV-curing box.
Introduction to Slicing Software (1) -0 Open, save, undo and redo. @ -Model mirror, hollow and infill, punching, text paste and split model explained in the following parts. @ Click to switch the preset view. @ Switch between slice/machine settings and support settings. & Drag the slider to preview each layer of the model: % "3D model preview. @ Click to slice. ® Move, rotate, scale and layout. @ -Click to switch to the Configuration Mode. 3.
Introduction to Slicing Software (2) View Changing @ View changing by mouse + Zoom in/out: scroll the mouse wheel. ¢ Position change: left click the platform, hold on and move the mouse: « Change view angle: right click the platform, hold on and move the mouse. @ View changing by interface controls: click the arrow can change the viewing angle by S0%in its direction. Click the center icon and the view will be automatically zoomed in, Click again o show the top view.
Introduction to Slicing Software (3) Model Changing Move selected: click “move” icon, input a number or manipulate the controls can move the model. You also can center or reset the model, Rotate selected: click “rotate” icon, input'a number or manipulate the controls can rotate the model, You also can reset the model. Scale selected: click “scale”icon, inputs number or percentage or manipulate the controls can scale the model. You-also can settee model to-its maximum size.
Introduction to Slicing Software @ Model rotating: Choose-a larger facet as-the ground fitting platform, which can improve print success rate. g Check uff Click-on-the larger bottom of the model. @ Model scaling After setting the model to the maximum size, center it to avoid the model exceeding the print range.
Introduction to Slicing Software @ Center the model: Fix Maximum TS L ol Select the model and click "Duplicate”, then an identical model will- be-duplicated. (Those models may overlap) For multiple models, click ’X Side" or "Y Side", the models can be aligned in X orY direction.