Safety instruction Always follow the safety instructions during assembly and usage, to avoid any unnecessary damage to the machine or individual in fury Ragged GY of Please contact our customer service first if you have any issue after receiving the products. Be cautious when using the scraper. Never direct the scraper towards your hand. In case of emergency, please immediately cut off the power of ANY CUBIC 3D printer and contact the technical support.
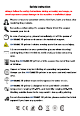
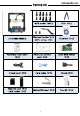
Contents Technical Specification Packing list Product Overview Menu Directory ooo Installation Install frame meme Leveling Printing test Filament iM mmm Test print Driver installation Cara installation Introduction to slicing software Manipulate 3D model in Cara settings Print online Print sme Printing Manual filament change Resume from outage eee FAQ
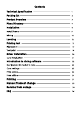
www.anycubic.com . oe , Technical Specification Printing Technology: FDM (Fused Deposition Modeling) Build Size: 210X 210X205 (mm3) Layer Resolution: mm Positioning Accuracy: X/Y 0.0125mm, Z 0.002mm Extrude Quantity: Single Nozzle/Filament Diameter: 0.
www.anycubic.
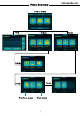
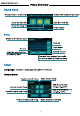
www.anycubic.com , Menu Directory Home menu Nozzle Temp /Target Temp EE Heated bed Temp/Target Temp Enter the tools list Enter the print list Enter the setup list Printer status .
, www.anycubic.com Menu Directory Motor: Disable all motors (only valid when machine is not printing) Speed: Decrease fan speed Increase fan speed Current fan speed Click to set fan Current print rate Click to set print Decrease print rate! Increase print rate Status: (the following with * is valid only for offline printing , i.e.
www.anycubic.
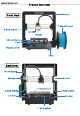
, , www.anycubic.com Installation section Installation section contains: Install the frame @Wiring @install the filament holder and filament Be cautions during assembly as some parts may have sharp edges. It is suggested to use a flat desktop and place the parts in an orderly manner for quick assembly. The color of some parts may be different from what in the manual, but the assembly is the same. Firmware has been per-uploaded to the motherboard.
www.anycubic.com , , Installation section 1. Install frame carefully lift the base to fit into the frame and fix them by 8 pieces of M5*8mm hex cap screws as shown in the red boxes.Fasten the screws when all the screws are per-installed. Figure 1 (2) Use two M3*5 screws to install the filament holder, then screw out two M3*5 screws that holding the frame to the base and fix the filament holder to the frame by these two M3*5 screws as shown in Fig.2.
, , www.anycubic.com Installation 2. Wiring (1) Fig.3, select the correct voltage mode according to your local voltage ratings (110V/220V). The switch is inside the bottom left of the base and 220V is default. Allan keys can be used to move the switch inside. 220V Figure 3 (2) There are 3 ports with different color (Red/Green/Black) at the bottom right side of the base, and there are 3 different color cable connectors respectively.
www.anycubic.com , , Installation section (3) Fig.5, customers may notice there is a ring of zip tie attached just below the plastic ring of the quick connector. Do not cut it off. Only cut this zip tie when swapping or repairing the ho tend. Figure 5 Please note: every units of the printer have been inspected and tested for actual printing. Therefore, in some cases, there might be very small marks left on the print head or on the heated bed.
www.anycubic.com Leveling Leveling the platform is a key step in 3D printing. Please follow the leveling procedures below to achieve proper leveling so the printed models could stay firmly on the printing platform and deliver good results.
www.anycubic.com . Leveling Step 3. Place a piece of A4 paper on the lower left corner of the printing platform, and manually move the printing head and platform back and forth to let the printing head to be above the lower left corner of the paper, as shown in oy Figure 8 Step 4. Tighten or loosen the adjustable nut underneath to adjust the distance between the nozzle and the platform to about the thickness of the the nozzle just touches the platform), as shown in Fig.9.
. www.anycubic.com Leveling Step 5. Follow step 4 to level the other three corners and the center of the platform, as shown in Fig.11. Figure 11 Step 6. Move the printing head and platform at the same time, so that the printing head can be moved in diagonal order, as shown in Fig.12. In the process of moving, check whether the distance between nozzle and printing platform is about a piece of paper thin or not. You may need to adjust the 5 points of the platform 1 or 2 times to check the leveling result.
www.anycubic.com Supplements to leveling: In some rare cases, after “Home All”, the nozzle can be still much lower than the platform, even after fully tighten the 4 nuts underneath. On the opposite, sometimes the nozzle is still too high from the platform, even after fully loosen the 4 nuts underneath. How to solve this: (1) Raise the nozzle by click “Axis” “10” on +Z column, adjust the 4 nuts under the platform, let the height in-between the support plate and the heated bed is ~15mm for all the 4 corners.
www.anycubic.com Leveling Tighten or loosen it (4) Click “Home” “Home all” to verify the results. After this, please level the platform again from Step 3.
www.anycubic.com Printing test 1. Filament in (1) Return to the home menu, click 10 times to rise the print head. (2) Return to the home menu, click “Tools"— “Filament” “Filament in”, and the interface as shown below will pop up, click “OK”. (3) Place the filament on filament holder, please note the direction of filament. Straighten the end of filament, pass the filament through filament sensor, and then press the handle on the extrude and push the filament in until it just goes in the whitey Teflon tubing.
.. www.anycubic.com Printing test Hand press Pass the filament Insert the filament through the filament into the extrude sensor Figure 14 (4)As shown in Fig. 15, slide the print head to the left, when the target temperature reached, click “Filament in” again, the extrude will automatically feed the filament in till the filament is melted through the nozzle. Now, click “Stop” on the screen, you may use tweezers to clean the nozzle. Figure 15 2.
www.anycubic.com Printing test There might be 3 kinds of results for the first layer of the test prints. A: Nozzle too close, lack of extrusion, the nozzle rub against the platform. Slowly tighten the corresponding nuts underneath by half circle or level again. Nozzle too close Filament B: Proper nozzle height, good extrusion and adhesion. Proper nozzle height Filament C: Nozzle too high, Large gap, filaments are not even adhere to the platform.
. . . www.anycubic.com Driver installation There are two operation mode for MEGA S 3D printer, print offline (via SD card) and print online (controlled by PC via USB). Print offline: After leveling the platform, insert SD card, click “Print” at the Home menu and select a file to print. Print online: Install driver to bridging PC and machine, and install Cara to control the machine via USB port.
www.anycubic.com . , Driver installation @ : ’ Cr ores into ua Be Aster I Goren Bo in CREST get Fins the directory of LP2L02 a COM appears in Parts Ed Figure 18 After successfully installation, a Com would appear in the Ports of Device Manager, x is random (as here is COM, customers will have their own Com depends on their PC. This Com port will be used for communication between the printer and PC later.
www.anycubic.com Introduction to slicing software Rise 2 a Other machine information a Cara Ready! @ The Slang rk Sofia Tme poo ars wah Grin no rad de abed Riga shi is a iss gin ged vid es Wheatstone eer Eki bias isn eT zonal Bar ks Burundi Seeker XU Figure 20 Upon finish, open Cara for the first time, there might be a default robot model appears, customers may click “File” “Clear platform” to delete it.
. . www.anycubic.com Introduction to slicing software > Lay flat: it is very important to ensure the flat portion of the model is well attached to the platform. So, please use Lay Flat option every time after rotating the model, as it will minimize the adhesion issues during printing. (Fig. 21) >Reset: click it to return the model to the original orientation. . grue 21 . (5) Scale: to uniformly scale the model along X/Y/Z dimensions.
www.anycubic.com , . Introduction to slicing software Cara settings (1) Machine settings Refer to Fig. 24, click settings” to input those suggested parameters into the corresponding column. Please choose the Serial Port (COM) as shown in your PC—Device Manager—Port (refer to Fig. 18 customers may have a different Com other than the example COM, and set the Baud rate to Those two parameters are essential for Cara to connect to the printer.
Introduction to slicing software www.anycubic.com Layer height [ren) Shelf thickness fmm} Enable retraction Fill Fi Density Speed and Temperature Bettors! Top thickness (rd): 1.2 int speed {en} 56 Printing temperature [C5] 200 Bad detergent (CO) Hl Support Support type [a Platform adhesion type Sine Filament Determiner fem} EPR Flow (3) nog Machine Hurdle size frm} 0.4 Spar {romps) stance nv] Trial Var Thickness {ore} Antisocial yer be with (36) Cut off abattoir {mn} Pat extrusion overlap { Speed 50.
www.anycubic.com —— Introduction to slicing Ebert con fig * Support Sei Saab dubbing Slang igs Ti Poitier Rival Putin Saris reacting ven) i snot 4) 2 hon when section Toe) tree NAY {me hat Leiden 2 ting he cot Tack Manic Shit fence ini Toke he Sir rum Dit Toke mast Eu ace Hi gts ae 156 1 Som ool Sem ine ima: Fan Bak an at nod fel Fai kee fo {341 far fan inset a ae) Ft wan to Line api (a Msn pee frost Son nest If: Bass this phone) in San in iy men) Sold ln Intel ties fn URE hen Testis ve wil fer i pots roo.
www.anycubic.com , . Introduction to slicing software “Tweak at Z"” would allow custom changes at specified Z height. Customers may decide the Z height or layer counts at which to make a change. Then there are more settings for how you would like to change, such as temperature, fan speed and print speed. Fine tune those for specific model would produce better results. If wish to delete the plugins, stay mouse at the edge, hold the left button and drag mouse to show the Delete icon.
. . www.anycubic.com Introduction to slicing software Print online by Cara After parameter settings, customer can print online by Cara with USB connection. Click enter the printing popup window (Fig. 28). (If a simplified version of printing window appears, please click “File” to choose the ‘Interface UI’ in the "Printing window type” drop-down menu) Click “Print” icon when it is available after auto connect with the printer.
www.anycubic.com Printing Here shows the steps of printing offline (via SD card), print online please refer to Page 22. 1. As shown below, click “Preheat” “Preheat PLA (for example)” Fig.29. Figure 29 2. After the per-heat is finished, please click on Home screen “Tools”-> “Filament” “Filament The extrude motor will start to feed the filament into the ho tend.
www.anycubic.com Printing 4. Upon finishing, the print head and heated bed will be automatically cooling down. Only remove the printed object from the heated bed when it is cooled completely. Pull the print platform to the front side, and use scraper to carefully remove the object as shown in Fig.32. Never direct scarper to your hands. Please be mindful that the nozzle and heated bed are still hot after operation. Figure 32 5.
www.anycubic.com Manual filament change 1.Feed the filament: click via the Home menu: “Tools"-> “Preheat” “Preheat PLA (for example)” . After it reaches to the target temperature, press down the handle at the extrude as shown in Fig.33, and manually push the filament through the Teflon tubing till the ho tend and there should be filament melt through the nozzle. Make sure the filament passes through the filament sensor first before reaching into the extrude.
www.anycubic.com Resume from outage MEGA S allows resume print after accidentally power loss (This function only valid when print offline, via memory card only). 1. As shown in in slicing software (i.e. Curare, it is required to place the model at the rear of the platform. Because during “RESUME”, machine will home first and could touch/interfere with the unfinished object if the model was placed in the front area. 2.
www.anycubic.com Resume from outage 3. During printing, if there is an accident power loss, the print will stop immediately. But after power comes back, customers could choose “Print” — select the unfinished file— machine will home first and continuing on the unfinished object. Figure 37 Mote: @ In order to get smooth surface, use tweezers to carefully remove the excessive filament at nozzle before continuing print upon the last point. ® Do not move Z axis after power off otherwise resume will be invalid.