Dear customer, Thank you for choosing anaerobic products. Maybe you are familiar with laser engraving technology or have purchased cubical printers before, we still highly recommend that you read this manual carefully. The installation techniques and precautions in this manual can help you avoid any unnecessary damage or frustration. More information please refer to : 1. ANY CUBIC website provides software, videos, models, after-sale service, etc.
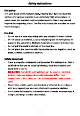
Safety Instructions The safety instructions as shown below must be read first before you use the machine. The company is not responsible for the individual injury caused by improper operations. Before Using « Please wear laser protection glasses when the machine is in the laser engraving mode. Make sure your protection glasses are certified for use with class 4 Lasers. ATTENTION: The glasses are not made to look into the laser for a long time, but just to protect you from an accidental radiation.
Safety Instructions Fire Safety The laser head which features high-intensity blue light can heat the surface of engraved material to an extremely high temperature. In some cases, the material may be ignited and the flame may spread beyond the engraving areas. The fire may destroy the machine or cause more damages. Fire Risk Do not use the laser engraving with any material it doesn't allow. Do not stack up material, such as engraving two or more pieces of paper at the same time.
Safety Instructions It is normal that a small flame appears when a laser beam irradiates the material. The flame should follow the laser and disappear while the laser travel forward. If a flame keeps burning on material: ® Turn off the machine and pull the plug. @ Put out the fire with a wet towel or a fire extinguisher when it is necessary. @ If the fire cannot be extinguished or spreads out of the machine, please call local emergency number (e.g. 998) and evacuate from the buildings.
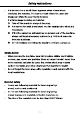
Safety Instructions Laser Safety The laser can damage your eyes and skin, we provide a pair of protection glasses to protect your eyes. Please wear protection glasses when the machine is in the laser engraving mode. Keep safe distance of at least 1 meter from the machine when it works. Warning Do not look at the laser directly with naked eyes. The modification or repair of the machine without permission may cause laser radiation. Do not run the machine unattended.
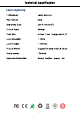
Technical Specification Laser engraving Technology: Laser engrave File Format: bmp Engraving Size: 220X140 (mm?) Picture Type: bitmap Pixel Size: mm (suggested 0.1) Laser Intensity: 1-100% Laser Height: 1-100mm Picture Mirror: Suggest to keep default value Rated power: 1500mw Supported Materials: Wood, leather, paper, etc.
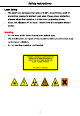
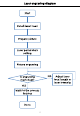
Laser engraving diagram | Start | Install laser head Prepare picture Laser parameters setting Picture engraving s engraving mark clear? YES Wait for the process finishes on NO Adjust laser focal length or laser intensity
Laser engraving Attention: @® Iris recommended to set laser intensity to 15% and laser height to 25mm for engraving Kraft paper we provided; set to 25% and 52mm for engraving wooden board we provided. @ Laser engraving is designed to be used within ambient temperature ranging Working outside this limit may result in low quality engraving. ®@ When switching working modes (3D printing mode and laser engraving mode), you must first power off the machine, then swap the corresponding cables on the green port.
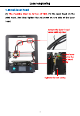
Laser engraving 1. install laser head (1) The machine must be turned off first. Fix the laser head on the print head. And then tighten the set screw on one side of the laser head. Secure the laser head cable with zip ties ha Tighten the set screw.
Laser engraving (2) Remove the green connector at the base. After that, connect the laser head's cable to this green port. ead cable connector stinting line 2. Prepare picture The test file “landscape” which can be engraved directly has been reloaded to the memory card. (1) Open the picture by a Image processing software (such as Paint, Photo shop, etc.).
Laser engraving (2) Set the picture pixels. (The picture pixel is <£ 2200 X 1400) hi Reggie Sale Ea Resize and Skew Rene By [Percentage ®) Marvels + Horizontal Maintain aspect ratio (3) Save the picture to memory card as “bmp” format.
Laser engraving 3. Laser parameters setting (1) Choose the bmp file. Laser intensity: Laser Height: Pel Lee: The larger the laser intensity value, the darker the gray scale part of the picture. It is recommended to set 15 for Kraft paper and 25 for wooden board. The distance between laser head and printing platform. It is recommended to set 50 for Kraft paper and 52 for wooden board. The size of each pixel of the picture. The recommended setting is 0.1.
Laser engraving Cloture “NO” and 'X EN’ Mirror: “X EN": The picture will be mirrored in X direction. Picture “NO” and “YEN" Mirror: The picture will be mirrored in Y direction. 4, Picture engraving (1) wear protective glasses. Place a Kraft paper on the platform, then click “Laser Indication”, the laser head would travel square to show the working area. You may need to adjust the position of the Kraft paper to place it inside the working area. Then tape the Kraft paper to the platform.
Laser engraving 3: Print head does not move after clicking “Laser Indication” or “Start engraving”. A: The machine needs time to process the picture. If there are blank area around the picture, the machine may spend more time to process the blank area before actually start from the first gray pixel. The blank space around the picture should be minimized to reduce the time it takes before start. 5.
Laser engraving / ‘Minimum light spot Laser head nut (2) Adjustment of the laser intensity Adjust the Laser intensity during the engraving process. Click the screen to return to the main menu, and then click “Setup” — “Laser” — “Laser Intensity”.
Laser engraving Thank you for purchasing cubical products! Under normal usage and service, the products have a warranty period up to one year. Please visit antigenic official to report any issues with eugenics products. Our professional after-sale service team would response within 24 hours and solve the issue.