About uICE Overview uICE enables complete control of your Windows system with handheld remote controls, standard and multimedia keyboards, wireless or wired. Use uICE to remote-control multimedia applications like Windows Media Player, Winamp or other MP3 players, your favorite DVD/DivX video player or TV viewer, or presentation software like Microsoft Powerpoint. uICE is a versatile all-in-one interface between an input device and any kind of software application.
Online registration Online registration is available through the ShareIt! registration service. We accept all major credit cards like Mastercard/Eurocard, Visa, American Express and Diner's Club online via a VeriSign secured SSL web interface. Credit card orders are usually processed within a maximum of 48 hours. Offline registration If you don't like to use your credit card number online, you have the option to use bank transfer/wire transfer, Checks or Money Orders through postal mail.
l You may also store or install a copy of the software on a storage device, such as a network server, used only to install or run the software on your other computers over an internal network. However, you must acquire and dedicate a license for each separate computer on which the software is installed or run from the storage device. l The unregistered shareware version of the software may be freely distributed, provided the distribution package is not modified.
Quickstart uICE features a Setup Guide which explains the basic concepts of the user interface and setup steps. To start the guide, select Help|Setup Guide from the uICE main menu. For more detailed information, follow the steps below. 1. Select your hardware 2. Configure the hardware 3. Learn the buttons of your remote control 4. Associate actions with the buttons 5.
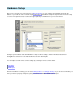
Device Selection This should be your first step in setting up uICE. Select your remote control receiver device from the list. The Info button pops up information as well as configuration tips about the selected driver. If you'd like to use Hotkeys without a remote control, select Keyboard. If you'd like to use both a keyboard and a remote control, select your receiver device from the list. The Hotkey functionality is always available.
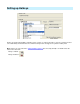
General Options Customize the general behaviour of uICE. All options are per-user settings. Start with Windows Enable this checkbox to let uICE automatically start with Windows. Hide on startup Enable this checkbox to automatically hide the main window when uICE starts up. Disable exit confirmation By default, uICE asks if you really want to exit when you click the Exit button. Exiting uICE means that all remote control functions as well as any active sleep- or wake-up timers get disabled.
Leave window focus after keystroke The basic keystroke actions (Keystroke to application, Keystroke to window) require a window (or application) to be put into foreground before it can accept a keystroke. uICE uses a mechanism to restore the window order on the desktop to its previous state a few seconds after the keystroke, which has certain performance issues on slower machines.
TCP/IP Server Configure the built-in TCP/IP server. Usually you won't need to adjust these settings, except for three cases: l You want to use a remote control client (e.g. the Winamp plugin) on another computer located somewhere in your home network or the Internet. In this case, enable the Make server available to other machines checkbox. l Another application is using the server's default port, preventing the server from starting up (you'd see a message in the status bar).
Hardware Setup After you've selected your receiver device at General Config, you can configure the hardware and learn the buttons of your remote control or define keyboard Hotkeys at Hardware Setup. The figure below shows the setup screen for TV capture boards, note that the upper part may look different for your receiver device. Configure your hardware and click Initialize.
Setting up Hotkeys Hotkeys are defined at Hardware Setup like remote controls. To add a new Hotkey, open the context menu and select Add Hotkey Command. Give the command a unique name and type the key into the Hotkey field.
Learning buttons Before you can start using your remote control, you need to learn in the buttons so they can be translated into commands. Note that some devices have their buttons already prelearned, in this case you can skip this topic and proceed to the Actions chapter. The Commands section provide a context menu to add and edit buttons or remote control folders. Right-click the treeview to open the menu. 1. Add a remote control folder. From the context menu, select New Remote Control .
If you rename buttons or remote controls at Hardware Setup and have associated actions or On-Screen Menu commands, uICE automatically applies the new name to the affected commands. Deleting learned buttons or remote controls does not modify any actions. Common buttons uICE is partially self-configuring when using the Batch Learn mode shown above. The following table lists the Batch Learn mode buttons and their default functionality.
Keyboard This driver is a generic driver for standard and multimedia keyboards*, wireless or wired. Select this driver if you don't have a supported remote control. Keyboard Hotkeys are always available, even if you have another remote control device selected. Important: The Hotkey Enable toggle key, configurable at General Config|Device Selection, enables or disables keyboard Hotkey handling. If you select the Scroll Lock key (the default) for example, Hotkeys are active if Scroll Lock is on.
ATI Remote Wonder This driver supports the ATI Remote Wonder shipped as add-on for Radeon 7500/8500 and stand-alone. Configuration Click the Initialize button to detect the hardware. Important: uICE takes complete control over the remote control, therefore the ATI remote control application (ATIX10.EXE) should not be running at the same time as it would interfere. If a running ATIX10.exe instance gets detected by the driver, it will be closed on device initialization and restarted after exiting uICE.
WEB Launch default browser / Go to homepage n/a Toggle left mouse button for Drag&Drop Volume up/down Previous/Next track (requires support in foreground application) MUTE Next/Previous Track (if applicable) Next/Previous track (if applicable) Mute Numeric keys ...
Cancel (ESC key) Cancel (ESC key) Toggle Crossfade n/a n/a Toggle Repeat (WMP 7/8 only) Toggle Repeat n/a Toggle Shuffle (WMP 7/8 only) Toggle Shuffle
Logitech OEM (AST, NEC, IBM) Configuration Select the COM port where the device is attached. Click the Advanced button to enable or disable the mousepad.
Irman Configuration Select the COM port where Irman is attached.
UIR (Universal Infrared Receiver) The UIR is a home-brew receiver device. With a bit of soldering experience, you can easily build it yourself. Visit the UIR website for circuit diagrams and PCB layouts. Configuration Select the COM port where UIR is attached.
Packard Bell Fast Media Configuration Select the COM port where the device is attached. Note that the Fast Media driver must not be installed.
Anir Multimedia Magic Configuration Select the COM port where the device is attached. Note that the original Animax driver must not be installed.
Creative Live!Drive IR This driver supports the Live!Drive IR and AudigyDrive that comes with Soundblaster Live! Platinum and Audigy Platinum soundcards. Configuration Click the Initialize button to startup the Live!Drive. Depending on your system's hardware configuration, you may need to switch the driver to another Input Port. If uICE doesn't receive input from the remote control, try another port.
Soundblaster Extigy This driver supports the Soundblaster Extigy remote control (RM-1000). Configuration Click the Initialize button to detect the device. Important: The Windows drivers for the Soundblaster Extigy, available at www.soundblaster.com, have to be properly installed. The RemoteCenter software is not required and should be disabled while uICE is running. Default Actions The following table shows the default button functions. You can change this functionality at Actions.
application) Slow n/a Toggle Repeat (WMP 7/8 only) Toggle Repeat Previous Track Next Track Previous/Next Track (requires support in forground application) Previous/Next Track (if applicable) Previous/Next Track (if applicable) Step n/a WMP 6: Preview Toggle Shuffle WMP 7/8: Toggle Shuffle EAX Audio Mode (Treble, Bass, Panning, Fader) Options Show/Hide OSM File Browser Display Show/Hide OSM Application Selector Return Cancel (ESC key) Start/Menu Toggle Crossfade Show/Hide On-Screen Me
Pinnacle PCTV This driver supports remote controls from Pinnacle Systems' PCTV product line (PCTV/PCTV Pro/PCTV Sat). Many third-party remote controls should work as well with the PCTV receiver. Configuration Select the COM port where the device is attached. More Information The default configuration supports the current 41-button remote control. For older PCTV models, you may need to relearn the buttons.
WinFast TV2000 XP Deluxe This driver supports remote controls from Leadtek WinFast TV2000 XP PCI TV cards. Configuration Click the Initialize button to detect the hardware. Important: only the CH+/- and VOL+/- buttons support repeated commands. Default Actions The following table shows the default button functions. You can change this functionality at Actions.
Green n/a Toggle Shuffle (WMP 7/8 only) Toggle Shuffle Yellow n/a n/a Toggle Crossfade Blue n/a 0..9 Numeric keys FineTune +/- n/a PIP n/a WMP 7/8: Skin/Full Mode n/a WMP 6: Preview Recall Cancel (ESC key) Enter OK (ENTER key) .
Magic TView (CPH051, CPH061) This driver supports remote controls from Askey/Anubis/Typhoon Magic TView (CPH051/CPH061) PCI TV cards. Configuration Click the Initialize button to detect the hardware.
FlyVideo 3000 This driver supports the remote control from Lifeview FlyVideo 3000 (Philips chipset based) PCI TV cards. Configuration Click the Initialize button to detect the hardware. Default Actions The following table shows the default button functions. You can change this functionality at Actions.
2 Numeric key Previous Track (if applicable) Previous Track (if applicable) 3 Numeric key Toggle Shuffle (WMP 7/8 only) Toggle Shuffle 4 Numeric key Rewind (if applicable) Rewind 5 Numeric key Stop Stop 6 Numeric key Forward (if applicable) Forward 7 Numeric key n/a Toggle Crossfade 8 Numeric key Next Track (if applicable) Next Track (if applicable) 9 Numeric key n/a n/a 0 Numeric key Stop Stop Recall Show/Hide On-Screen Menu Menu Select in On-Screen Menu mode Enter Pl
TV Capture Board This is a generic driver which supports many BT8xx based TV capture boards with built-in infrared receiver hardware. TV cards with an external, serial port based receiver device are not supported by this driver. Use the Generic Serial IR Receiver device instead. Configuration Click the Setup button to start the configuration wizard and follow the instructions. The wizard configures the driver to understand the signals from your TV card.
Hauppauge WinTV Configuration Click the Initialize button to detect the hardware.
WinLIRC The WinLIRC driver does not directly access hardware, but works as a TCP/IP client connecting to the WinLIRC server. For information on how to get WinLIRC and supported hardware, visit the WinLIRC and the LIRC homepage. WinLIRC Step-By-Step l Start WinLIRC and learn a remote control as usual.
Generic DCD Line Device This is a generic driver for serial port remote control receivers sending bit streams through the RLSD (Receive Line Signal Detect) / DCD (Data Carrier Detect) line. One example device using this technology is the basic home-made LIRC / WinLIRC receiver. You can find schematics for this hardware at the LIRC Project website. All decoding of the bit stream is done in software, therefore accurate timer hardware is required and a fast computer is recommended.
LIRC Basic Device The LIRC Basic Device is a home-brew receiver device. With a bit of soldering experience, you can easily build it yourself. Visit the LIRC Project website for circuit diagrams. Configuration Select the COM port where the device is attached.
Generic Serial IR Receiver The Generic Serial IR Receiver is a generic serial port driver with adjustable settings for devices which conform to the RS-232 protocol standard. Configuration Select the COM port where the device is attached. The Setup button opens the driver configuration dialog with the following three property pages: l Port Settings Adjust the COM port settings.
Reinitialize every xx sec If your receiver doesn't respond any more after some time, enable this to reinitialize the device every xx seconds. This option may cause certain performance issues on some hardware configurations. You should leave it disabled if your device operates properly. If you need to turn it on, disable it when burning CDs or running similar applications.
miroMEDIA Remote Configuration Select the COM port where the device is attached.
REALmagic Hollywood Plus Remote Control Configuration Select the COM port where the device is attached.
Redlink 105 TV Configuration Select the COM port where the device is attached.
Silitek SM-1000 Configuration Select the COM port where the device is attached.
URCR 1.2 The URCR is a home-brew receiver device. With a bit of soldering experience, you can easily build it yourself. Visit the URCR website for circuit diagrams and PCB layouts. Configuration Select the COM port where the device is attached.
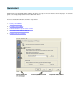
USB Human Interface Device This is a generic driver for USB Human Interface Devices (HID) that appear in Windows Device Manager like the following: HIDs can be any kind of input devices like remote controls, keyboards, game pads and mice, usually connected to one of the PC's USB ports. Configuration If you have more than one USB Human Interface Device installed in your system, click Setup to select your remote control device.
Other Devices If you have another device not mentioned in the list, it is still possible that it works with one of the device plugins. First, find out how your device is connected to the computer. If it is plugged into a serial port, you have a fair chance that it will work with either the Generic Serial IR Receiver or the Generic DCD Line Device.
About Actions To control applications and perform various system tasks, uICE provides a set of functions, called Actions. One or more actions can be combined into a layout and associated with a command. The command, sent from the hardware layer in uICE when you press a button on your remote control, triggers the active layout and starts execution of the contained action(s).
2. The execution layer locates the command and its associated layout(s) in the tree and determines the active layout (there's only one in this case). 3. The active layout executes its action(s). The next topic shows how to define remote control folders, add and edit commands .
Adding and editing commands The Actions treeview provides a context menu to add, delete and edit commands. Right click the treeview to open the menu. 1. Add a remote control folder. From the context menu, select New Remote. 2. Give the folder the same name as in Hardware Setup. You can select it from the dropdown box, or just press a button on the remote control (if the hardware is already initialized). 3. Right click the remote control folder and select New Command. 4.
Defining Actions To add actions to a layout, use the toolbar left to the actions list or select from the context menu. You will now see the Action Definition window: Name You can give the action a descriptive name. By default, uICE automatically fills in the label of the selected action. Action Select from the available actions. All actions and their parameters are explained in the Reference chapter.
Actions usually require one or more parameters. The easily define parameters. buttons right the the parameter fields open assitants to The Delay checkbox, available for the second and all following actions in a layout, tells the execution engine to pause for an adjustable amount of milliseconds (ms) between the execution of two actions. If you apply a delay of 1000ms to the second action, the first action get executed, and then the execution will pause for one second before processing the second action.
The Startup Macro uICE supports a special, predefined remote control folder, the Startup Macro. You can add one single-layout command to this folder, with as much actions as you like. All actions of this command get executed immediately after starting uICE. The next chapters introduce two important parameters used in several actions: Window Paths, to reference a certain window on the desktop, and Window Messages, Microsoft Windows' basic communication architecture.
Window Paths Several actions operate on certain desktop windows, like PostMessage or Keystroke to window. The Operating System identifies windows on the desktop using a unique numerical value, called a window handle. These handles are only valid for the life cycle of a window (i.e. the same window gets a different handle if you close and reopen it). To be able to identify a window even between two sessions, uICE uses a different approach, called window paths .
Fig.2 Now the window path would change to IEXPLORE.EXE\Register uICE - Microsoft Internet Explorer (IEFrame). For applications that change their window titles at runtime, uICE supports wildcards (*,?). You can substitute the changing part of the window path, like in IE's case: IEXPLORE.EXE\* - Microsoft Internet Explorer (IEFrame). Now IE's main window can be identified regardless of the website's title. Note: There are still certain limitations in window paths.
Introduction to window messages This chapter will show you a bit of the backgrounds behind Microsoft Windows' basic communication mechanism: window messages. Windows based applications are event driven, i.e. they get notifications and informations from the Operating System about occured events (e.g. user input events like typing, mouse movements and mouse clicks, selection of menu items or button clicks) in form of a special system structure, called a message.
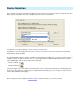
l uICE now shows the running applications on their windows organized in a tree. Find Internet Explorer's executable (IEXPLORE.EXE) and select it. If you use the autoselect feature (i.e. moving the mouse cursor over the window and hitting F2 on the keyboard), uICE will automatically select the window beneath the mouse cursor, which is usually one of the main window's child windows. For this example, select the executable to let uICE monitor Internet Explorer's complete message traffic.
The advantage of using keystroke messages over one of the keystroke actions is, that uICE does not need to change the window order on the desktop, which saves processing time. Each application is responsible to handle keystroke messages properly. Some applications however monitor the keyboard hardware itself, which can't be simulated with messages. For these applications, you'll need to use one of the Keystroke actions.
Execute/Close applications To select a file, click the button right to the Filename field. Environment variables in the form %WINDIR% are supported for file system paths. Tip: It is always a good idea to close applications using the PostMessage action instead of Close application. Several applications have their own procedure to shut itself down and release resources and hardware they might be using, while Close application sends a generic Windows command to the program that it should close.
Maximize current window Maximize the window currently in front of the screen. The next button push will restore the window to its normal size. No parameters. Close current window Close the window currently in front of the screen. No parameters. Switch to window Puts the specified window into foreground. Field Required ? Value Window Yes Path to window. Press the windows. button to select from currently open Cycle through windows Opens the Windows Task Manager.
Filename Yes Filename of application. A path is not required. Minimize application Minimize an application's main window. The next button push will restore the window to its normal size. Field Required ? Value Filename Yes Filename of application to minimize. A path is not required. Maximize application Maximize an application's main window. The next button push will restore the window to its normal size. Field Required ? Value Filename Yes Filename of application to maximize.
Field Required ? Value Filename Yes Filename of application. A path is not required. Keystroke Yes Keystroke definition. Click to open the keystroke helper. uICE tries to send keystrokes to the application's main window. If the application's main window was not created by its executable file image, uICE cannot determine the proper window from the file name. Many applications also create more than one top-level window, so uICE needs to "guess" the correct window.
the number has to start with "0x" (without the quotation marks). l To simulate the ALT, SHIFT or CTRL key along with another key, type the leading character (A, S or C) of the key enclosed in brackets { }, followed by the key that shall be pressed with one of those keys. The ALT, SHIFT and CTRL statement is only valid for the next following key. l It is not necessary to use the {S} statement to get readable upper case characters like 'A'. {S}a is the same as just A.
Before using this action, test your system by saving all open documents and putting it into standby mode manually. Many badly written device drivers may prevent the system from waking up again properly. Turn off display Switches the display into energy saving mode. Multi-monitor configurations are not supported. No parameters. Change Display Mode Change the current display mode. The dropdown box lists the available modes.
Field Required ? Value Mixer Yes Select the output line from the dropdown list Accel No Acceleration level ( 1..20 ). Adjust this value to let the volume decrease more ore less faster. If not applied, a default acceleration level is used. Mute Mutes / Unmutes a mixer line. Field Required ? Value Mixer Yes Select the output line from the dropdown list Record Volume Increase or decrease the volume of a record mixer line.
specific window. Click the Position Yes button to open the position wizard. Position coordinates. These are logical coordinates (0..65535) to be independent of screen resolution. Use the position wizard to easily apply the correct coordinates. Roll Mouse Wheel Rolls the mouse wheel. Field Required ? Value Direction Yes Roll direction (Up/Down) Accel No The acceleration level ( 1..255 ). Adjust this value to let the wheel roll more or less faster. Click Mouse Button Clicks a mouse button.
No parameters. Open Location Opens a web location in the default browser. Field Required ? Value Location Yes The location's URL ( e.g. http://www.mediatexx.com ) Window messages PostMessage uICE can capture and re-send messages sent to application windows. This feature is able to simulate the selection of menu items, push-button clicks, mouse (double-)clicks and keystrokes without changing the window order on the desktop.
Switch Layout Switch command into another layout. If Switch all command layouts simultaneously is enabled for application presets, this will switch all other commands into the corresponding layout as well, e.g. switching to the second layout switches all other commands of the same application preset to the second layout (regardless of layout names). Field Required ? Value Layout Yes Select from available layouts. Set active application Set the active application preset.
Menu Item Yes Select the menu page to go to.
Overview The amount of remote control buttons is usually quite limited. Common remote controls have only 20-30 buttons, which is just not enough to control the numerous functions of today's software technology. To overcome these limitations, uICE provides two unique features that allow assignment of different functions to a single remote control button. Application-specific Commands You can organize buttons/commands in application presets.
Application Presets Application presets contain command sets with actions specific for an application. These commands get executed only if the respective application is running and active . To add an application preset, right click the remote control label in the tree and select New Application from the context menu. You can now type a descriptive name for the application (this name will be used for On-Screen Menu items), or select one of the preconfigured applications from the dropdown box.
preset to be switched into a corresponding layout. Example: if you switch button '0' into the second layout, all other commands will also be switched into their second layout (regardless of layout names). This option is useful to define complete command sets for different application modes that require different actions for each mode, such as viewing and browsing pictures.
Multi-Layout Commands A layout is a container for one or more actions. The actions contained in a layout get executed one after the other whenever a command was received from the remote control. Multi-Layout Commands offer the ability to assign multiple action sets to a single command. Each layout is independent from other layouts, only the actions contained in the currently active layout get executed.
l The second time the Favourites command gets executed, the toolbar closes and the Switch Layout action within the Browse Location layout switches all commands back to their first layout.
About OSDs and the On-Screen Menu uICE provides On-Screen Displays (OSD) and an On-Screen Menu (OSM) similar to those known from TV sets. By default, every executed command displays an OSD, either with special information like for volume control or containing the button name and the actual layout name. OSD windows can be disabled for certain actions by checking the Disable OSD box in the command definition.
On-Screen Menu items Applications The Applications submenu lists the configured application presets. When selecting one of the applications, uICE executes it (if it's not yet running) or brings its main window to the front. Once the application is selected, the commands of its preset become active. To control another application, select it from the Applications submenu. The commands of the previously active application get disabled, and the commands of the selected application become active.
Menu Commands To navigate between On-Screen Menu (OSM) items, uICE uses the commands from Hardware Setup. The Menu Commands page lets you assign commands to menu navigation actions like up, down, left and right. Only the Menu/Back command is reserved to bring up the OSM, all other commands are still available for use at Actions and only active if the OSM is visible. Menu Action Menu/Back Description Enters On-Screen Menu mode.
Visual Style The Visual Style page lets you customize colors, font and background for the On-Screen Menu (OSM) as well as position and display duration for other On-Screen Displays (OSD). Transparency Set the transparency of OSDs and OSM. Transparent/translucent backgrounds are only available in Windows 2000 or higher. Background Set the background color of OSDs and OSM. Selection Mark Customize the color of the OSM's selection mark. Click the colored field to select a color.
About Scripts uICE provides full support for Active Scripting, Windows' built-in, language independent scripting features. Similar to creating dynamic web pages with Javascript/JScript or VBScript, you can let commands execute script operations to combine uICE actions with the raw power of a full programming language - without the need of a compiler. To run a script, use the Run Script action under Engine actions.
wmp6.Filename=Env("windir")+"\\media\\tada.wav"; wmp6.Play(); The following sections describe the uICE object model, assuming that you're reasonably familiar with writing scripts. For tutorials and reference material on scripting languages, visit the MSDN library at msdn.microsoft.com or use one of the innumerous resources available on the web. Let's start with the top-level object, called - guess what - uICE.
Application Command Display Globals Mixer Mouse OSD Power Window Properties and methods specific to executable files Properties of the currently executing command Display adapter operations Access to global variables Audio control Mouse control Programmable OSD Power functions like system shutdown and wake-up Properties and methods specific to windows Alert method Displays a text-only OSD Alert( sText ) Arguments sText Required. Text string to display in the OSD.
sLocation Optional. The name of the network server where the object is to be created. Remarks This method creates an instance of the automation server specified in sProgIDorClassID. Only local-server or remoteserver instances are created, i.e. automation servers running in its own executable. sProgIDorClassID can be a ProgID, or a CLSID in the form "{xxxxxxxx-xxxx-xxxx-xxxx-xxxxxxxxxxxx}". JScript example: wmp6=CreateObject("MediaPlayer.MediaPlayer"); //create an instance of Windows Media Player 6 wmp6.
KillTimer( sTimerName ) Arguments sTimerName Required. The name of a running timer. Remarks This method cancels a timer that has been set previously by a call to SetTimer. The timer function will not be called, and the script that called SetTimer will be released. This method can be called from any script, not only from the script that set the timer. See Also SetTimer LoadConfiguration method Displays a text-only OSD LoadConfiguration( sConfigurationName ) Arguments sConfigurationName Required.
SetTimer method Set a timer SetTimer( sTimerName, nTimeOut ) Arguments sTimerName Required. The timer name nTimeOut Required. TimeOut value in milliseconds. Remarks After a timer runs out (i.e. after nTimeOut milliseconds), a function in the script with the same name as sTimerName is called. After calling the SetTimer method, the script remains in memory (including all variables) until the timer runs out or the KillTimer method is called.
Arguments nMilliSecs Required. Amount of time, in milliseconds, to suspend execution. Application Object The Application object provides properties and methods specific to executable files Application( [sNameOrFile] ) Arguments sNameOrFile Optional. Either the name of an existing Application Preset or a path and file name. Remarks If sNameOrFile is omitted, an object representing the application preset of the current command is returned.
Execute( [sCmdLine] [, sVerb] ) Executes the file contained in the File property. Same as setting the Running property to true, except you can optionally supply a command line and/or a shell verb Arguments sCmdLine Optional command line sVerb Optional shell verb to perform on the file, if the file is not an executable (e.g. "open", "play", "print") JScript example: Application("notepad.exe").Execute("C:\\Autoexec.bat"); //open C:\Autoexec.bat in notepad Application("Readme.txt").
Display( [nDisplayNum] ) Arguments nDisplayNum Optional. The index number of the display adapter. Valid numbers range from zero to one less of the amount of installed gfx cards. The default is 0. Properties Name Number Off Width Height Read-only string containing the name of the display adapter hardware. Read-only, zero-based index number containing the display adapter number. Read/write boolean value indicating the power management state of the display. Can be set to true to turn the display off.
See Also Change Display Mode action Globals Object The Globals object can be used to save variables between script executions or to pass variables to other scripts. Globals( sVariableName, Value ) Arguments sVariableName Required. A string containing the name of the variable. Value Required.Variant value of the variable. Remarks The Globals collection object can store any kind of values.
The Mixer object basically represents a single soundcard. Common soundcards have two fixed "destinations", Playback and Record, represented by the MixerDestination object. Typically you won't use the MixerDestination object directly (except for enumeration purposes, if required), but index into a MixerSource object using Mixer.Playback(sourceindex) or Mixer.Record(sourceindex) . A MixerSource is a single audio data source, like CD-IN, MIDI, Wave and so on.
Remarks If you have more than one soundcard installed in your system, Mixer(0) is your first sound device, Mixer(1) the second and so on. For the more common situation with a single soundcard, you can omit the nMixerNum parameter. Methods SetDefault() Sets this mixer object as the default sound device in uICE. This affects all Audio Control actions. See Also Mixer Overview MixerDestination Object The MixerDestination object represents a collection of audio data sources.
See Also MixerSource Object MixerSource Object The MixerSource object represents a single audio data source. Mixer.Playback( SourceIndexOrName ) Mixer.Record( SourceIndexOrName ) Arguments SourceIndexOrName Required. Either an index number or source name. See remarks. Remarks The SourceIndexOrName parameter can be either a numerical index or a name of a valid mixer source. Mixer source names are the labels that appear in the Windows volume control panel applet.
The Wave source is Mixer.Playback(1) or Mixer.Playback("Wave") . MixerSource objects are collection objects containing one or more MixerControl objects. The following VBScript example enumerates all available MixerControl objects of the "Wave" MixerSource: Dim str For Each control In Mixer.Playback("Wave") str=str+control.Name+" " Next Alert str 'str contains "Volume Mute " or using a JScript for(;;) loop and a numerical index: str=""; for (i=0; i
Arguments mixerdestination Required. A MixerDestination object (i.e. Playback or Record) SourceIndex Required. Index to a MixerSource object. Properties Name Value Channels Channel Read-only string containing the name of the object Read/write long value containing the value of the object. The value is a combination of all channels. Valid values depend on the type of the control. Number of channels. 2=Stereo, 1=Mono Read/write number containing the value of a single channel.
The Mouse object provides properties and methods related to the mouse cursor and mouse buttons. Mouse Properties Read/write unsigned horizontal coordinate of the mouse cursor Read/write unsigned vertical coordinate of Y the mouse cursor Read/write state of the mouse button Button( [eMouseButton=btnLeft] [, nXButton=0] ) specified in eMouseButton and nXButton. See remarks. X Remarks eMouseButton can have one of the following values: btnLeft btnMiddle btnRight btnX Left mouse button. The default.
ButtonDown( eMouseButton=btnLeft [, nXButton=0] ) ButtonUp( eMouseButton=btnLeft [, nXButton=0] ) Same functionality as the Button property. See above for a description of arguments. OSD Object The OSD object provides access to programmable On-Screen Displays OSD Properties Visible Type TimeOut Read-only boolean value indicating whether the OSD is currently visible Read/write value from the eOSDType enumeration indicating the current OSD type. See remarks.
osdTreble Param1 is a string that is to be displayed above the graphical representation of the current treble value. Param2 is an unsigned number containing the current treble value in percent (0..100) osdBass Displays the Bass OSD. Param1 is a string that is to be displayed above the graphical representation of the current bass value. Param2 is an unsigned number containing the current bass value in percent (0..100) Displays the Panning OSD.
Properties TimeOut WakeTime Read/write timeout value, in seconds, for all power management methods. Read/write string containing the system wake-up time. The string must be in the format hh:mm either in 24 hour or 12 hour format with PM/AM. To cancel a previously set wake-up time, set WakeTime to an empty string, i.e. Power.WakeTime="" . Example: Power.WakeTime="23:59" resumes the system at 1 minute before midnight. Power.WakeTime="10:00PM" wakes at 10pm.
Arguments sWindowPath Optional. Text string containing the Window Path to the window. If omitted, a window object representing the current foreground window is returned. Remarks Click the icon in the scripteditor's toolbar to create a Window object from an existing window.
Close() Closes the window. SwitchTo() Puts the window into foreground. SetMousePosition( x,y ) Sets the mouse cursor relative to the window's upper left corner. Arguments x,y Required. x and y coordinate relative to the window's upper left corner Remarks Click the icon in the scripteditor's toolbar to insert a SetMousePosition method with proper coordinates automatically. Keystroke( sKeys ) Type into the window Arguments sKeys Required. String containing keystrokes. See Keystroke actions.
Remarks Never forget to call KeyUp after KeyDown. PostMessage( nMsg, wParam, lParam ) SendMessage( nMsg, wParam, lParam ) Posts or sends a message to the window. Arguments nMsg Required. WM_xxx value from the eWinMessages enumeration, or a numerical value representing a valid Win32 message. wParam Required. Appropriate WPARAM value for nMsg. Depends on the message. lParam Required. Appropriate LPARAM value for nMsg. Depends on the message.
Refresh( sNewWindowPath ) Refreshes the window object and updates internal window caches using the the window path specified in sNewWindowPath. sNewWindowPath Required. The new window path for the object.
VK_ACCEPT =0x1E, VK_MODECHANGE =0x1F, VK_SPACE =0x20, VK_PRIOR =0x21, VK_NEXT =0x22, VK_END =0x23, VK_HOME =0x24, VK_LEFT =0x25, VK_UP =0x26, VK_RIGHT =0x27, VK_DOWN =0x28, VK_SELECT =0x29, VK_PRINT =0x2A, VK_EXECUTE =0x2B, VK_SNAPSHOT =0x2C, VK_INSERT =0x2D, VK_DELETE =0x2E, VK_HELP =0x2F, VK_LWIN =0x5B, VK_RWIN =0x5C, VK_APPS =0x5D, VK_SLEEP =0x5F, VK_NUMPAD0 =0x60, VK_NUMPAD1 =0x61, VK_NUMPAD2 =0x62, VK_NUMPAD3 =0x63, VK_NUMPAD4 =0x64, VK_NUMPAD5 =0x65, VK_NUMPAD6 =0x66, VK_NUMPAD7 =0x67, VK_NUMPAD8 =0x6
VK_F23 =0x86, VK_F24 =0x87, VK_NUMLOCK =0x90, VK_SCROLL =0x91, VK_OEM_NEC_EQUAL =0x92, VK_OEM_FJ_JISHO =0x92, VK_OEM_FJ_MASSHOU =0x93, VK_OEM_FJ_TOUROKU =0x94, VK_OEM_FJ_LOYA =0x95, VK_OEM_FJ_ROYA =0x96, VK_BROWSER_BACK =0xA6, VK_BROWSER_FORWARD =0xA7, VK_BROWSER_REFRESH =0xA8, VK_BROWSER_STOP =0xA9, VK_BROWSER_SEARCH =0xAA, VK_BROWSER_FAVORITES =0xAB, VK_BROWSER_HOME =0xAC, VK_VOLUME_MUTE =0xAD, VK_VOLUME_DOWN =0xAE, VK_VOLUME_UP =0xAF, VK_MEDIA_NEXT_TRACK =0xB0, VK_MEDIA_PREV_TRACK =0xB1, VK_MEDIA_STOP =0
VK_CRSEL =0xF7, VK_EXSEL =0xF8, VK_EREOF =0xF9, VK_PLAY =0xFA, VK_ZOOM =0xFB, VK_NONAME =0xFC, VK_PA1 =0xFD, VK_OEM_CLEAR =0xFE } eVkCodes; eWinMessages enumeration The following Win32 message constants are available to scripts: typedef enum tagWinMessages { WM_INPUT = 0x0FF, WM_KEYDOWN = 0x100, WM_KEYUP = 0x101, WM_CHAR = 0x0102, WM_COMMAND = 0x0111, WM_SYSCOMMAND = 0x112, WM_LBUTTONDOWN = 0x0201, WM_LBUTTONUP = 0x202, WM_LBUTTONDBLCLK = 0x0203, WM_RBUTTONDOWN = 0x0204, WM_RBUTTONUP = 0x0205, WM_RBUTTOND