
Operating instructions

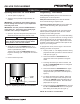

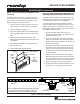

DELUXE FOOD WARMER
17
P/N 1010678 Rev. G 08/08
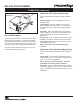
Checking and Cleaning the Water Strainer
(Monthly) DFW/DFWT/DFWF-200/250 Only
The Water Strainer protects your equipment from any
foreign debris in the water line that could damage the
unit’s solenoid (causing the unit to leak/flood)
To ensure proper and consistent steaming results,
check the Water Pressure Regulator (Figure 12) and
Strainer Cup regularly. If the pressure on the gauge
has dropped, check the Strainer Cup and clean out the
accumulated debris as follows:
1. Shut off the water supply valve to the unit,
unscrew the Strainer Cup, and carefully remove
2. At the sink, gently flush all of the accumulated
Screen. Be especially careful not to damage the
seat at the bottom of the Strainer Cup and con-
firm that the orange O-ring is properly seated in
its place before screwing the Strainer Cup and
top back together.
4. Purge the air out of the Strainer and tubing by
from the equipment and, over a bucket, push the
white plastic tip in until there is good water flow.
5. Replace damaged or worn parts as needed.
6. Verify that the Water Pressure Regulator is set to
20–25 psi (1.4–1.7 kg/cm
2
or 138–172 kPa).
MAINTENANCE (continued)
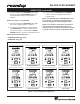
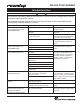
Figure 12. Inlet Hose Assembly
Male Quick
Disconnect
Insert
Strainer Cup
Tubing
Mesh
Screen
O-ring
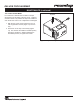
Figure 11. Water Tank Filter
Water Tank Filter
Filter Stem
Access
Cover
with Tank
(dotted line)
Bottom
Hole
of Water
Tank
Tank Cover
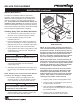
Water Tank Filter (Models DFW/DFWT-100/
150 Only)
The Water Tank Filter is used to prevent particles or
food products from entering and damaging the water
pump. Inspect and clean this filter monthly or more
regularly using the following procedure.
1. Turn the power off, unplug the power cord, and
allow the unit to cool down before proceeding.
2. Open the Slide Door (Figure 11).
3. Remove the Water Tank Filter, located inside the
tank, by pulling it upwards and out of the bottom
hole.
4. Clean the filter by running it under tap water.
Replace the Water Tank Filter if the screen is torn
or damaged.
5. Reinstall the Filter Stem into the bottom hole of
the tank (Figure 11).
6. Fill the Water Tank and test the unit.
Spare O
Rings (3)
O Ring
NOTE: If the Male Quick Disconnect Fitting leaks water while
it is engaged into the rear of the Steamer, then the O-ring
must be replaced. Three (3) spare O-Rings are supplied.