
Owner`s manual

P/N 1010455 Rev. E 01/158
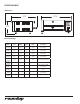
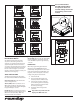
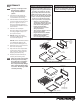
Figure 6. Control Programming Sequence
UP DOWN PRGM
READY
20
SINGLE SHOT
START/STOP
E. SHO Time in Seconds
UP DOWN PRGM
START/STOP
READY
00
SINGLE SHOT
F. SHO TIME IN MINUTES
UP DOWN PRGM
START/STOP
READY
1500
SINGLE SHOT
A. Total Cycle Time
UP DOWN PRGM
START/STOP
READY
15
SINGLE SHOT
B. Total Cycle Minutes
UP DOWN PRGM
START/STOP
READY
H20
SINGLE SHOT
UP DOWN PRGM
START/STOP
READY
SINGLE SHOT
G. H2O Cycle H. H2O Setting
UP DOWN PRGM
START/STOP
READY
00
SINGLE SHOT
UP DOWN PRGM
START/STOP
READY
SHO
SINGLE SHOT
C. Total Cycle Seconds
D. SHO Cycle
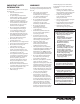
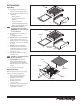
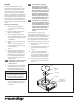
Hi-Limit Reset Button
A hi-limit thermostat turns o electri-
cal power to the steam generator if it
overheats. To reset this thermostat, allow
approximately 45 minutes for the unit to
cool down, remove the black cap, and then
press the Hi-Limit Reset button located on
the rear of the unit (Figure 7). If the unit
requires continuous resetting, contact your
Authorized Service Agency.
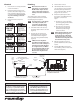
Status Indicator LEDs
The Miracle Steamer’s Control Board has
four status indicator LEDs described below:
Green (Program): When lit, indicates the
unit is in Program mode.
Yellow (Audio): When lit, indicates 10-15
VDC is being supplied to the audio signal.
The audio signal sounds and the LED lights
for approximately 3 seconds.
Red (Heat): When lit, indicates the Control
Board is calling for heat by supplying 10-15
VDC to the Solid State Relay. When o,
indicates that the unit is satised.
Green (H2O): When lit, indicates that 24 VAC
is being supplied to operate the solenoid
valve. This LED is only lit for approximately
1 second.
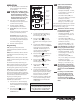
Fault Codes
When the programming parameters for
Minutes/Seconds/SHO/H2O have been
inadvertently changed below or above their
limits, the unit displays the “ERR” fault code
(Figure 8). If this code appears, clear these
settings using the procedure below:
1. Turn the unit o.
2. Press and hold the Program and
Start/Stop buttons simultaneously
3. Turn the unit on while continuing
to hold the Program and Start/Stop
buttons. Release the buttons when
the unit stops beeping,
4. The display will now register the
cycle time.
NOTE: Repeat these steps if the unit still
displays the “ERR” fault code.
NOTE: It is recommended that
the SHO and H2O settings
be adjusted to the recom-
mended settings shown in the
Programming section of this
manual.
RE ADY
HILIMIT RESET BUTTON
POWER CORD
CAP
UP DOWN PRGM
START/STOP
POWER
READY
ERR
Figure 8. “ERR” Fault Code
Figure 7. Hi-Limit Reset Button