
Specifications


If the LINE Series Preamplifier is not functioning properly, please
check each of the following:
1. Check that the Power Supply Umbilical Cord (Y) is connected
correctly to the Power Supply Input Socket (X). Next, ensure that
the AC Detachable Power Cord is plugged into the Preamplifier’s
or Power Supply’s Detachable Power Cord Socket (N) and is
connected to a live source of AC power. For instance, if using a
power bar, check that the bar is turned on.
2. Be sure that the Power Switch (M) on the rear of the Line 1
chassis or the Line 2 Power Supply chassis are in the “ON” posi-
tion. On the Line 3 preamplifier make sure that the Power Button
(AA) on the front of the Power Supply is in the “ON” position
(IN).
3. Check that the proper input has been selected with the
Selector Buttons (A-D) on the Preamplifier chassis.
4. Ensure that the preamp is not in MUTE or STANDBY mode, or
still in the 32 (10 + 22) second warm-up/turn-on cycle.
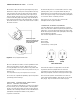
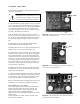
5. Check that the AC Line Fuse inside the Power Supply chassis
(or Preamp chassis in the Line 1) is good. Be sure to first unplug
the AC Detachable Power Cord from the Power Supply before
removing chassis covers to check the fuse. For fuse locations see
figures 15-17. To remove the fuse, simply unscrew the fuse hold-
er and remove the fuse.
If the fuse has blown, the thin metal con-
ductor will have melted and the glass may appear “smoked”. If the
fuse has blown, replace with a fuse of the same type and rating
(See specifications for fuse ratings).
6. If the LED display window shows six horizontal bars when in
OPERATE mode, be sure you have the tubes of the proper type
plugged in the correct positions.
7 . Check to be sure that all the tubes are correctly and firmly seat-
ed in their tube sockets and that all nine contact pins are inserted
in each socket (i.e. no pins are bent over). Verify that an orange
glow is visible from inside of each tube when the unit is on.
8. If you are still experiencing any difficulty with your Line Series
Preamplifier, contact your dealer or distributor for assistance.
REPLACEMENT OF THE TUBES
Sonic Frontiers strongly discourages non-factory replacement of
the tubes. The tubes supplied are measured, selected, and
matched in balanced pairs - channel to channel and triode
section to triode section - for optimum performance.
Problems arising from non-SFI supplied tubes will not be covered
under warranty.
If replacement tubes are needed, desired or required contact
Sonic Frontiers for assistance.
TROUBLE SHOOTING
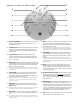
Figure 15 - The Fuse in the Line 1 is located in the right rear
corner of the preamplifier chassis.
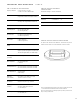
Figure 16 - The Fuse in the Line 2 is located in the right rear
corner of the power supply chassis.
Figure 17 - The Fuse in the Line 3 is located in the right rear
corner of the power supply chassis.
Fuse
Fuse
Fuse
W A R N I N G
D I S C O N N E C T the AC Detachable Power Cord
from the Line 1 Main Chassis or Line 2 & Line 3
Power Supply before beginning troubleshooting.