
Installation guide


Last revision 12/00 2
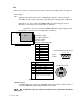
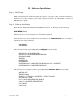
For 3 Audio Card Setup:
ISA Slot 1 Audio adapter #1 (record/playback)
ISA Slot 2 Audio adapter #2 (playback only)
ISA Slot 3 Audio adapter #3 (playback only)
ISA Slot 4 Metrabyte adapter (only for satellite systems)
PCI Slot 4
PCI Slot 3 SCSI controller adapter (only when using SCSI drives)
PCI Slot 2 Network adapter
PCI Slot 1
AGP Slot AGP video adapter
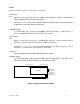
External Requirements
1. RapidFire Dongle must be attached to LPT1 port or the printer port of the on-air computer
.
2. Mouse, Trackball, or Touchscreen Interface must be connected to COM1 (serial port #1).
3. General I/O (input/output) devices, such as monitor and keyboard and SCSI Drive
connections should also be made.
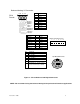
Audio Connections
Adapter Installation
Make sure the main power to your computer is OFF. You will need a full-size, 16 bit/AT slot. If
you are unfamiliar with the internal design of your computer see its "Guide to Operations" manual
for step by step installation procedures. Read
JUMPER SETTINGS
and
CONNECTIONS
for
information about configuring the adapter before plugging it into the slot.
Jumper Settings
The Antex SX series audio adapters have several hardware jumpers that are used for multiple
board operation. Refer to the Antex User’s Manual for your particular Audio Card for the proper
jumper settings.
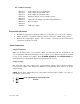
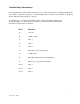
NOTE:
On the SX-7, jumper JP2 serves as the adapter selection jumper. Adapter 1 is at the top,
with adapter 4 at the bottom.
1
2
3
4
PLACE JUMPER HERE IF YOU HAVE ONLY ONE
ADAPTER