
Installation manual


Engineering - 42
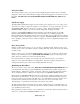
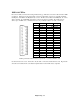
Example relay closure wiring to AMX Harness Board.
Again, do not worry about disabling relay closures in the event that one satellite receiver might fire a
closure while another satellite feed was on the air. With the AMX 8x4 Switcher, the SMARTCASTER
software keeps track of which digital inputs are valid during the time that each Network is on the air.
Make sure the SMARTCASTER is setup properly to acknowledge relay closures through the AMX
Harness and not the standard relay card. In the ‘Options Setup’, or OSETUP at the C:> prompt, check
Option 17, “Detect closures via TTL input instead of relay card”. It should be set to ‘Y’.
In addition, to program the SMARTCASTER to see relay closures, refer to Timed Events in the
Operations portion of the manual. This section explains how to setup the AMX inputs at different times
of the day for each Network.
Audio Level Adjustment & Operation
Audio adjustments can be made with the trim pots located on the front of the unit. For balanced audio
signals operating at unity gain, the pots should be fully counter-clockwise. For lower level, (i.e.
unbalanced), inputs, adjust the pots as desired.
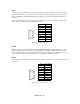
Front view of the AMX 8x4 Switcher.
Adjust levels for the SMARTCASTER record inputs. To do this, some temporary modification needs to
be made in ‘Other Options’, (OSETUP from C:> prompt). Option 6,
“Default AMX input for recording to the SMARTCASTER” should be set to the channel being adjusted.
Next, re-enter the SMARTCASTER program, and go into the Record Screen. At this point, on the
Activity Lights, the channel being adjusted should be lit. Try recording a test spot. Levels from the
channel being adjusted should appear. Trim the pots so that the word, OVERLOAD does not appear on
the Screen. Once all channels are adjusted, do not forget to set Option 6 back to its original setting.