
Installation manual
Engineering - 32
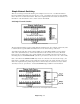
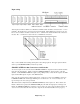
Setting Levels
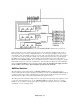
Setting the input levels involves synchronization of the VU meters at the source, (usually the production
console or the audition bus of the air console), with the SMARTCASTER input. To set the input gain,
use complex audio modulation such as music, speech, or a spot, and set the gain so that the meters on the
board read correctly. Go into the Record Screen of the SMARTCASTER. After setting up a sample test
spot to record, (refer to the Operations section of the manual for information on recording), adjust the
DIGITAL INPUT GAIN to under the ‘G’ in the word GAIN. (The words DIGITAL INPUT GAIN
appear on the SMARTCASTER Record Screen. Use these words on the Screen as a reference). Now
adjust the IHF pots on dBX #1 to the desired level. Do not let the word “OVERLOAD” appear. Any
audio recorded while this word appears is distorted.
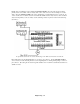
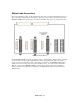
To set the output gain, open the channel on the console that carries the audio from the SMARTCASTER
to a normal operating position for the board. Next, start playing back a properly recorded spot in the
SMARTCASTER. (Note: In SMARTCASTERS using Simultaneous Playback and Record, a spot should
be played in live assist to adjust the output gain for the air channel, and a spot should be auditioned in the
Record Screen to adjust the output gain for the SMARTCASTER’S audition channel.) Adjust the trim
pots for the desired playback level.
If the SMARTCASTER is a Sat-Pac unit that uses the external AudioPort, there is no level information
on the Screen. Setting levels with the Sat-Pac can best be done by recording an input signal at high level,
and auditioning it. If the audio is distorted, lower the input signal via the trim pots on the dBX, and try
again until the audio is not distorted.