
User Manual


9
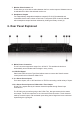
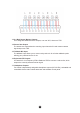
5. Front Panel Explained
1. Power button
Toggles standby/operation state.
2. Input Select buttons channels 1-8
Input select allows you to switch between your desired input source, which will be fed to
your selected monitor output.
3. Sum Select button
The sum select button allows you to send your stereo sum to your selected monitor
output.
4. Rotary control
Large stepped relay attenuator for headphone volume and main monitor outputs.
Clicking the volume attenuator allows you to select which output you are controlling.
Pressing and holding allows you to mute the currently selected output. i.e. Monitor
outputs or headphone outputs which is indicated by the LED’s (8a and 8b).
5. Mono, Dim & M/S
Pressing the mono button sets the currently selected monitor output to mono. This
button corresponds to the last setting selected in the Mono effects dropdown menu in the
software control panel.
Press the Dim button to activate the -20dB attenuator. Press once more to restore
normal volume.
When Mono is activated you also have the option to select M/S. Pressing the M/S
button selects either the sum or the difference between the left and the right channel.
This supplies a stereo effect, which allows us to monitor just the centre or the just the
periphery of the audio.
6. Talkback button
Press the Talkback button to activate the talkback microphone. This can be distributed to
your selected headphones using the software control panel.