
User manual


4
Setup
Remove all packing materials from the fog machine. Check that all foam and plastic padding is removed,
especially in the nozzle area.
Fill with Antari Fog Liquid (FLM-05) or dealer recommended high-quality water-based fog fluid. Any other
types of fluid can damage the unit. When filled, place cap back on liquid tank.
Charge the battery. Plug the adaptor into a grounded electrical outlet. The green light on the battery charger
will light up when it is connected to the power supply. Then connect the charging head to the battery. Please
note the battery required 8hr charging time on first charge. The battery will be fully charged in approximately
2~3 hrs.
The charge will last between 10-12 minutes of constant fog output before needing to be re-charged.
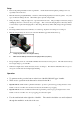
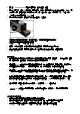
Plug the charged battery into the bottom of the M-1 Mobile Fogger with the label face up.
1. Lift-up the plate before inserting the battery.
2. Make sure the battery is inserted on the right position (see photo).
The green light by the front of the handle will flash when the button is first pressed. This indicates the battery
has enough charge to power the M-1.
When the red light starts to flash, the battery needs to be charged. The machine will still be able to fog for a
short period of time after the red light begins flashing.
Operation
To generate smoke, press the button on the front of the M-1 Mobile Fogger’s handle.
There are two operation modes that can be selected for the M-1.
1. Operation mode 1. M1 mobile fog machine will start to produce fog if users keep pressing the button on the
handle or remote controller. Once the button is released, the machine stops fogging.
2. Operation mode 2. Users can make the M1 mobile fog machine produce fog by pressing the button on the
handle or remote controller once. To stop fogging, press the button again.
Use the small switch on the right side of the M-1. The switch is inside the case and is adjusted
through the small hole on the side of the case.