
Operating instructions


ENGLISH
116
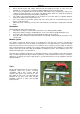
Then use the spanners to tighten the
coupling. Complete the connection without
stopping (a hissing sound may be heard),
use a counterhold and tighten the coupling
securely.
Never under any circumstances tighten the
fixed nipples with the spanner. Only use the
spanner as a counterhold when connecting.
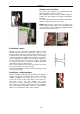
It should be noted that if you do not use a
counterhold, you risk turning the nipples on
the outdoor unit too much and rendering
them useless. Check and tighten the
couplings about 12-24h after installation.
Check the couplings for leaks by applying
some soap and water. Check for bubbles.
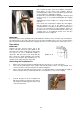
Check the seals and tighten the couplings
again 12-24 hours after installation. Check
for leaks by wetting with soapy water. Also
check the connections at the indoor unit. If
no bubbles appear, the couplings are
properly connected and tightened!
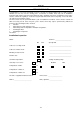
Electrical connection - indoors
IMPORTANT:
You must never connect the power before the contact arrangement below is connected and the protective
covers are re-fitted. The unit is connected to the mains supply with a plug, i.e. it requires no intervention
in the house's electrical system.
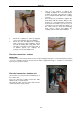
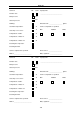
Electrical connection - outdoor unit
Unscrew the cover in front of the terminal block on
the outdoor unit.
Press the connectors together and fit the cable
with the help of a strain reliever.
Note that the cable from the indoor unit must be
mounted under the strain reliever.