
Installation guide


6
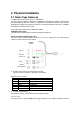
2. Set the mounting base onto the wall or ceiling and center it over the mounting hole, using the
supplied four retaining screws to secure the main body.
3. Set the proper image by moving the camera body (some model may limit the PCB board
to180°rotational adjustment) and set the focus by turning the lens to the left or right
direction.
4. When the camera focus adjustment has been completed, use the provided L-wrench to
fasten the tamper-resistant housing to the main body.
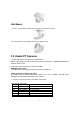
5. Vari-Focal Dome Operation Guide: Once the picture appears on the monitor, open the
cover and adjust the lens wrench to “NEAR←→FAR”, get the view zoom that you desire,
and then adjust the focus wrench of the lens to obtain the best picture. After adjustment,
tighten both wrenches.
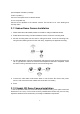
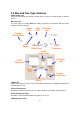
6. Must connect the LAN cable to Ethernet’s switch or hub and the DC-Jack to the power
source. And connect the other cables and connectors if necessary.