
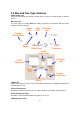
Installation guide


5
power adapter included in package.
5. MIC in (audio in)
Connect a microphone to the network camera.
6. Line out (audio out)
Connect a loud speaker to the network camera. This function is for voice alerting and
two-way audio.
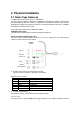
2.1.1 Indoor Dome Camera Installation
1. Please select the most suitable position on the wall or ceiling to install the camera.
2. Rotate the dome housing counterclockwise to remove it from the mounting base.
3. Set the mounting base onto the wall or ceiling and center it over the mounting hole,
using the two retaining screws for the main body, supplied by the appurtenance bag.
4. For lens adjustment, move the camera body and set the focus by turning the lens to the
left or right direction. When the camera focus adjustment has been completed, rotate
the dome housing clockwise to secure it to the mounting base
5. Connect the LAN cable to Ethernet’s switch or hub and the DC-Jack to the power
source. And connect the other cables and connectors if necessary.
6. Done.
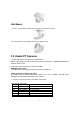
2.1.2 Vandal (IR) Dome Camera Installation
1. Use the provided L-wrench, loosen the tamper-resistant housing cover (with screws still
attached on the cover). The unit has a factory installed side conduit entry and one may
adjust the cables to back conduit entry according to installation requirement.