
Manual


2120
Trigger
Warning:
Your ANSCHÜTZ target rifle offers you a
versatility of individual adjusting properties.
Please make sure that your rifle always is
unloaded when carrying out adjustments.
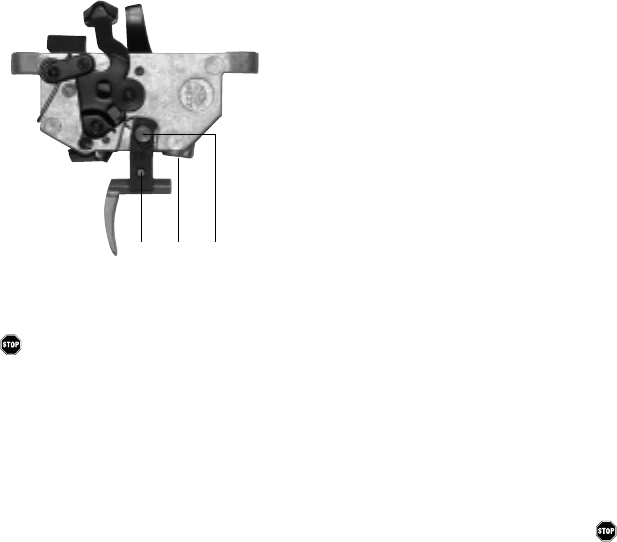
1. Trigger weight
Adjust the trigger weight with set screw
No. 2:
•if you turn it to the right:
trigger weight is increased (+)
•if you turn it to the left:
trigger weight is decreased (-)
Trigger weight and first stage weight
depend on each other with regard to the
mechanic mechanism. If one of them is
changed there will always be a corres-
ponding change of the other as well.
2. Sear engagement
The sear engagement is the distance
between the second stage and the release
of the trigger.
Important note:
To protect your precise trigger and to
guarantee perfect operation you should
always close the action carefully. If the sear
engagement of single stage triggers is too
small and the trigger weight is too low or if
the first stage of two-stage triggers is too
short, the trigger might release inadvertently
by a sudden impact or too powerful closing
of the action if the gun is loaded and not in
the ”safe“ position.
Adjustment of the sear engagement for
assembled two-stage triggers with set screw
No. 1:
•if you turn it to the left:
sear engagement is shortened
•if you turn it to the right:
sear engagement is extended
Adjustment of an optimum sear engage-
ment:
Make sure your rifle is not loaded. Cock
your rifle and release the trigger. Check if
the trigger releases as desired.
The sear engagement is too long:
There is a small distance between the
second stage and the release of the trigger.
•Turn set screw No. 1 counter-clockwise
after cocking and releasing (approxi-
mately 1/8 turn each).
•Repeat this process until you do not feel
the second stage anymore. Then turn
1/4 turn back to the right. Thus the opti-
mum sear engagement is adjusted.
The sear engagement is too short:
There is no second stage. The trigger
releases un-defined without second stage.
•Turn set screw No. 1 clockwise for at least
1/4 turn after cocking. Then release the
trigger and check if there is a second
stage. If not, repeat this procedure until
you feel a second stage.
•As soon as you feel a second stage
proceed according to the points of the
paragraph „The sear engagement is too
long“ to obtain an optimum sear enga-
gement.
Adjustment of the optimum sear enga-
gement for assembled single stage triggers
with set screw No. 1:
•Cock the rifle.
•Turn set screw No. 1 (first stage) as long
to the right until the trigger releases.
•Turn set screw No. 1 from this position
approx. 1/4 turn to the left.
Warning:
Single stage triggers are very sensitive and
must be operated with special care.
The sear engagement of 5/100 mm is ob-
tained after the action is closed. In
combination with a minimum trigger weight
there might be a malfunction and an
increased risk (independent shot release).
3. Malfunctions of the trigger due to
wrong adjustment procedure
If the trigger is not adjusted correctly
malfunctions may occur, tampering with the
trigger adjustments will not result in any
success. Therefore proceed as follows:
After every change the function of the
trigger must be checked. When the
malfunction is removed check the desired
trigger values and adjust them again if
necessary.
The trigger catches the cocking piston or
firing pin, but the trigger does not release:
•Make sure that the safety of the trigger is
released.
The trigger does not catch the cocking
piston or firing pin:
•The first stage trigger is adjusted too
tightly.
•Turn set screw No. 1 approx. 1-2 turns to
the left. Procede according to par. 2.
4. Safety
There is a safety lever at the right side of
the trigger. Please see chapter „Cocking,
loading and safety operation“.
5. Maintenance
Please see chapter „Cleaning, mainte-
nance, care, oils“.
r e
t