Version 1.
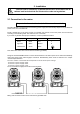
Robin MiniMe Table of contents 1. Safety instructions.......................................................................................................... 3 2. Fixture exterior view ...................................................................................................... 5 3. Installation....................................................................................................................... 6 3.1 Connection to the mains.......................................................
The Robin MiniMe was not designed for merged projection as due to the nature of the light source, each projector can look slightly different. FOR YOUR OWN SAFETY, PLEASE READ THIS USER MANUAL CAREFULLY BEFORE POWERING OR INSTALLING YOUR ROBIN MiniMe ! Save it for future reference. This device has left our premises in absolutely perfect condition.
This fixture was designed for indoor use only, do not expose this unit to rain or use near water. When choosing the installation spot, please make sure that the fixture is not exposed to extreme heat, moisture, dust or entertainment smoke (haze) Air vents and slots in the fixture´s head and base are provided for ventilation, to ensure reliable operation of the device and to protect it from overheating. Do not block the light output with any object when the fixture is under operation.
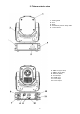
2.
3. Installation Fixtures must be installed by a qualified electrician in accordance with all national and local electrical and construction codes and regulations. 3.1 Connection to the mains For protection from electric shock, the fixture must be earthed! The Robin MiniMe is equipped with auto-switching power supply that automatically adjusts to any 50-60Hz AC power source from 100-240 Volts.
3.2 Rigging the fixture A structure intended for installation of the fixture (s) must safely hold weight of the fixture(s) placed on it. The structure has to be certificated to the purpose. The fixture (fixtures) must be installed in accordance with national and local electrical and construction codes and regulation.
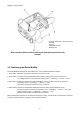
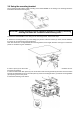
Rigging via omega holder: 1-Omega holder with a quarter-turn loks 2-Clamp 3-Trust 4-Attachment point 5-Safety wire When installing fixtures side-by-side, avoid illuminating one fixture with another! 3.3 Positioning the Robin MiniMe The Robin MiniMe is designed to be installed in one of four possible installation locations: 1. Front Table - the fixture is placed near the floor in front of the screen. 2. Front Ceiling - the fixture is suspended upside-down from the ceiling (truss) in front of the screen.
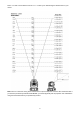
There is a chart of throw distance ratio of 3.5 : 1 to assist you in determining the ideal location for your fixture. Note: There is a tolerance among these numbers due to optical component variations. We recommend that if you intend to permanently install the Robin MiniMe, you should physically test the projection size and distance using the actual fixture before you permanently install it.
3.4 Using the mounting bracket The mounting bracket allows simple mounting of the Robin MiniMe on the ceiling. The mounting bracket is intended for horizontal mounting only. IMPORTANT! Ceiling mounting requires extensive experience, including calculating working load limits and installation material being used. To fasten the Robin MiniMe on the ceiling via the mounting bracket, follow these steps: 1. Fasten the mounting bracket (1) on the ceiling (2) by means of the four screws (3).
5. Gently tighten the stabilization screw until reaches the base of the fixture to prevent the MiniMe from wobbling. 6. After connecting power and DMX cables place the cable cover (9) and secure it with an 1/4-turn screw (10) 3.5 Installing the wide-angle lens module Disconnect from the mains before the wide-angle module installing If you need to install the optional wide-angle lens module, follow the steps: 1. Remove both top and button covers (1) from the fixture head. 2.
3.6 DMX-512 connection The fixture is equipped with 5-pin XLR sockets for DMX input and output. Only use a shielded twisted-pair cable designed for RS-485 and 5-pin XLR-plugs and connectors in order to connect the controller with the fixture or one fixture with another.
3.7 Ethernet connection The fixtures on a data link are connected to the Ethernet with ArtNet communication protocol.The control software running on your PC (or light console) has to support Art-Net protocol. Art-Net communication protocol is a 10 Base T Ethernet protocol based on the TCP/IP.Its purpose is to allow transfer of large amounts of DMX 512 data over a wide area using standard network technology. IP address is the Internet protocol address.
3.8. Wireless DMX operation The external Robe Wireless CRMX module allows receiving wireless DMX. CRMX module operates on the 2.4 GHz band. Robe Wireless CRMX 1 - 5-pin XLR (female) 2 - Locating pin 3 - Lock Push in the 5-pin XLR plug (1) into 5-pin XLR sockit (4) and simultaneously locating pin (2) into hole (5) in the fixture. In this way the wireless DMX module is connected with the fixture and prepared for operation.
4. Control menu map Default settings=Bold print Level 1 Level 2 Level 3 DMXA 001 Mode DMX Level 4 Level 5 ArtNet IP Addr IP Ad1 000-255 :.
Level 1 Level 2 Fans Level 3 Level 4 Gobo Sel Mode Numer SS Gobo Swap T 0-30 s, 3 s Level 5 Auto, High Defaults Manual DMX Ctrll Pan 0-255 : LED Engi Test Prg Static Dimr.
Level 1 Level 2 Level 3 Level 4 Level 5 Blue C 0-255 Gamma C 0-5 Store Sw Upd Hw Upd MAC High MAC Low 17 Level 6 Level 7
5. Control menu The Robin MiniMe is equipped with 2-row LCD display which allows to set the fixture´s behaviour according to your needs, obtain information on its operation, test its various parts and lastly program it, if it has to be used in a stand-alone mode. Control panel: [ESCAPE] button used to leave the menu without saving changes. [NEXT] , [PREV] buttons for moving between menu items and for value adjusting. [ENTER] button used to enter the selected menu (menu item) and to confirm adjusted value.
environment. It is therefore impossible to specify accurate cleaning interval. This item allows you to change the cleaning interval of the air filters. This "alert" value is 300 hours and it is set as default. Inspect the fixture within its 300 hours of operation to see whether cleaning is necessary. If cleaning is required, clean all air filters and change the value in this menu on acceptable level. Min. level of alert period is 10 hours, max. is 300 hours. R Ti - Remaining Time.
LED Engi - Led engine options. Enter the menu if you want to set special options for LED engine. Ceil P - Ceiling projection. When this function is "On", the picture is top (bottom and left) right reversed. This function enables to project the image from a ceiling mounting of the MiniMe. Rear P - Rear projection. When this function is "On", the picture is left (right) reversed. This function enables to project the image to a rear projection screen. GRP Engi - Graphic engine options.
5.7 User Media (User Media) Custom media files can be saved in the fixture memory or can be called from the external USB drive. No USB - This item will appear if no USB flash drive is connected. Init USB - This item will appear if an USB flash drive without desired folder structure is connected. Press [ENTER] to start initialization. Initilization process creates folder called ‘minime’ in the root folder of the USB flash drive. Inside this folder are three subfolders: extmedia, intmedia, update.
encoded as mp3, video as mpeg2. This file cannot be played. Another AVI file can have audio as ogg vorbis and video as h264. This file can be played. Whether the Robin MiniMe can play the file or not depends on the encoding, not on the container. Mirror Media - This menu allows to load files from the folder intmedia (on the USB memory stick) into the fixture and vice versa. From Minimi - the option copies custom media files from the fixture into USB memory stick (custom files only).
Gamma C - a gamma setting Store - saves adjusted values into memory Calibration of pan/tilt/focus via the control board. 1. Disconnect DMX controller from the fixture and enter the "Calib" menu. 2. Enter the "Cal PTF" menu. 3. Use the [PREV] and [NEXT] to find "Pan" and press [ENTER]. 4. Set desired value and save it by pressing [ENTER]. 5. Repeat steps 3 and 4 for tilt and focus. 6. After calibrating all effects, find item "Store" and press [ENTER].
Two keystone channels (KeyStoning Vertical, KeyStoning Horizontal) adjust the image shape, aspect ratio is kept. Default DMX value for both channels is 128, it means that no keystone correction has been used. The channel " KeyStoning Vertical" turns image along X-axis. The channel " KeyStoning Horizontal" turns image along Y-axis. The keystone values can also be used to create interesting skewing effects. Note: The horizontal keystone is not running while the Robin MiniMe displayes external HDMI source.
8. Error and information messages DMX address blinks It means that no DMX signal is received. Check DMX connectors and cables, check connection between the fixture and the control desk. Note of exclamation at sign "Art" It means that no ArtNet signal is received. Check RJ 45 connectors and cables, check connection between the fixture and the control desk.
9. Technical Specifications Electrical Power supply:.........................electronic auto-ranging Input voltage range:............... 100-240V, 50-60Hz Fuse:.......................................T 3.15A/250V ~ Power consumption *:...............100W@230V,I=0.43A, power factor=0.87 *Allow for a deviation of +/-10% Mains input: CE - max. 16A cETLus - max. 10 A Mains output: CE - max. 15A cETLus - max.
Dimmer Smooth dimmer from 0 - 100 % Pan/Tilt Control Max. pan movement range: 450° Max.
Dimensions (mm) Mounting bracket (optional) 28
Accessories Omega holder (P/N 99010420).......................1 piece Optional accessories (P/N 1098 0222) ROBE Wireless CRMX white (P/N 1098 0197) Lens wide-angle 1:1.5 black (P/N 1098 0211) Lens wide-angle 1:1.
10. Maintenance and cleaning DANGER ! Disconnect from the mains before starting any maintenance work A soft lint-free cloth moistened with any good glass cleaning fluid is recommended for objective lens, under no circumstances should alcohol or solvents be used! Never use alcohol or solvents for cleaning lenses in the moving head! Use wet cloth only. It is absolutely essential that the fixture is kept clean and that dust, dirt and smoke-fluid residues must not build up on or within the fixture.
11. ChangeLog This section summarizes all types of changes in the user manual. Version of the manual Date of issue Description of changes 1.3 8/12/2013 DMX chart version 0.93 was renamed at version 1.0 1.4 7/01/2014 Added chapter " 7. Using external HDMI input." Changes in technical specifications DMX chart version 1.1 (change at channel 17) 1.5 15/01/2014 DMX chart version 1.2. Changes in menu Personality and User Media 1.6 10/03/2014 Added chapters 3.4 Using the mounting bracket 3.
DMX protocol Robin MiniMe - DMX protocol, version 1.2 Channel DMX Value 0 - 255 Pan movement by 450° 0 - 255 Fine control of pan movement proportional Pan fine 2 proportional Tilt 3 0 - 255 Tilt movement by 270° proportional Tilt fine 4 0 - 255 Fine control of tilt movement proportional Pan/Tilt speed , Pan/Tilt time 5 0 1 2 - 255 2 - 255 Standard mode Max. Speed Mode Pan/Tilt speed mode Speed from max. to min. Pan/Tilt time mode Time from 0.2 s to 25.5 sec.
DMX protocol Channel DMX Value 9 0-255 10 0 - 255 11 0 - 255 Function Keystoning Vertical Vertical keystoning (128 Default) Keystoning Horizontal Horizontal keystoning (128 Default) Cyan Cyan (white-->full cyan) Type of control proportional proportional proportional Magenta 12 0 - 255 Magenta (white-->full magenta) proportional Yellow 13 0 - 255 Yellow (white-->full yellow) proportional Virtual colour wheel 14 0-15 16 17-55 56 57-95 96 97-134 135 136-174 175 176-214 215 216-246 247 248-255
DMX protocol Channel DMX Value 22 23 24 25 26 27 28 29 30 31 32 33 34 35 36 37 38 39 40 41 42 43 44 45 46 47-49 50 51 52 53 54 55 56 57 58 59 60 61 62 63 64 65 65 66-69 70 71 72 73 74 Function Vertical linear shade, white-->blue Diagonal shade, white -->blue Diagonal shade, blue -->white Horizontal linear shade, white-->cyan Horizontal Linear shade, cyan-->white Vertical linear shade, cyan-->white Vertical linear shade, white-->cyan Diagonal shade, white -->cyan Diagonal shade, cyan -->white Horizontal li
DMX protocol Channel DMX Value 75 76 77 78 79 80 81 82 83 84 85 86 87 88 89 90 91 92 93 94 95 96 97 98 99 100 101 102 103 104 105 106 107 108 109 110 111 112 113 114 115 116 117 118 119 120 121 122 123 124 Function Diagonal shade, black -->white and vice versa, fast Shade black -->white, slow rotation, clockwise Shade black -->white, fast rotation, clockwise Shade black -->white, slow rotation, anticlockwise Shade black -->white, fast rotation, anticlockwise Horizontal linear shade, white-->red and vice v
DMX protocol Channel DMX Value 125 126 127 128 129 130 131 132 133 134 135 136 137 138 139 140 141 142 143 144 145 146 147 148 149 150 151 152 153 154 155 156 157 158 159 160 161 162 163 164 165 166 167 168 169 170 171 172 173 174 Function Diagonal shade, magenta -->white and vice versa, fast Shade magenta -->white, slow rotation, clockwise Shade magenta -->white, fast rotation, clockwise Shade magenta -->white, slow rotation, anticlockwise Shade magenta -->white, fast rotation, anticlockwise Horizontal l
DMX protocol Channel DMX Value Function 175 Horizontal/Vertical/Diagonal colour transition fast 176-255 Reserved Type of control step Digital gobo wheel selection 16 0-31 32-63 64-95 96-255 Default-Factory Digital gobo wheel Internal Custom Digital gobo wheel External Custom Digital gobo wheel (USB memory stick) Reserved (for future functions) 0 1-250 Open Gobos/videos (by one DMX value:1,2,3…...
DMX protocol Channel DMX Value 15 16 17 18 19 20 21 22 23 24 25 26 27 28 29 30 31 32 33 34 35 36 37 38 39 40 41 42 43 44 45 46 47 48 49-79 80 81 82 83 84 85 86 87 88 89 90-99 100 101 102 Function 3-stripe transition up-->down, vertically 3-stripe transition down-->up, vertically 6-stripe transition up-->down, vertically 6-stripe transition down-->up, vertically Transition 2 from left --> right, horizontally (diffusion edge) Transition 2 from right --> left, horizontally (diffusion edge) Transition 2 up --
DMX protocol Channel DMX Value Function 103 104 105 106 107 108 109-179 Horizontal Ellipse Iris in/out Reserved Positive/negative (black and white) White/negative (black and white) Positive/negative (coloured) Pixeling Reserved Manual effects 180 Circular Iris 181 Elliptical Iris -vertical 182 Elliptical Iris-horizontal 183 Black mask 184 Inverse black mask 185 White mask 186 Inverse white mask 187 Gobo/video movement in horizontal (X) axis 188 Gobo/video movement in vertical (Y) axis 189 Reserved 190 C
DMX protocol Channel DMX Value 0 1-255 Function Type of control 6 Open Mask effect from min. level to max.