Evaporative Cooler User Manual Read and Save These Instructions Note: The specifications and/or components of this appliance are subject to change without prior notice Model No.
Page 2 of 20
1 Safety Instructions ............................................................................ 4 2 Guide to Evaporative Air Coolers ...................................................... 6 3 Components ..................................................................................... 7 4 Preparation ....................................................................................... 8 5 6 7 4.1 Wheels.....................................................................................
1 Safety Instructions When using electrical appliances, basic safety precautions should always be followed, including the following: • Carefully read this instruction manual before using the appliance. • Keep the appliance out of reach of young children.
• Unplug this apparatus during lightning storms or when unused for long periods of time. • Do not block any ventilation openings. • Never put objects into the louvre when the unit is working. • Unplug the appliance before filling or cleaning. • For detail regarding cleaning and descaling, please refer to the section “Care and Cleaning” of this user manual. • For detail regarding filling, please refer to section “Preparation” of this user manual.
2 Guide to Evaporative Air Coolers The performance of evaporative systems deteriorates as the humidity increases. Consequently, evaporative systems are not suitable for high humid regions. They are generally suitable for areas with dry summers, although their effectiveness will be reduced during the occasional periods of humid weather that these areas can experience. Evaporative air Coolers not only cool but also humidify homes.
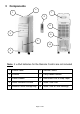
3 Components 5 1 7 6 8 2 9 4 10 3 Note: 2 x AAA batteries for the Remote Control are not included 1 Control Panel 6 Remote Control 2 Louvres 7 Carry Handle Recess 3 Castor Wheels 8 Rear Mesh Filter & Evap Paper 4 Water Indication Window 9 Water Tank Lock 5 Remote Control Storage Bay 10 Water Tank & Level Markings Page 7 of 20
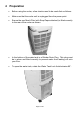
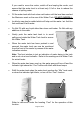
4 Preparation • Before using the cooler, a few checks need to be made first as follows: • Make sure that the cooler unit is unplugged from the power point. • Ensure the rear Mesh Filter (with Evap Paper attached) is fitted correctly to the rear of the cooler as shown. • In the bottom of the water tank is a Rubber Drain Plug. This plug must be in place and fitted correctly to prevent water from leaking out onto your floor. • To open the water tank, rotate the Water Tank Lock Anticlockwise 90°.
• Grasp the handle in the lower front of the water tank and pull out. Note: The water tank cannot be pulled out fully. This is to prevent accidental water spillage. • The Rubber Drain Plug is located as shown below. Water Pump and Water Level Sensor Rubber Plug • Ensure this rubber plug is pushed all the way down into the drain hole before adding water. • Ensure the cooler is standing on a flat and level surface and in the position the cooler will be operated from, then water can be added.
If you need to move the cooler, switch off and unplug the cooler, and ensure that the water level is at least only ¾ full or less to reduce the chance of spilling water. • Fill the water tank with fresh clean cold water until the level has reached the Maximum mark on the rear of the Water Tank. DO NOT OVERFILL. • Ice blocks can also be added which will help cool the water / air. Add Ice first and then fill with water. • Do Not Fill with any liquid other than clean cold water.
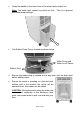
4.1 Wheels The cooler has four castor wheels for ease of moving the cooler around. When the cooler has been located in the desired operating position, it is advised to lock the castor wheels to prevent the unit from moving. To do this, press the levers down, which are located on the front of the castor wheel. To unlock, lift the lever up. Unlock Lock 4.2 Louvers The Horizontal louvres need to be manually adjusted to your desired position.
5 Controls 5.1 Evaporative Cooler 5.2 Remote Control Note: 2 x AAA batteries are not included. The Cooler comes with a remote control for your convenience. The functions on the remote control are the same as the buttons on the evaporative cooler. To install the batteries, first remove the back of the remote control by sliding the back battery cover off. Insert the batteries inside the battery compartment matching polarity icons with those in the battery compartment and then refit the cover securely.
6 Operation Important: Refer to the Section “Preparation” prior to Operation. Note: This cooler has a “Memory”. The Memory function will remember the settings last used when the evaporative cooler is turned Off with the On/Off button and will re-use the same settings (excluding the Cool function) when it is switched on again providing the cooler is not unplugged in-between uses. NOTE: Memory function is not available for Sleep mode and Timer Function. 6.
The fan will continue to run in the Low Speed Natural Mode until manually turned off. Note: To have the fan automatically turn off at your desired time in this mode, use the “Timer” function to select the auto-off timer. c. NAT: The “Natural” variable speed wind mode automatically selects one of three variable speed wind speed patterns. Each Pattern produces a different wind pattern depending on the Speed Setting Selected.
6.5 Cool • Press the “COOL” button if you want to have cooler wind blowing from the air cooler. (refer to section “Guide to Evaporative Coolers) This activates the water pump inside the appliance causing the air to be cooler. The Indicator light above the button will be illuminated when this feature is On. 6.6 • Press the “COOL” button again to turn this function off. • Press the “ON/OFF” button to turn the appliance off.
7.1 Rear Air Inlet Mesh Filter • Clean the air cooler regularly, especially the rear air inlet mesh filter. Do not allow this filter to become blocked. IMPORTANT: Never spray with liquids or submerge the unit in water or any other liquid. Ensure that the fan is switched off from the supply mains before removing the guard. Do Not use flammable liquids, chemicals, abrasive creams, steel wool or scouring pads for cleaning.
• At the same time the mesh filter has been removed, check to ensure the water return tray and hole are clean and free from blockage. • Refit the Mesh Filter by hooking the two tabs at the bottom of the Mesh Filter into the cooler first and swing closed the top of the mesh filter and clip shut securely.
7.2 Water Pump The water pump is attached to the bottom of the water tank and the water intake grille may become blocked over time, especially if the water is not very clean. Water Intake Grille this side • To clean the grille of the pump, first turn off and unplug the cooler from the power point. • Using a very soft brush or cloth, gently wipe the front of the grille to remove any debris. • Rinse out the water tank and refill with fresh clean water.
9 Warranty Against Defect 12 Month Warranty Thank you for your purchase from Kmart. Kmart Australia Ltd warrants your new product to be free from defects in materials and workmanship for the period stated above, from the date of purchase, provided that the product is used in accordance with accompanying recommendations or instructions where provided. This warranty is in addition to your rights under the Australian Consumer Law.
Page 20 of 20