
User Manual

DIGITAL SCREEN AND REMOTE CONTROL OPERATION
THIS APPLIANCE MUST BE EARTHED.
• Ensure the ON/OFF control switch is in the OFF (position ‘0”) position before
connecting to mains power.
• Make sure the appliance, including the plug and cord, is not damaged.
• Insert power plug into a wall socket with correct power output, 220-240V 50Hz.
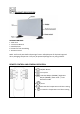
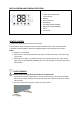
The buttons of touchscreen located on the product correspond to the remote control
functions.
The digital screen operation:
1. Connect the appliance to a safety socket, and switch on the POWER SWITCH on the side
panel. After a beep sound, the heater enters into standby mode and the screen shows the
approx. ambient temperature in the room.
2. Power setting:
2.1 Press the ON/OFF button
, the heater goes into "Auto Mode" for heating and icon
lights on.
Note: Under "Auto Mode", the default setting temperature is 25°C, the heater will start
heating or stop automatically. You cannot set your desired temperature.
2.2. Press the Fan button
, the Fan system will be ON or OFF. The icon will light on or
go out.
2.3 The button
is a multi-function switch. Press the button in turns, the heater can
obtain the following functions.
- Low Heat Output (1000W)
- High Heat Output (2000W)
- Auto Mode
- Frost Protection Mode
Note: Under "Frost Protection mode'', the default setting temperature is 7°C and when the
room temperature is lower than 7
o
C, the heater will start heating.
3. Temperature setting:
The ambient temperature is displayed every time the appliance starts up.
The temperature can be set when the appliance is operating. The temperature regulation
range is 5
o
C - 45
o
C.
- Press the button
or to set the temperature. The temperature will increase or
decrease by 1
o
C after each press. The setting will be memorized and confirmed after 3
seconds.
- When the ambient temperature is higher than the preset temperature, the heater will
stop heating.
- When the ambient temperature is lower than the preset temperature, the heater will
start heating automatically.