
User Manual
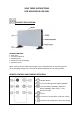
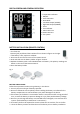

DIGITAL SCREEN AND GENERAL OPERATION
Symbol:
Function:
1. Temperature Indicator
2. ON/OFF
3. Frost Protection
4. Auto Mode
5. Low Heat Output (1000W)
6. High Heat Output (2000W)
7. Timer
8. Time Indicator
9. Switch OFF Time
10. Switch ON Time
11. Fan system
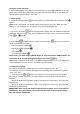
BATTERY INSTALLATION (REMOTE CONTROL)
- First Time Use
Remove (pull) and discard the insulation film as shown in figure on the right.
- If the battery is flat, replace it as below:
1. Drive out the screw on the rear of the remote control.
2. Push and slide out the battery holder as figure 1 below.
3. Replace the battery with a new CR2025 button cell battery. The polarity markings are
shown on the rear of the Remote Control.
4. Close the battery holder.
Fig 1.
BATTERY PRECAUTIONS
Follow these precautions when using a battery in this device:
1. Use only the size and type of battery specified.
2. Be sure to follow the correct polarity when installing the battery as indicated in the
battery compartment. A reversed battery may cause damage to the device.
3. If the battery in the device is consumed or device is not to be used for a long period of
time, remove the battery to prevent damage or injury from possible battery leakage.
5. Do not try to recharge the battery not intended to be recharged; It can overheat and
rupture. (Follow battery manufacturer's instructions.)
6. The battery shall not be exposed to excessive heat such as sunshine, fire or the like.
7. Clean the battery contacts and also those of the device prior to battery installation.