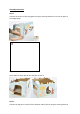
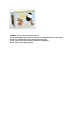
are on Part A. Refer to the image below:
Step 4.
Tuck the sides of part C into the sides of Part A, use the blue tabs that are on part A to
secure the roof.
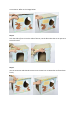
Step 5.
Use the connector tabs Part B to secure Part C onto Part A. Remember to fasten them
firmly.