Bassinet Instruction Manual 0-6 months 9 kg BASSINET MAXIMUM WEIGHT THE ILLUSTRATIONS SHOWN IN THIS MANUAL ARE FOR REFERENCE ONLY. THE MANUFACTURER RESERVES THE RIGHT TO CHANGE ANY SPECIFICATION OR FEATURE WITHOUT FURTHER NOTICE. IMPORTANT! PLEASE READ CAREFULLY BEFORE USE AND KEEP FOR FUTURE REFERENCE.
1 Safety Notes CAUTION: Read these instructions carefully before assembly and use and keep for future reference. The child may be hurt if you do not follow these instructions.
1 Safety Notes WARNING: Page 3
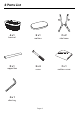
2 Parts List L Ax1 bassinet Dx1 support bar R Bx1 Cx2 mattress side frame Ex4 Fx1 screw mattress cover Gx1 allen key Page 4
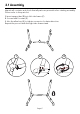
3.1 Assembly Unpack all contents and check that all parts are present before starting assembly. Please refer to the parts list. 1. Insert support bar (D) into left side frame (C). 2. Secure with 2 screws (E). 3. Use the allen key (G) to tighten screws in clockwise direction. Repeat the process with the right side frame stand.
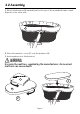
3.2 Assembly 1. Attach the bassinet (A) handrail joint to the top of the assembled frame stand. Repeat for the other side. A 2. Place the mattress cover (F) over the mattress (B). 3. Insert mattress into the bassinet. WARNING: Use only the mattress supplied by the manufacturer. An incorrect mattress can cause death.
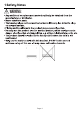
3.3 Assembly WARNING: The bassinet sleep surface must be horizontal. Never place infant to sleep on a sloped surface.
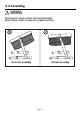
4 Wheels / Castors The bassinet has wheels located on the front of the frame legs for easy manoeuvring. 1. Hold the bassinet from the long handrail and lift up to access the wheels. 2. At the same time, push the bassinet forwards or backwards to desired space. NOTE: there is an anti-slipper at the bottom of each leg to stop the bassinet from moving.
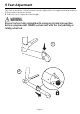
5 Feet Adjustment The feet at the base of the bassinet can be adjusted for storage and transportation. 1. Press button down as shown. 2. Pull feet out to adjust the feet length. WARNING: Ensure feet are fully extended with spring pin clicked into position before using bassinet. NEVER use bassinet with the feet partially or totally retracted.
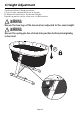
6 Height Adjustment The bassinet has 5 height positions. 1. Press in the adjustment lever as shown. 2. Adjust the bassinet to the desired height. Repeat operation on the other side of the bassinet. WARNING: Ensure the two legs of the bassinet are adjusted to the same height. WARNING: Ensure the spring pin has clicked into position before placing baby in bassinet.
7 Care & Maintenance Page 11
KEYCODE: 43-008-193 MADE IN CHINA FOR AU / NZ: IMPORTED FOR KMART STORES IN AUSTRALIA AND NEW ZEALAND.