
User guide


- 7 -
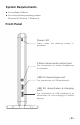
Connecting USB 2.0 / USB 3.0 devices:
Connect your USB devices to the USB ports on the display dock. As long as one
USB device is connected to a port and the connection works properly, make
sure it’s plugged into a working electrical outlet if your device (e.g. printer,
optical drive, etc.) came with its own AC adapter.
4.
Connecting Microphones and Speakers/Headphones:
To connect your speaker/headphones, insert the plug into the green hole on the
front of the display dock. To connect a microphone, insert the plug into the pink
hole on the front of the display dock.
5.
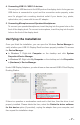
Once you finish the installation, you can open the Windows Device Manager to
verify whether your USB 3.0 Display Dock has been properly installed. To access
the Device Manager:
Under USB Display Adapters, you should see an item named USB3.0 Dual Display
Docking Station.
If there is a question or exclamation mark next to that item, then the driver is not
properly installed. Please delete the item, select the Delete the driver software
for this device option (if provided), unplug the adapter from your computer, and
then repeat the installation steps.
In Windows 7: Right-click Computer on the desktop and click System
Properties>Device Manager.
In Windows XP: Right-click My Computer on the desktop and click Properties
> (Hardware) > Device Manager.
Verifying the Installation