
Installation guide


COMMISSIONING SECTION 4
CAUTION! DO NOT OPERATE THE WATER HEATER UNTIL THE STORAGE
VESSEL IS COMPLETELY FILLED WITH WATER, WITH WATER RUNNING FROM
ALL HOT TAPS.
Open the main gas supply cock after all connections to the gas control are completed
and test all connections, using proprietary leak detection fluid.
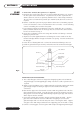
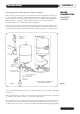
Filling the Heater with Water
1. Close the water heater drain valve.
2. Open the cold water supply valve.
3. Open several hot water taps to allow air to escape from system.
4. When a steady stream of water flows from the taps. the heater is filled.
5. Close the taps and check for leaks at the drain valve, temperature/pressure relief valve
and the hot and cold water connections.
Draining Water from the Heater
If it becomes necessary to drain the heater, follow the steps below.
1. Depress control panel rocker switch to the OFF position (see Operating).
2. Rotate and partially depress gas control knob clockwise to OFF position.
3. Shut off the gas supply to the heater.
4. Close the cold water supply shut-off valve.
5. Open the drain valve on the water heater.
6. Open a hot water tap to allow air to enter the system.
Refill the water heater as described above.
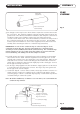
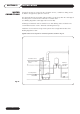
Lighting the Burner
1. Ensure gas supply is ON.
2. Turn gas control knob to ON position.
3. Using control thermostat, select required water temperature.
4. Move electrical ON/OFF switch to ON. After a delay of about 10 seconds, the burner
will light.
5. Check pilot and main gas connections at gas control valve using leak detection fluid
whilst burner is alight. Turn off, seal any leakages, then re-test.
25