
User's Manual


5. Maintenance
Page 36 MF0145ASA.docx User’s Manual for ION
®
-M7HP/85HP EU
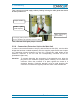
5.2. Replacing the Fan Unit
Replacement of the fan unit is not required as a preventative measure. Only if an
alarm indicates a malfunctioning of a fan, must the unit be exchanged.
Note: Please observe that the fan unit can only be replaced as a whole. Do
not remove the fans separately.
Note: NEVER blow out the fan unit with compressed air. This would cause
permanent damage to the unit.
Read and observe chapter 1.2 Health and Safety as well as the instructions in
section 5.1 General before starting with the replacement.
1. Switch off the Extension Unit. Make sure the power supply connector is
disconnected for the following replacement procedure. Then, proceed as
follows:
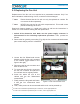
2. Remove the fan guard by unscrewing (Torx 20) the four countersunk-head screws
(two at each side) by which it is fastened:
1)
3. Loosen the four fillister-head screws
M4x8 by which the fan unit is screwed
to the cabinet (circle-marked in the
figure to the right).
2)
4. Disconnect the fan-unit connector and
take out the fan unit.
5. To mount the new fan unit, re-connect
the fan unit connector and place the
fan unit back into its original position.
6. Screw the whole fan unit to the
cabinet with the four fillister-head
screws M4x8.
2)
7. Finally mount the fan guard and fasten
it with the four countersunk head
screws.
1)
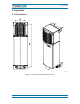
figure 5-1 Fan unit and heat sink
8. Then, mains power can be reconnected and the unit can be powered up.
1)
In order not to exceed the specified torque of 0.82 N-m, use an appropriate tool.
2)
In order not to exceed the specified torque of 3.3 N-m, use an appropriate tool.
Fan unit connector Fan unit
Heat sink
4 Fillister-head
screws