
User's Manual


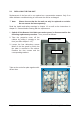


Table Of Contents

5.3. CLEANING THE HEAT SINK
Note: Read the health and safety warnings in chapter 1.2 as well as the
instructions in chapter 5.1 General before starting with the
replacement procedure. Then, proceed as follows:
1. Switch off the Remote Unit. For the following procedure ensure to have mains
disconnected before!
3. Use compressed air (max. 5 bar) to
blow out the heat sink from back to
front as illustrated in the figure below:
2. Remove the protective cover and the
fan plate with the fan unit from the
Remote Unit as described in chapter
5.2 Replacing the Fan Unit, steps 1
and 2:
4. In case the dirt cannot be blown out
completely and parts of it stick to the
ribs of the heat sink, clean the parts
concerned carefully from the front
using e.g. a brush. Take care that the
material is not scratched or damaged.
Page 42 MF0145A8A_FCC modif.doc
5. After cleaning the heat sink, mount the fan unit and protective cover again
according to chapter 5.2 Replacing the Fan Unit, steps 7 and 8. Then, switch the
Remote Unit back on.
Use
compressed air
(5 bar max.)
Brush (not metallic)