
User's Manual

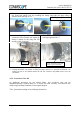


Table Of Contents

User’s Manual for
Remote Unit ION™-M17/17P/17P
Page 32 M0143AWA_uc.doc
7. Bring the plastic ring over the cable(s), push it into the backshell and compress
the seals and plastic ring by screwing the clamp ring tight (no gap) using a
spanner with opening 20. ***
Screw tight until gap is closed
8. Connect the plug to the optical-fibre
connector of the remote unit, again by
fitting a stamp on the plug into the
groove of the connector.
9. To lock the connector, push the black
locking ring forward.****
*** For disassembling, release the clamping ring and remove the seals and the plastic ring first.
**** Locking mechanism: The system of locking the plug is based on a “push-pull” mechanism. The
locking ring has to be pushed forward to lock the connector and pulled back to free the
connection.
4.3.2. Protective-Tube Kit
As additional protection for the optical fibers, this connector type can be
supplemented by a special tube kit. To fasten the tube correctly, first unscrew the
clamp ring (if already installed) of the original plug kit.
Then, proceed according to the following instruction:
Groove
Push forward to lock, pull
bac
k
to
fr
ee
co
nn
ect
i
o
n