
Installation Guide

CommScope ERA
®
Medium Power Carrier Access Point Installation Guide M0201AJG_uc
Page 50 © Decemeber 2020 CommScope, Inc.
Installing CAP Ms
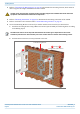
3 Follow the steps in "Unpack and Inspect the CAP M and Optional Accessories” on page 29. Table 11 lists
the parts that ship with the CAP M Pole Mounting Kit for Up to 18" Poles.
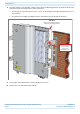
4 Refer to "Determine the Mounting Site” on page 24 to determine the mounting location, which must be
able to support the weight and dimensions of the CAP M.
5 Refer to "Mounting Orientation” on page 34 to determine the mounting orientation of the CAP M.
6 Refer to and observe all cautions listed in "General Mounting Cautions” on page 33.
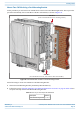
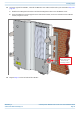
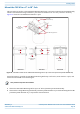
7 Attach either a Single
Mounting Bracket
(CommScope PN
7821955-xx) or a Dual
Mounting Bracket
(CommScope PN
7821954-xx) to the two
screw pins on one of the two
Pole-Mounting Brackets.
Attach the M6 nut and
washers in the order shown.
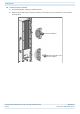
a Slide one M6 plain
washer (7A) over each
screw pin.
b Slide one M6 split-lock
washer (7B) over each
screw pin, next to the M6
plain washer.
c Secure one M6 Hexagon
Nut (7A) to the end of
each screw pin, and then
torque to 11 N-m.
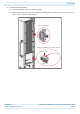
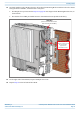
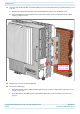
8 Repeat Step 7 on the second Pole-Mounting Bracket.
Table 11. Parts List for CommScope PN 7692096-XX
Description Quantity Description Quantity
Pole-Mounting Bracket 2 M8 Threaded Bolt 8
Bracket 2 M8 Hexagon Nut 8
M6 Hexagon Nut 4 M8 Plain Washer 16
M6 Plain Washer 4 M8 Split-Lock Washer 8
M6 Split-Lock Washer 4 M8 Nut 8
Installer must verify that the mounting surface will safely support the combined load of the electronic
equipment and all attached hardware and components.
The balance of this procedure may require two installers to complete.
Pole-Mounng
Brackets
Dual-Mounng
Bracket
7c
7a
7b
Screw
pin