
Installation Guide


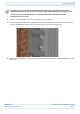

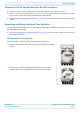

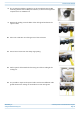
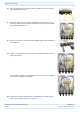
Table Of Contents
- Table of Contents
- Document Overview
- Fiber CAP M2 Overview
- Plan and Prepare for a Fiber CAP M2 Installation
- Mount the Fiber CAP M2
- Connect the Cables to the Fiber CAP M2
- Powering on a Fiber CAP M 2
- Contacting CommScope

M0203AHA_uc CommScope ERA
®
CAP M2 with Fiber Interface
© August 2022 CommScope, Inc. Page 21
Mount the Fiber CAP M2
6 Confirm that the Wall Mount Bracket is securely fastened to the wall.
7 Lift the CAP M2 onto the bracket and align the holes on the CAP M2 with the rear holes of the bracket,
closest to the mounting surface. Ensure that the hanger tab is secure on the bracket.
8 Tighten the CAP M2 M5 screws, provided with the CAP M2, on both sides on the top and bottom at a Torq
of 6.5 Nm.
The anchor screws do not ship with the CAP M2 as the anchor type is dependent on the on-site
conditions (wall structure and materials). Use screw anchors that are rated for the mounting surface.
The hole for the screws in the bracket is 7.5 mm in diameter and will accommodate screws
between 5.8 mm and 7.5 mm.