
Installation Guide


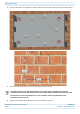
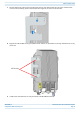
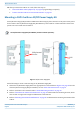
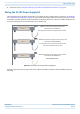
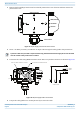
Table Of Contents
- Table of Contents
- Document Overview
- Fiber CAP L2 Overview
- Plan and Prepare for a Fiber CAP L2 Installation
- Mount the Fiber CAP L2
- General Mounting Cautions
- Mounting CAP L2 with a Wall Mounting Kit
- Mounting a CAP L2 with an AC/DC Power Supply Kit
- Wiring the AC/DC Power Supply Kit
- Mounting a CAP L2 with a Hybrid Fiber Splice Box Kit (optional)
- Connect the Cables to the Fiber CAP L2
- Powering on a Fiber CAP L2
- Contacting CommScope

M0203A9B_uc CommScope ERA
®
CAP L2 with Fiber Interface
© September 2022 CommScope, Inc. Page 21
Mount the Fiber CAP L2
Mounting CAP L2 with a Wall Mounting Kit
The following sections provide the installation methodology and steps required to mount a CAP L2 to a wall.
When wall mounting a CAP L2, the recommendations should be observed.
1 Use "Plan and Prepare for a Fiber CAP L2 Installation” on page 15 to identify the installation site and
installation requirements, and to prepare for the installation.
2 Refer to and observe all cautions listed in "General Mounting Cautions” on page 19.
3 Refer to "Mounting Orientation for Wall Mounts” on page 20 to determine the mounting orientation of the
CAP L2.
Table 12. Wall Mount Kit (784842) components
Part Number Region Quantity Component
7846281-01 EMEA 1
Wall Mounting Bracket, single (included in CAP L2 kit)
7848842 NAR
Wall Mounting Bracket, single (not included in CAP L2 kit)