
Installation Guide

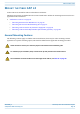


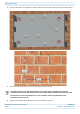
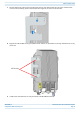
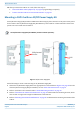
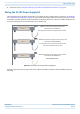
Table Of Contents
- Table of Contents
- Document Overview
- Fiber CAP L2 Overview
- Plan and Prepare for a Fiber CAP L2 Installation
- Mount the Fiber CAP L2
- General Mounting Cautions
- Mounting CAP L2 with a Wall Mounting Kit
- Mounting a CAP L2 with an AC/DC Power Supply Kit
- Wiring the AC/DC Power Supply Kit
- Mounting a CAP L2 with a Hybrid Fiber Splice Box Kit (optional)
- Connect the Cables to the Fiber CAP L2
- Powering on a Fiber CAP L2
- Contacting CommScope

M0203A9B_uc CommScope ERA
®
CAP L2 with Fiber Interface
© September 2022 CommScope, Inc. Page 19
Mount the Fiber CAP L2
MOUNT THE FIBER CAP L2
A Fiber CAP L2 is suitable for indoor and outdoor installations.
Mounting instructions are divided into the sections listed below. Follow the mounting instructions that are
applicable to this installation:
• "Wall Mount a CAP L2” on page 20
– "Mounting Orientation for Wall Mounts” on page 20
– "Mounting CAP L2 with a Wall Mounting Kit” on page 21
– "Mounting a CAP L2 with an AC/DC Power Supply Kit” on page 24
– "Mounting a CAP L2 with a Hybrid Fiber Splice Box Kit (optional)” on page 28
General Mounting Cautions
The following cautions apply to all Fiber CAP L2 installations; there may be other mounting cautions
applicable to a specific mounting option, which will be defined in the applicable mounting procedure.
Attach all CAP L2 securely to a stationary object as described in this installation guide.
To maintain proper ventilation, keep at least 76 mm (3-inch) clearance around the CAP L2.
The installation site must be able to bear the weight of the CAP L2; see Table 11 on page 18.