
User's Manual Part 2


ION
®
-E Series Hardware Installation Guide M0201AA
Page 60 © June 2017 CommScope, Inc.
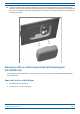
Installing UAPs
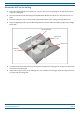
7 Slidethesupport-barclipsonto
theceilinggrid,andthensnap
themintoplace.
8 Usean8mmmetrictorque
wrenchtotightenthelocking
nutstoatorqueof4.5N-m,and
thentightenthetwomounting
bracketthumbscrews.
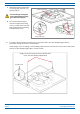
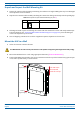
9 Forsafety,theinstallationofhangerwirestoattachtheUAP'sTwo-PartSlidingSupportBarsto
permanentceilingstructuresisrecommended.
Attachhangerwires,accordingtolocalbuildingcodesfromtheroofstructuretotheholesatendsofthe
UAP'sTwo-PartSlidingSupportBars,asshownbelow.
The mounting kit is designed
to be supported by the ceiling
grid—NOT the ceiling tile.
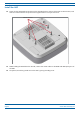
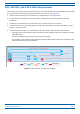
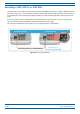
4 M5 x 10 screws
Support-Bar clips
Thumbscrews
Locking nuts
Hanger wires connected to the pre-drilled holes
in the Two-Part Sliding Support Bars
Exploded view