
Installation Guide
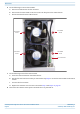


Table Of Contents
- Table of Contents
- Document Overview
- ERA System Overview
- CAP H Overview
- Safely Working with a CAP H
- Installing a CAP H
- Using the Status LED to Determine State of the CAP H
- Maintenance
- Contacting CommScope

M0201AKG_uc CommScope ERA
®
High Power Carrier Access Point Installation Guide
© February 2021 CommScope, Inc. Page 57
Maintenance
Cleaning the Heat Sink
Do the following to clean the heat sink:
1 Adhere to all cautions and warnings listed in "Rules to Observe During Maintenance" on page 53 and at
the start of this section.
2 Label any unlabeled cables before disconnecting them to ensure correct reconnection.
3 Disconnect the CAP H from mains power and make sure it is powered down before proceeding.
4 Follow Step 4 on page 55 through Step 6 on page 56 to remove the Fan Unit from the CAP H chassis.
5 Use compressed air (max. 5 bar) to blow dust, dirt, or other debris out of the heat sink from back to front.
If the dirt cannot be blown out completely and parts of it stick to the ribs of the heat sink, clean the parts
concerned carefully from the front using e.g. a brush. Take care that the heat sink material is not scratched
or damaged.
6 Once the heat sink is clean, remount the Fan Unit as described in Step 7 on page 56.
7 Reconnect the CAP H to mains power and make sure it is powered on.
This procedure requires the use of compressed air. Risk of injury by flying particles when compressed air
is used. Wear protective clothing, especially protective glasses.
Rotating fans. Risk of injury in operation. Wear tight-fitting clothes and disconnect mains before
connecting or replacing or cleaning the Fan Unit.
All CAP H screws have a right-hand thread. Use an appropriate tool to tighten or loosen them. Turn the
screws clockwise to tighten them and turn them counter-clockwise to loosen them.