
Installation Guide

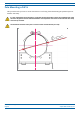
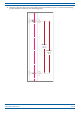
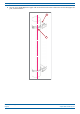
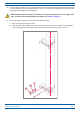
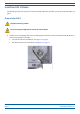
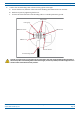
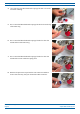
Table Of Contents
- Table of Contents
- Document Overview
- Era System Overview
- CAP H Overview
- Safely Working with a CAP H
- Installing a CAP H
- Using the Status LED to Determine State of the CAP H
- Maintenance
- Contacting CommScope

M0201AKC CommScope Era
™
High Power Carrier Access Point Installation Guide — Preliminary
© April 2019 CommScope, Inc. Page 31
Installing a CAP H
3 Place the bands around the pole or post and feed the loose end into the lock and tighten the slotted screw
securely. When the screw is turned clockwise, it acts as a worm drive and pulls the threads of the band,
causing the band to tighten around the pole.
When fastening the brackets, make sure that they are installed congruently and not at an angle to each
other. To determine the distance between the clamps, refer to Step 1 on page 29.
4 Do
the following to mount the CAP H in the Pole Mount Bracket.
a Hang t
he CAP H in the upper bracket.
b Push the CAP H into to the lower bracket, and then fasten it to the lower bracket
with two M8x25
screws (C), split-lock washers (D) and flat washers (E), as shown below; torque to 27 N-m.
C
D
E