
Installation Guide

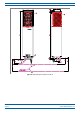
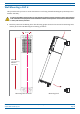
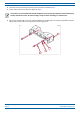
Table Of Contents
- Table of Contents
- Document Overview
- Era System Overview
- CAP H Overview
- Safely Working with a CAP H
- Installing a CAP H
- Using the Status LED to Determine State of the CAP H
- Maintenance
- Contacting CommScope

CommScope Era
™
High Power Carrier Access Point Installation Guide M0201AKC
Page 26 © April 2019 CommScope, Inc.
Installing a CAP H
2 Drill four holes (two holes per bracket) at the positions marked in Step 1.
3 I
nsert anchors in each of the holes drilled in Step 2.
The anchors are not included with the CAP H shipment as the suitable type depends on the wall material).
Anchors should be used for all wall mountings, except for when mounting to a wooden wall.
4 Mount the brackets (A) to
the wall using the M8x20 screws (B), split-lock washers (C) and flat washers
(D) so that the flat washers are against the mounting bracket:
A
B
C
D