
Installation Guide

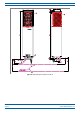
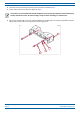
Table Of Contents
- Table of Contents
- Document Overview
- Era System Overview
- CAP H Overview
- Safely Working with a CAP H
- Installing a CAP H
- Using the Status LED to Determine State of the CAP H
- Maintenance
- Contacting CommScope

CommScope Era
™
High Power Carrier Access Point Installation Guide M0201AKC
Page 20 © April 2019 CommScope, Inc.
Installing a CAP H
INSTALLING A CAP H
The following sections guide you through the installation of a CAP H. Pay attention to all cautions and follow
the steps in the order presented.
CAP H Installation and Cascade Rules
Support for cascading of CAP H APs is not currently supported. This feature is planned for Era Software
V2.7 and above.
• When install
ing a CAP H, you must observe the following rules.
– The CAP H connects via its Optical Port 1 to an OPT Card in a Classic CAN or TEN.
– You can only in
stall the OPT Card in Slots L1- L4.
– You can connect up to 4 CAP Hs per OPT Card, for a total of 16 CAP Hs.
– You
can connect up to 4 Primary CAP Hs per OPT Card, and then connect one Secondary CAP H to each
Primary CAP H, for a total of 32 CAP Hs. (Requires SW version v2.7or higher when available).
• Whe
n cascading a Secondary CAP H (Requires SW version v2.7or higher when available), you must
observe the following rules.
– I
n a cascade, the CAP H connected directly to a Classic CAN or TEN is the Primary CAP H, and the
CAP H that connects to the Primary CAP H is the Secondary CAP H.
– To c
ascade two CAP Hs, connect the fiber-optic cable from Optical Port 2 of the Primary CAP H to
Optical Port 1 of the Secondary CAP H.
– You
connect CAP Hs to an OPT Card in a Classic CAN or TEN. Each OPT Card has four 10 Gbps ports
(labeled 1 - 4) for fiber connections.
The OPT Card can only be installed in Slots L1 - L4 of a Classic CAN or TEN.
You can connect up to 4 CAP Hs per OPT Card for a total of 16.
– The
total 320 MHz RF bandwidth is shared between the two cascaded units, but can be shared
unevenly; that is, with more bandwidth going to either the Primary or Secondary CAP H-either CAP H
ca
n transmit all the 320 MHz RF bandwidth or any subset of it.
– The
Primary and Secondary CAP Hs power up as soon as power is applied to them. In a cascade, the
GUI discovers and readies the Primary CAP H for RF first, and then the Secondary CAP H will be
disco
vered and readied for RF.
Prepare for Installation
Do the following before beginning installation.
• Rev
iew and know the cautions in "Safely Working with a CAP H" on page 14.
• Re
view the system design plan.
• Identify
and obtain all tools and materials required to complete the installation; see "Recommended Tools
and Material" on page 21