
Installation Guide
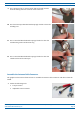
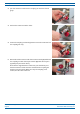


Table Of Contents
- Table of Contents
- Document Overview
- Era System Overview
- CAP H Overview
- Safely Working with a CAP H
- Installing a CAP H
- Using the Status LED to Determine State of the CAP H
- Maintenance
- Contacting CommScope

M0201AKD_uc CommScope Era
™
High Power Carrier Access Point Installation Guide
© December 2019 CommScope, Inc. Page 43
Installing a CAP H
Do the following to connect the MAINS power to the CAP H.
1 Foll
ow the steps in "Ground the CAP H" on page 32.
2 Locate
the MAINS power cable that was delivered with the CAP H (shown in Figure 7 on page 42).
3 L
ocate or install a suitable power junction box or receptacle near the CAP H, and then route the power
cable from the power source to the CAP H.
Do not connect the cable to the CAP H MAINS connector at this time. The power source must be
interruptible.
4 Sec
ure the MAINS cable per local regulations and electrical codes. Allow enough slack in the cable at the
CAP H to plug or unplug the cable into the CAP H MAINS connector.
5 Wire the power
cable to the junction box or receptacle. Refer to the color code and pin numbers shown in
Figure 7 on page 42.
6 With the cab
le's MAINS plug disconnected from the CAP H, turn the circuit breaker on, unscrew the plug's
protective cover, and carefully test the plug with a voltmeter to ensure that the voltage and polarity are
correct.
7 On
cethetestinghasbeencompleted,turnoffthecircuitbreaker.
8 Unscrew the
protective cover from the MAINS connector of the CAP H (see Figure 7 on page 42).
9 Insert the
plug into the MAINS connector and tighten the clamping ring until it is hand tight. Do not
over-tighten the clamping ring.
10 Turn on the
circuit breaker.
The CAP H is powered on as soon as power is connected to it.
Do not connect or disconnect the power cord at the mains connector while power is on. Turn off mains
power before connecting the power cord at the CAP H, then, engage mains again.