
User's Manual


Geometrix
®
Wireless Location System 38
Andrew Corporation Proprietary
Chapter 3 Replacement
This chapter provides detailed instructions for replacement of an installed WLS unit. For safety,
the steps should be followed in the order presented.
3.1 WLS Replacement Procedure
1. Place the WLS rear panel power switch in the OFF position.
2. Place the WLS circuit breaker on the base station power panel in the OFF position.
3. Disconnect the power cable from the rear panel of the WLS unit.
4. Disconnect the GPS Antenna, WAN, GSM antenna (if applicable), AOA calibration
source (if applicable) and alarm (if applicable) cables from the rear panel of the WLS unit.
5. Disconnect the antenna input cables from the rear of the WLS unit. Ensure the cables
are properly labeled to identify their source for reconnection into the new unit.
6. Disconnect the ground cable from the rear of the WLS unit.
7. Remove the rack bolts and take the WLS unit out of the rack. Save the rack bolts for
installation of the new unit.
8. Remove the WLS mounting brackets from the de-installed WLS and reattach to the
replacement WLS unit. Ensure the bracket orientation remains the same.
9. Install the replacement WLS unit in the rack using the rack bolts removed in step 7
above.
10. Connect the ground cable to the rear of the WLS unit.
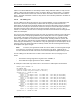
11. Connect the antenna input cables to the rear of the WLS unit. Refer to Table 2-2 for
connection information.
12. Connect the GPS antenna, WAN, GSM antenna (if applicable), AOA calibration source (if
applicable), and alarm (if applicable) cables to the corresponding connection on the rear
of the WLS unit.
13. Connect the power cable to the rear of the WLS unit.
14. Place the WLS circuit breaker on the base station power panel in the ON position.
3.2 Verification
Following WLS replacement, the following steps should be followed to verify proper operation.
1. Place the WLS rear panel power switch in the ON position.
2. Verify that the front panel ON LED is illuminated and the WLS cooling fans are running.