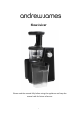
Slow Juicer Please read the manual fully before using the appliance and keep the manual safe for future reference.
Contents page Appliance safety Page 3 Appliance components illustration Page 5 Assembling the appliance Page 6-7 Using the juicer Page 8 Disassembling the appliance Page 9 Cleaning & maintenance Page 10 Troubleshooting Page 11 Recipes Page 12 Electrical information Page 14 UK & EU Guarantee Page 15 Disposal of the appliance Page 16 Contact details Page 17 2
Appliance safety When using any electrical appliance, basic safety precautions should always be followed including: This appliance can be used by children aged from 8 years and above and persons with reduced physical, sensory or mental capabilities or lack of experience and knowledge if they have been given supervision or instruction concerning use of the appliance in a safe way and understand the hazards involved. Children shall not play with the appliance.
place the unit on a hot surface. Always remove the plug of the appliance safely. Do not pull on the appliances cord to remove the appliance plug from the electrical socket. Never handle or operate the appliance with wet hands. When passing the appliance onto a 3rd party please include the instruction manual. Keep hands and utensils out of the slow juicer, a scraper may be used but only when the slow juicer is switched off at the mains.
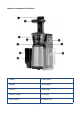
Appliance components illustration 1. Pusher 6. Juice spout 2. Hopper 7. Pulp spout 3. Strainer 8. Juice jugs 4. Strainer holder 9. Pulp jug 5. On/Off knob 10.
Assembling the appliance 1. Place the motor unit (10) onto a flat secure surface ensuring that the suction feet stick to the work surface. 2. Fit the attachment with both the Juicer spout (6) and pulp spout (7) onto the motor unit (10) so that the three securing locks on the motor unit fit correctly. 3. Attach the spiral juicer attachment into the strainer (3) and fit the strainer holder (4) onto the outside of the strainer. 4.
Using your juicer The juicer is suitable for foods such as celery, spinach, carrots, apples, bananas, tomatoes, cucumbers and pears. It is essential that the juicer extracts as much juice from fruits and vegetables as possible, therefore avoid using fruits and vegetables that are high in starch as they tend to absorb moisture. Also make sure that all fruit and vegetables are cleaned thoroughly, ready for juicing. 1. When juicing fruit with stones or hard seeds, pit the fruit.
Cleaning & Maintenance All removable parts of the appliance should be washed in warm soapy water, rinsed and then dried before storing. They are not dishwasher proof. Regularly clean the outside of the appliance with a soft damp cloth and dry it with a towel. Store the appliance in a clean and well ventilated place. After storing the appliance for a long period of time without using it, it is essential to clean all parts of the appliance before beginning the juicing process.
Troubleshooting Problem Cause Troubleshooting method The running machine stops suddenly Check to see if the power plug is properly inserted The quantity of materials put into the machine is too large. Hard fruits and vegetables are not cut small enough Insert the plug correctly Press “R” for 2-3 seconds then “ON” (repeat the process). If it still does not run please clean the machine and try again. Hard fruits and vegetables should be cut into smaller pieces .
Recipes All recipes follow the same method. Remove hard skins and pits from fruit and vegetables that require it. Place the ingredients in the food chute ensuring that it does not overflow. Fantastic fennel Cucumber (1/2) Fennel (small square approx.
Top secret Carrots (5-6) Handful of turnip Kale leaf (1) Apple (1) Kiwi fruit (2) Mighty muscles Spinach (5 large handfuls) Cucumber (1) Carrots (3) Sweet & sour Grapefruit (1/2) Apples (2) Popeye juice Spinach (1 cup) Cucumber (1/2) Celery (2 stalks) Carrots (3) Apple (1/2) 11
Electrical information Please note: It is extremely important that the wires or cores in the flex are connected to the correct terminals in the plug. If the colour of the mains lead of the appliance does not correspond with the coloured markings identifying the terminals in your plug proceed as follows: The Live (Brown) wire connects to the rightmost live (L) terminal nearest to the fuse. The Neutral (Blue) wire connects to the leftmost neutral (N) terminal.
plug and severed cable, it must be destroyed to prevent it from engaging into a socket. If the supply cord is damaged it must be replaced by a service agent or a similarly qualified person in order to avoid a hazard. All of our electrical appliances conform to pre-existing EC Directives 2006/95/EC (Low Voltage Directive) and 2004/108/EC (EMC Directives). For further information please visit http://www.esc.org.
Once a product has been returned to us, we will aim to repair or replace it within 30 days of receipt. The guarantee does not cover any defect arising from improper use, damage, buildup of lime scale or repair attempts made by third-parties. Also, the guarantee does not cover normal wear and tear of individual parts.