
Manual


6
Before rst me use
Check that the voltage indicated on the rang label corresponds to the
mains voltage in your home.
Wash all parts (except body in warm water).
Before plugging in the appliance, ensure the “ON/0/R” switch is turned to
“0” posion.
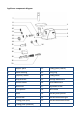
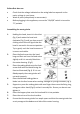
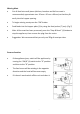
Assembling the meat grinder
1. Holding the head, insert it in the inlet
(Fig 1) and rotate the head an-
clockwise (Fig 2) unl you hear a small
clicking sound this will signal that the
head is secured in the correct posion.
Try to gently rock the head to ensure it
is secure and stable.
2. Place the feed screw into the head,
long end rst and turn the feed screw
slightly unl it is securely ed into
the motor housing. (Fig 3)
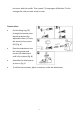
3. Place the cung blade onto the feed
screw sha with the blade facing the
front as illustrated (Fig 4). If it is not
ed properly the meat grinder will
not work properly.
4. Place the desired cung plate or
blade into the feed screw when making sausages or juicing tomatoes (Fig 5).
5. Support or press the cung plate with one nger then screw the xing ring,
using your other hand (Fig 6) so that it securely ts. Ensure you do not over
ghten it.
6. Place the hopper plate onto the head and x it into posion.
7. Place the unit on a rm level surface.
8. Ensure that the meat grinder has ample space and that the meat grinder has
an air passage at the boom and side of the motor housing.