Meat Grinder Please read the manual fully before using the appliance and keep the manual safe for future reference.
Contents Important safeguards Page 3 Appliance components diagram Page 5 Before first time use Page 6 Assembling the meat grinder Page 6 Mincing meat Page 7 Reverse function Page 7 Making kibbe Page 8 Mince meat stuffing Page 8 Making sausages Page 9 Tomato juicer Page 10 Cleaning and maintenance Page 11 Electrical information Page 12 UK & EU Guarantee Page 13 Disposal of the appliance Page 14 2
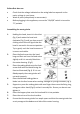
Important safeguards When using any electrical appliance, basic safety precautions should always be followed including: This appliance can be used by children aged from 8 years and above and persons with reduced physical, sensory or mental capabilities or lack of experience and knowledge if they have been given supervision or instruction concerning use of the appliance in a safe way and understand the hazards involved. Children shall not play with the appliance.
place the unit on a hot surface. Always remove the plug of the appliance safely. Do not pull on the appliances cord to remove the appliance plug from the electrical socket. Never handle or operate the appliance with wet hands. Appliance specific safety instructions When carrying the unit ensure that you hold the motor housing with both hands, do not carry the unit by holding only the hopper plate or the head. Do not fix the cutting blade and cutting plate when using the kibbe attachment.
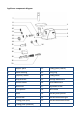
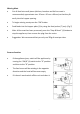
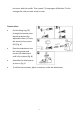
Appliance components diagram 7 8 1 9 5 10 2 11 3 12 4 6 13 14 15 16 17 18 19 20 21 1. Hopper plate 12. Cutting plate (coarse) 2. Motor housing 13. Fixing ring 3. (ON/OFF) switch 14. Cutting blade 4. Stop/R switch 15. Sausage attachment 5. Unlock button 16. Kibbe attachment 6. Head inlet 17. Adjustable screw 7. Food pusher 18. Dam-board 8. Head 19. Tomato juicer pourer 9. Feed screw 20. Tomato attachment grill 10. Cutting plate (fine) 21.
Before first time use Check that the voltage indicated on the rating label corresponds to the mains voltage in your home. Wash all parts (except body in warm water). Before plugging in the appliance, ensure the “ON/0/R” switch is turned to “0” position. Assembling the meat grinder 1. 2. 3. 4. 5. 6. 7. 8.
Mincing Meat Cut all food into small pieces (skinless, boneless and fat free meat is recommended, approximate size: 20 mm x 20 mm x 60 mm) so that they fit easily into the hopper opening. To begin mincing meat press the "ON" button. Feed foods into the hopper plate (1) by using the food pusher (7) only. (Fig.7) After all the meat has been processed, press the “Stop & Reset” (4) button to stop the appliance, then remove the plug from the mains.
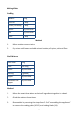
Making Kibbe Stuffing Mutton 100g Olive oil 1 tbsp. Onion (cut finely) 1 tbsp. Spices To your taste Salt To your taste Flour 1 tbsp Method 1. Mince mutton once or twice. 2. Fry onion until brown and add minced mutton, all spices, salt and flour. Shell Mixture Lean meat 450g Flour 150-200g Spices To your taste Nutmeg 1 (grated) Pepper To your taste Powdered red pepper To your taste Method Mince the meat three times and mix all ingredients together in a bowl.
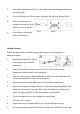
3. Place kibbe attachments (16) onto the feed screw shaft, fitting protrusions in the slots (Fig.8). 4. Screw the fixing ring (13) into place until tight. Do not over tighten (Fig.9). 5. Form a cylindrical shell using the mixture and stuff with mince meat. (Fig.10). 6. Form kibbe as illustrated Fig 9. Fig 10. above and deep fry. Making Sausages Before starting please assemble sausage attachment by following (Fig.11) Making sausages: 1.
let out air with the needle. Then repeat 7-9 steps again till finished. Tie the sausage skin; they are now ready to cook. Tomato Juicer Put the fixing ring (13) through the tomato juicer bracket and place the adjustable screw (17) into the tomato juicer pourer (19) (Fig. A) Place the attachment into the meat grinder and revolve the attachment until it fits in place (Fig. B) Assemble the attachments as seen in (Fig C). To collect the tomatoes, place a container under the attachment.
Cleaning and maintenance Disassembling Make sure that the motor has stopped completely. Disconnect the plug from the power outlet. Disassemble by reversing the steps shown in illustrations 1-6. To remove the cutting plate (12), place a screwdriver between the cutting plate (12) and the head (8) as illustrated and ease it out gently (fig.13). Press the fasten knob, move the head anti-clockwise as shown in (fig 14). Cleaning Remove all the parts from the main body.
Electrical information Please note: It is extremely important that the wires or cores in the flex are connected to the correct terminals in the plug. If the colour of the mains lead of the appliance does not correspond with the coloured markings identifying the terminals in your plug proceed as follows: The Live (Brown) wire connects to the right- most live (L) terminal nearest to the fuse. The Neutral (Blue) wire connects to the left-most neutral (N) terminal.
UK and EU Guarantee Your new Andrew James product comes with a 24 month guarantee and a 2 year fixed warranty, effective from receipt confirmation. Your receipt or order number is required as proof of purchase date so it is imperative that you keep it safe. This guarantee only applies if the item has been used solely for the use intended, and all instructions have been followed accordingly. Please note this product is only for domestic use only and is not for commercial use.
Disposal of the appliance Please note that this Andrew James product is mark with this Symbol: This means that this product must not be disposed of together with ordinary household waste, as electrical and electronic waste must be disposed of separately. In accordance with the WEEE directive, every member state must ensure correct collection, recovery, handling and recycling of electrical and electronic waste. Private households in the E.U.