Digital Food Dehydrator Please read the manual fully before using the appliance and keep the manual safe for future reference.
Contents Page Safety guides Page 3 Appliance specific safety instructions Page 4 Illustration of the appliance Page 5 Before first time use Page 6 Preparing the food Page 6 Setting up your food dehydrator Page 7 How to operate the appliance Page 8 Dryness test Page 9 Storage of the foods Page 9 Rehydrating foods Page 10 Vegetable prep table Page 11 Fruit prep table Page 12 Making beef jerky Page 13 Troubleshooting Page 14 UK and EU Guarantee Page 15 Disposal of the appliance P
Safety Guides When using any electrical appliance, basic safety precautions should always be followed including: This appliance can be used by children aged from 8 years and above and persons with reduced physical, sensory or mental capabilities or lack of experience and knowledge if they have been given supervision or instruction concerning use of the appliance in a safe way and understand the hazards involved. Children shall not play with the appliance.
extension cord in a position where it can be pulled on by children or animals or be tripped over. Always operate the appliance on a smooth, even and stable surface. Do not place the unit on a hot surface. Always remove the plug of the appliance safely. Do not pull on the appliances cord to remove the appliance plug from the electrical socket. Never handle or operate the appliance with wet hands.
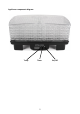
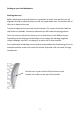
Appliance components diagram Temp Timer 5 On/Off
Before first time use Clean all parts of the appliance with a damp cloth. Ensure that the appliance is dry before attempting to dehydrate food. Make sure that all parts are fitted correctly and are in working condition.
Setting up your food dehydrator Stacking the trays Before loading the trays with food it is a good idea to make sure that they are all aligned correctly by stacking them up near the preparation area. The narrow side of the tray is always at the top. Trays have alignment arrows cast into the handle. The arrows should be visible on top of the tray handles. Incorrectly stacked trays will hinder the drying process. Once the trays are all correct side up you can stack them in two different ways.
How to operate your food dehydrator 1. Safely place the appliance on a flat and level surface. Load and insert the trays, then insert the plug into the electrical outlet. 2. To adjust the temperature press the “TEMP” button and select the temperature you require. To change the temperature in singular digits, press the button without holding it. To increase the temperature rapidly hold the button. 3. Set the desired amount of time by pressing and holding the “Timer” button.
Dryness Test Fruits, if dried properly, should have a pliable and leathery texture with little moisture (less than 20%). It is a frequent problem that people over dry fruit, this can lead to a poor taste and the fruit having less nutritional value. Therefore to achieve the best possible taste from dehydrated food ensure the correct drying time is followed. Vegetables should be chewy and brittle however different vegetables can vary in texture.
Re-hydrating foods Foods that have been dehydrated can be re-hydrated in water, this can be performed in 3 ways: Fruits and vegetables can be soaked in water for 2-6 hours, ensure that they are refrigerated during this process. They can be soaked in boiling water for 5-10 minutes until they have reached the desired consistency. You can also re-hydrate fruits and vegetables by cooking them. Do not add seasoning or sugar during this process.
Vegetable preparation table Vegetable Preparation Dryness test Approx. time Artichokes Cut into 1/3 inch strips and boil for about ten mins Brittle 6-14 hours Asparagus Cut into 1 inch pieces. Tips yield better product Brittle 6-14 hours Beans Cut and steam until translucent Brittle 8-26 hours Beets Blanch, cool, remove tops and roots, slice Brittle 8-26 hours Brussel sprout Cut sprouts from stalk. Cut in half lengthway Crispy 8-30 hours Broccoli Trim and cut.
Fruit preparation table Fruit Preparation Dryness test Approx.
Making Beef jerky As with nearly all foods, it is important to start with a quality cut of meat. Select a lean cut or round stake about one to one and a half inches thick, trim off all the excess fat and connective tissue. Fat hampers how well the meat will dry and the connective tissue will make the beef jerky hard to chew. For easier cutting, place meat in the freezer for about 30 minutes to partially freeze. Then turn it over and freeze it for an additional 15 minutes.
Troubleshooting Symptom Possible cause Possible solutions No heat. Be sure the unit is plugged in. No Fan. Make sure the power is switched No power. on. No heat. Broken wire in unit. Check the outlet is working. Do not use the appliance, send it for repairs. No fan. Slow drying. Trays overfilled. Fan jammed or running to slowly. Air must flow freely around food for proper drying. Reduce quantity in trays or rearrange food.
UK and EU Guarantee Your new Andrew James product comes with a 24 month guarantee and a 2 year fixed warranty, effective from receipt confirmation. Your receipt or order number is required as proof of purchase date so it is imperative that you keep it safe. This guarantee only applies if the item has been used solely for the use intended, and all instructions have been followed accordingly. Please note this product is only for domestic use only and is not for commercial use.
Disposal of the appliance This Product is for Household Use Only! Correct disposal of this product This marking indicates that this product should not be disposed with other household waste throughout the EU. To prevent possible harm to the environment or human health from uncontrolled waste disposal, recycle it responsibly to promote the sustainable reuse of material resources.
Warning: If the appliance is double insulated indicated by the double insulated symbol: it should not have an earth wire or earth connection. Plug The plug must be protected by the correct AMP fuse; this will be indicated on the case of the plug. Only BSI or ASTA approved fuses should be used. When changing the fuse always replace it with a fuse that is of the same identical rating as the original. If you are unsure about which plug or fuse to use, always refer to a qualified electrician.