
User guide

6
Operang procedures & maintenance
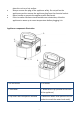
Unpacking your ice maker
1. Remove the exterior and interior packaging and check that the ice basket
and ice scoop are inside. If any parts are missing, please contact our
customer service.
2. Remove any tape xing the ice basket & ice scoop. Clean the tank & ice
basket before use.
3. Put the ice maker on a level and at counter top away from direct sunlight
and other sources of heat (i.e. stoves, furnaces and radiators). Make sure
there is at least a 10mm gap between the back & sides of the product from
the wall.
4. Allow two hours for the refrigerant uid to sele before plugging in the ice
maker.
5. The appliance must be posioned so that the plug is accessible.
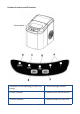
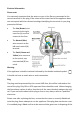
Using your Ice Maker
1. Open the cover, remove the ice basket and pour water into the tank. Ensure
that the water level is between the minimum and maximum mark. Press the
“power” buon on the control panel to begin the ice making cycle.
2. Select the ice cube size by pressing the “Select” buon. If the room
temperature is lower than 15˚C, it is recommended to select small ice cubes
in order to avoid the ice scking together.
3. The ice making cycle lasts approx. 5 to 13 minutes, depending on the ice
cube size and the room temperature. The recommended room temperature
is between 10˚C- 38 ˚C.
4. If the water pump cant inject water, the ice maker will stop automacally
and the “Add water” indicator will come on. Press the “Power” buon and
ll the water up to the max water level mark and press the “Power” buon
again. Allow the refrigerant to sele for 3 minutes before restarng.
5. If you are not using the machine for a long period of me, drain all the water
from the reservoir and dry the tank.